

Poster production, making American retro style posters – poster design
When we want to make an American retro-style poster with a sense of age, gradient radioactive lines are a very commonly used element. Today, let us learn about the production of American retro-style reflective lines! Rendering: Operation steps: 01Create a new canvas of 1200×1600 pixels. Use the Gradient Tool to pull out the gradient background. 02 Execute: Filter-Distort-Wave, then execute Filter-Distort-Polar Coordinates Be sure to adjust the value to the appropriate position! 03 Import the “Microphone” material and add corresponding text, press Filter-Noise-Add Noise 04Finally you can enjoy the results!
Poster production, create a very creative character poster – poster design
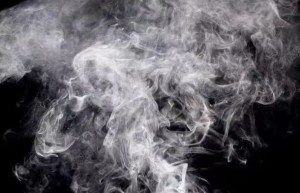
Create a very creative character poster Rendering: Search the public account photoshop tutorial forum and receive free self-study benefits Operation steps: Part 1 Material preparation Use the quick selection tool to cut out the image Get character material. Smoke material backup Part 2 Poster background production 1. Create a new white background document, import character materials, and adjust the size and position 2. Create a new gradient fill layer, edit the gradient fill, and set a radial gradient from black to dark blue Part 3 Character color production 1. Create a new solid color fill layer, set it to red, and change the blending mode from normal to overlay 2. Select the red layer Maskhttp://www.16xx8.com/tags/38847/ to make the left half of the character appear red 3. Create a new solid color fill mask, set it to turquoise, and repeat the above two steps to make the right half of the character appear turquoise Part 4 Overall effect adjustment 1. Import the smoke material, adjust the size and position, change the layer blending mode to screen, and adjust the layer order 2. Adjust the color of the character, neutralize red and turquoise, and reduce the abruptness 3. Add text to complete…
Poster production, create novel digital year posters – poster design
Create a novel digital year poster Rendering: Operation steps: 1. First enter the year number, Ctrl+t to adjust the position of the number. To learn PS, please go to www.16xx8.com 2. Use the rectangle tool to drag a rectangle under the number 2, adjust the size and position, and align the rectangle strip with the number 2. 3. Hold down the Alt+shift keys for the rectangle under number 2 and copy the translation rectangle (this step is more troublesome, you can use the ruler to confirm the alignment). 4. Rasterize the layers of numbers 0 and 3, elongate the rectangles under 0 and 3, use the rectangular marquee tool to enlarge the border, reduce the opacity of the rectangular strip, and use the eraser tool to erase the excess. Merge all number layers so that the numbers and rectangle bars are on one layer. 5. Add a background layer, reduce the transparency of the background, and use the quick selection tool to select the numbers. Add the image Mask http://www.16xx8.com/tags/38847/, and adjust the background layer so that the part you need is exposed digitally. 6. Add the outer glow layer style, adjust the opacity, noise and size range to increase…

Poster production, quickly create hollow text posters – poster design
Today I would like to share with you how to make a hollow text poster. The tutorial is still very simple. The main knowledge points are: layers and color levels Rendering: If you want to learn more, please visit www.16xx8.com Operation steps: 1. Open PS, create a new canvas of A4 size, create a new blank layer (ctrl+shift+alt+n), and fill it with gray 2. Enter a few letters at will. Note that three letters are in one line and three lines are separated 3. Ctrl+t shrinks layer 1, creates a new blank layer, and puts it on top of the layer 4. Change the foreground color to orange, press the Ctrl key and click on the text layer thumbnail, a selection will appear, press the Shift key to select. After the selection appears, select layer 2, alt+delete to fill, and orange text will appear 5. Use the marquee tool to select the text one by one, and press ctrl+t to change the position and size, as shown in the figure: 6. (ctrl+j) Copy layer 1, press ctrl key and click on the text layer thumbnail. When the selection appears, select the copy of layer 1 and press delete key to…

Poster production, use PS to create academic posters – poster design
In university study, we need to start learning to make academic posters. Photoshop is a powerful tool for creating academic posters. Below, I will introduce to you some tips on how to create posters with pictures and text in PS. Rendering: Search the public account photoshop tutorial forum and receive free self-study benefits Search the public account photoshop tutorial forum and receive free self-study benefits Wavy header First, use the Curved Pen Tool to draw the desired wavy shape and choose an appropriate fill color. Repeat to create multiple layers of wavy shapes, going from dark to light in color. After the creation is completed, double-click the top layer, select “Shadow” in the pop-up layer style, adjust the parameters, add shadows to the waves, and create a sense of layering. Finally, use the text tool to add a title (remember to use the “center” mode), and an eye-catching title is ready # Production of poster partition In academic posters, you also need to add some different modules, which can be in the form of small headings or boxes. This poster is in the form of a small header. First, use the Rectangle Tool to make several elongated rectangles and fill…

Poster production, using PS to create diffuse light posters – poster design
Use PS to create diffuse light posters Rendering: Search the public account photoshop tutorial forum and receive free self-study benefits Operation steps: step1: CTRL+DELETE fills the background with a background color step2: Select the Ellipse tool on the toolbar and hold down SHIFT to draw a perfect circle step3: Select the gradient in the color fill of the graphic and choose the color you like. In order to better integrate the colors later, you can fill it with a transparent gradient color and pull the transparency of the light color part to 0 step4: Select the filled circle, select Filter-Blur-Gaussian Blur, and select the value according to the preview effect step5: Follow the same steps to add a circle of another color, Gaussian blur and adjust the placement step6: Hold down Shift/Ctrl and select the background layer + two circle layers. Ctrl+E merges the three layers step7: Select Filter-Noise-Add Noise and adjust the value according to the preview effect. The value I chose is 8. The effect after adding noise is as follows step8: Finally add your favorite text Complete: Search the public account photoshop tutorial forum and receive free self-study benefits Use PS to create diffuse light posters Rendering:…

