
Static file configuration
We place all HTML files in the templates folder by default
Place all static files used by the website in static by default Next
Static file
File resources that will not automatically change dynamically after writing, such as css files, js files, and pictures we have written files, third-party framework files, we put all static files in a static folder by default.
Django will not automatically create a static folder. We need to manually create it ourselves in the django directory. Create this folder
Under normal circumstances, we will further divide the static folder and use it directly:
  static
 ├─ bootstrap front-end has been written and can be called directly
 ├─ js has been writtenjs file
 ├─ css written css file
 ├─ img img file used
 └─ Other third-party file resources
The reason why you can see the corresponding resource when you enter the url in the browser is because the developer has already opened an access interface to the resource on the backend
If the resource cannot be accessed, it means that the backend does not have an interface for the resource
http://127.0.0.1:8000/static/bootstrap-3.3 .7-dist/css/bootstrap.min.css
settings.py static file Configuration
# If you want to access static files, you must start with static
STATIC_URL = '/static/' # The interface prefix is similar to the token for accessing static files
"""
For example, there is this path:
/static/ The first one is the interface prefix
bootstrap-3.3.7-dist/js/bootstrap.min.js The next one is the path
After writing the interface prefix, you have it Permission to access the internal resources of all folders in the following list
Then it will be searched in the list in order from top to bottom until the path is returned to the page
The error will be reported
"""
# Static file configuration
STATICFILES_DIRS = [
os.path.join(BASE_DIR, 'static') # This static is the real static folder path
os.path.join(BASE_DIR, 'static1')
os.path. join(BASE_DIR, 'static2')
]
Static file interface prefix dynamic analysis
form form knowledge review
The form form uses get request data by default
Form form action parameter: controls the path submitted by the backend
- 1 .Do not write: By default, data will be submitted to the current URL (page address)
- 2. Write in full: Name and surname https://www.baidu.com
- 3. Only write the suffix: /index/
Form method parameter: The default is get request, which can be changed to post request
In the early stage When using Django to submit a post request, you need to comment out a line of code in the configuration file first

request object method First acquaintance
request.metd, etc., you need to specify it manually
 username = models.CharField(max_length=32)
4. Field addition, deletion, modification and check
# Addition of fields
1. Can be given directly in the terminal  Default value
2. This field can be empty
 pwd = models.IntegerField('Password',null=True)
3. Set the default value directly for the field
 is_delete = models.IntegerField(default=0)
# Modification of fields
Modify the code directly, and then execute the two commands for database migration
  # Deletion of fields
 Directly comment the corresponding fields, and then execute the two commands for database migration
 After the execution is completed, the data corresponding to the fields will be gone
  """
Be careful when operating models.py
 Don't comment out important fields by mistake
 Be sure to check the code you wrote before executing the migration command
 Suggestion: Leave  Your computer must be locked afterwards
"""
5. Data addition, deletion, modification and inspection
# 1. Query data
# select * from user where name=  username;
user_obj = models.User.objects.filter(name=username).first()
# 2. Add  Data
# insert into user(name,pwd) values(username,password);
models.User.objects.create(name=username,pwd=password)
# 3. Query all data
# select * from user;
models.User.objects.all() # [obj1,obj2,obj3,obj4]
# 4. Modify data
models.User.objects.filter(id=edit_id).update(name=username,pwd=password)
edit_obj.name  = username
edit_obj.pwd = password
edit_obj.save()
# 5. Delete data
models.User.objects.filter(id=delete_id).delete()
ORM creates a foreign key relationship
1. Tables and tables The relationship between
One-to-many
One-to-one
Many to Many
2. Judgment of table relationships
Think in someone else’s shoes
ORM’s creation location for foreign key fields
One-to-many: It is recommended to build on the side with many
One-to-one: It can be built on any side, but it is recommended to build on the table with higher query frequency
Many-to-many: 1. Build it yourself Table
2. It can be built in any party, but it is recommended to build it in a table with high query frequency
class Book(models.Model):
 title = models.CharField(max_length=32)
 price =  models.DecimalField(max_digits=8,decimal_places=2) # A total of 8 decimal digits occupy 2 digits
 # Publishing House Foreign Key
 publish = models.ForeignKey(to='Publish') # The default is the primary key
 """Automatically add _id suffix after the foreign key field"""
 # Author  Foreign key
 authors = models.ManyToManyField(to='Author') # Automatically create a third table of books and authors for you
 """The virtual field will not be instantiated in the table but tells the ORM to create a third relational table"""
class Publish(models.Model):
 title = models.CharField(max_length=32)
 email = models  .EmailField()
class Author(models.Model):
 name = models.CharField(max_length=32)
 age = models.IntegerField()
 author_detail = models.OneToOneField(to='AuthorDetail')
 """Automatically add _id suffix after the foreign key field"""
class AuthorDetail(models  .Model):
 phOne= models.BigIntegerField()
 addr = models.CharField(max_length=128)
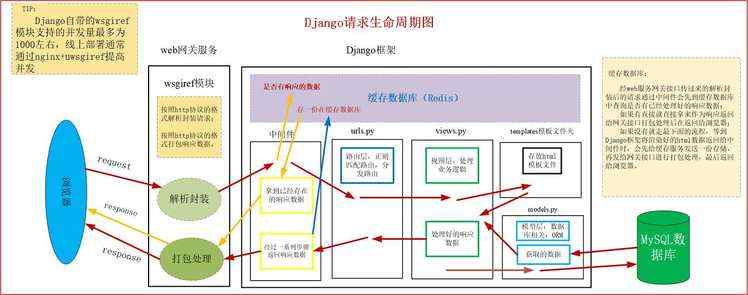
Django request life cycle flow chart
One , The meaning of the life cycle of Django requests
The life cycle of Django requests refers to what happens in the Django background from when the user enters the URL on the browser to when the user sees the web page.
2. Life cycle diagram and process of Django request

First, the user is browsing Enter the URL in the server and send a request request with the GET method.
The WSGi server that encapsulates the socket in Django accepts the request on the listening port.
It then parses and encapsulates it, and then transmits it to the middleware. The request then passes through the middleware in turn. ,
Verify or process the request, then transmit it to the routing system for route distribution, match the corresponding view function (FBV),
Then transmit the request request to views In this view function, the business logic is processed,
The table object in the models model layer is called, and the data of the database (DB) is obtained through ORM.
At the same time, get the corresponding template in templates for rendering, and then transfer the encapsulated template response to the intermediate key,
process it in sequence, and finally encapsulate it through WSGi , the response is displayed to the browser and displayed to the user.
number”>128)
django request life cycle flow chart
1. The meaning of the life cycle of a Django request
The life cycle of a Django request refers to: when the user enters the url on the browser to What happens in the Django background during the time period when the user sees the web page.
<h4 id="2. Life cycle diagram and process of Django request" 2. Life cycle diagram and process of Django request
First, the user enters the URL in the browser and sends a request request with the GET method.
Django encapsulates the WSGi server of the socket, and the listening port accepts this request,
then parses and encapsulates it, and then transmits it to the middleware. This request request goes through the middleware in turn,
verifies or processes the request, and then transmits it to the routing Route distribution is carried out in the system, and the corresponding view function (FBV) is matched.
Then the request request is transmitted to the view function in views to process the business logic.
Call the table object in the models model layer and get the data from the database (DB) through ORM.
At the same time, get the corresponding template in templates for rendering, and then transfer this encapsulated template response to the intermediate key ,
Process it in sequence, and finally encapsulate it through WSGi, and the response is displayed to the browser and displayed to the user.
 微信扫一扫打赏
 支付宝扫一扫打赏

