
7-7 Auto Levels/Auto Contrast/Auto Color – Beginner’s Tutorial
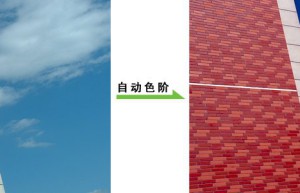
0711 The automatic color level is actually the same automatic function we used in the previous curve and color level setting boxes. The color gradation distribution of the three blue channels is expanded to the full color gradation range. This operation can increase color contrast, but may cause a color cast in the image. The specific reasons have been introduced in course #06. As shown in the 2 pictures below. The automatic contrast expands the color scale based on the RGB integrated channel, so it increases the color contrast without causing a color cast. Because of this, in most cases, the effect of increasing color contrast is not as significant as that of Auto Levels. As shown in the 2 pictures below. In addition to increasing color contrast, the Auto Color command will also perform brightness merging on a portion of the highlights and shadows. Most importantly, it corrects colors at 128 levels of brightness to 128 levels of gray. Because of this characteristic of aligning gray, it is possible to correct color casts and also to cause color casts. As shown in the 2 pictures below. Now let’s review the automatic functions we’ve been exposed to in Curves. At…
7-8 Other Color Adjustments – Beginner’s Tutorial
Photoshop also provides some other color adjustment commands. We will not introduce these commands in detail, but only briefly describe them. Among them, the channel mixer tool is currently difficult to understand, so I will not introduce it for the time being. I will explain it later when it is applied. And as everyone deepens their understanding of Photoshop and basic concepts, it is possible for them to learn it by themselves without a teacher. We will introduce the gradient mapping command after introducing the gradient settings. Optional color commands are introduced in the next section. Brightness/Contrast In fact, it is a branch of the curve function, used to simply increase or decrease image brightness and color contrast. Remove color It is equivalent to setting the saturation to the lowest value in Hue/Saturation and converting the layer into a grayscale image that does not contain hue. Reverse phase Convert the colors in the image to inverted colors, white to black, red to cyan, blue to yellow, etc. The effect is similar to the negative effect after printing on ordinary color film. Photo filters Equivalent to the colored filters used in traditional photography, which change the tone of the image. The…
6-5 Adjust channel curves individually – Beginner’s Tutorial
Until now, we have all adjusted in the RGB integrated channel of the curve. In fact, for images in RGB format, the curve of a certain channel can also be adjusted separately. The concept of curves in the individual channels is the same as in the integrated channel, and is also divided into highlights, midtones and shadows. In the color principle of course #01, we learned that pure white is composed of RGB at the highest luminous level, and pure black is composed of RGB that does not emit light. After mastering the principles of RGB color composition, it will not be difficult to look at individual channel curves. And if you haven’t fully mastered the color principle, it will be quite difficult. For a given image, changing the curve of a channel alone will cause color shift. It’s very simple. If you increase the middle adjustment of the red channel curve toward the Y axis, just like the adjustment we just made on the learning curve, it means that the red color is increased in the image, and then the image must be biased toward red. If you add green, it will look greener, and if you add blue,…
6-6 Automatic and black-gray-white field – Beginner’s Tutorial
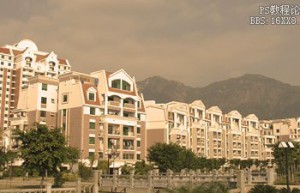
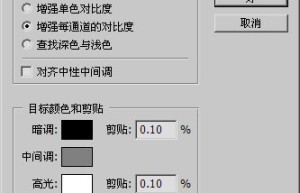
0611 There is an automatic button on the right side of the curve adjustment box. Its function is to expand the color levels in the RGB 3 channels. Full range. If the image is in CMYK mode, expand the CMY channels to the full range. However, if used improperly, it will cause color cast. Let’s take the picture above as an example. Let’s look at the histogram of each channel and find that there is not much difference between RGB and RGB. The peaks and troughs of RGB are all in similar positions. As shown on the left side of the picture below. The effect after using the automatic function is as shown on the right side of the left picture. At the same time, you can also switch to different channels in the curve setting box to see the effect of the automatic function changing the curve. The automatic command has many modes of action. If the result is not consistent with the figure below, click the option button of the curve setting box and select the algorithm as “Enhance the contrast of each channel”. And check “Save as default” below. As shown below on the right. The remaining…
7-9 Convert grayscale to color – Beginner’s Tutorial
We already know how to convert color to grayscale. In addition to the decolorization command, the more representative one is the hue/saturation adjustment tool. By reducing the saturation, you can get grayscale. But for grayscale, it cannot be converted to color through the same method. As shown in the left picture below, a grayscale rectangle has no change after increasing the saturation. This is because the saturation command is based on the existing hue, but grayscale does not contain hue, so the saturation option has no adjustment effect on a grayscale color. What needs to be remembered is that pure black and pure white are also grayscale colors. There is also no way to adjust saturation directly. After checking the coloring option, Photoshop will use a single color to replace all the colors in the original image, including grayscale. Therefore, you can use this method to convert grayscale to color, as shown on the right below. Now try to see if you can change the almost black rust stain in the picture below to a blue color similar to other parts. Let’s do it yourself first. Download the sample file sample0702.jpg For this image, first target the dark rust areas…
7-10 Using the History Brush – Beginner’s Tutorial
We have been exposed to the history record function of Photoshop for a long time, and we also know that the history record is linear. Changing the previous history will delete the subsequent records. In other words, we cannot modify the operations done in the previous history while retaining the existing effects. But there is a tool that can directly erase the effect of a certain step in the history based on the existing effect without returning the history. This is the History Brush Tool〖Y/SHIFT Y〗. This tool is conceptually different from other tools, but it’s not difficult to master once you understand the process. First we open an image, which is a picture of Yuanbao chocolate. As shown below on the left. Download the sample file sample0703.jpg Then bring up the History palette. Perform the three operations of inverting, decolorizing, and tonal equalizing on the image in sequence, resulting in the effect shown in the middle picture below. At the same time, the history of these three steps is also listed in the history palette. As shown below on the right. The next operation can be called the erasure of historical records. Since historical records have many steps, one…

7-11 Using Color Adjustment Layers – Beginner’s Tutorial
We have come up with the idea a long time ago that we should try to retain maximum editability, and a very important part of this is to retain the original image in the layer. But in actual operation, many tools have a destructive effect on the pixels in the layer. The same goes for color adjustment commands. We can demonstrate the damage color adjustments can do to the original image with a simple experiment. Open the original image below on the left in Photoshop. Then use the Brightness/Contrast adjustment command to lower the brightness to -100. After confirmation, the image effect is as shown in the middle picture. Then use the brightness/contrast adjustment command again to set the brightness to +100. The resulting image will look like the image on the right. It is obvious that two addition and subtraction operations that seem to cancel each other out do not restore the image to its original state. We have also encountered similar operations when changing the image size in Course #02. This is because when the first operation is confirmed, the pixels in the image have changed, and the second operation is based on the changed image. The details…
8-2 First introduction to masks – Beginner’s tutorial
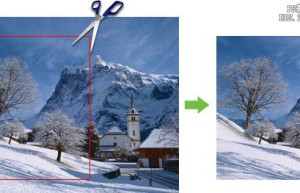
Before continuing, please make sure you fully understand the knowledge in Chapter #04, that is, the meaning and role of black, white and gray in the channel. Otherwise the following will be difficult to understand. Now imagine that we want to remove the edges of a painting and hang it on the wall. The best way to do this is to use scissors to cut off the unnecessary parts. Cut along the red line as shown in the picture below. It is obvious that this cropping has caused permanent damage to the painting and cannot be restored. This situation is just like the operation we did on the image in Photoshop before, it is a destructive operation. Although the operation can be undone to achieve the purpose of restoration. But we also know that undoing is actually the return of the historical record, and since the operations in the historical record are linear, other operations must be undone even if they are correct. For example, if we crop first and then make color adjustments, then to undo the cropping, we must first undo the color adjustments. Now imagine that we want to remove the edges of a painting and hang…
Non-mainstream PS tutorial: reverse negative process to create non-mainstream yellowish effect – color grading effect
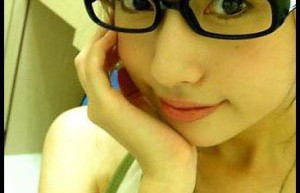
Source: eNe Author: Shi Shui WuhenThis tutorial introduces another non-mainstream case of using reverse negative punch to create. When making, you can first use the reverse negative impulse action to quickly create the effect, or you can follow the author’s steps. After the effect is created, details such as skin polishing and blushing are applied to the characters. Final effect Original picture 1. First do the reverse negative wash effect, click on the blue channel, “Image”–“Apply Image”, and set the parameters as shown in the figure. The effect is as shown in the picture: 2. Next, set the green channel parameters. The effect is as shown below: . 3. Next, set the green channel parameters. The effect is as shown below: 4. CTRL+L to adjust the color level and fine-tune the parameters of each channel, as shown in the figure The effect is as shown in the figure: 5. Create a new layer, add blush to MM, and reduce the opacity 6. Use a round soft-angled brush to bring out the highlights of MM’s eyes. 7. Next, use the “eyelash brush” to add thick eyelashes to MM (click here to download the eyelash brush). 8. You can add some patterns…
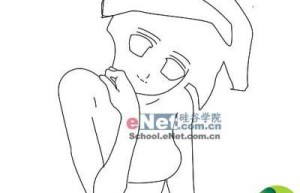
Photoshop Production Example: Cartoon Wallpaper Production Tutorial – Background Wallpaper
Source: eNet Author: UnknownThis tutorial introduces how to make beautiful cartoon wallpapers. Idea: The tutorial is divided into four parts. The first part is the beautiful cartoon girl, decorated flowers, text and background. The focus is on character creation. The production process is more complicated. Final effect 1. Create a new document of 800*600 pixels, with a blank document with a white background. Then use the pen tool Draw the general outline of the character, and then adjust the hardness of the brush tool to 1 pixel. Then create a new blank layer and use the Brush Stroke command in the Paths palette. The results are as follows 2. In fact, if you look carefully, it is not difficult to find that most of the colors in cartoon MM are color fast. This is actually a vector image, which means that we can use the vector layer in PS to edit it, because it is Vector graphics do not suffer from pixel loss. The way to add a vector layer is Layer-Add Vector Layer and then select Hide All. Use the pen tool to hook out the color part we need in the vector layer mask3. Draw the main color…

