
When doing synthesis tutorials, we always emphasize that creativity is the key. The second is the question of technique, because it is not too difficult to operate with only technique. This tutorial is a very creative work, which can be said to be a surreal scene operation. In the tutorial, we will use color adjustment and picture editing. There are some basic techniques such as cutout and deformation. Overall, the difficulty is moderate. With a little patience and creativity, I believe students can learn from the ideas and create an extraordinary overall effect. Let’s learn how to make it specifically through the tutorial.
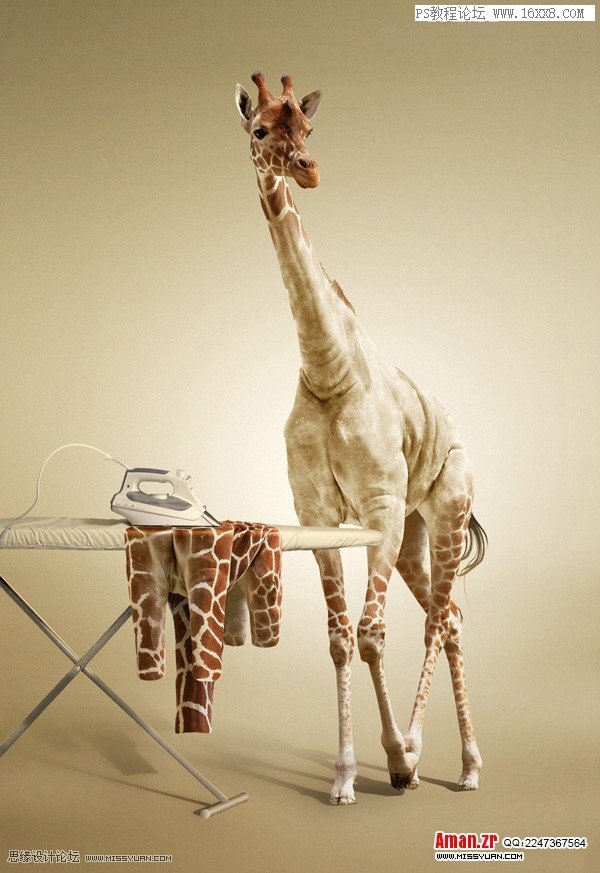
Rendering:
Material: http://bbs.16xx8.com/thread-166235-1-1.html
Operation steps:
First step
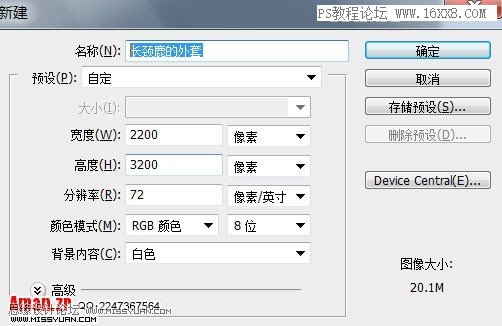
1. Press ctrl+N to create a new document with a size of 2200x3200px and name it “Giraffe’s Coat”
Step Two
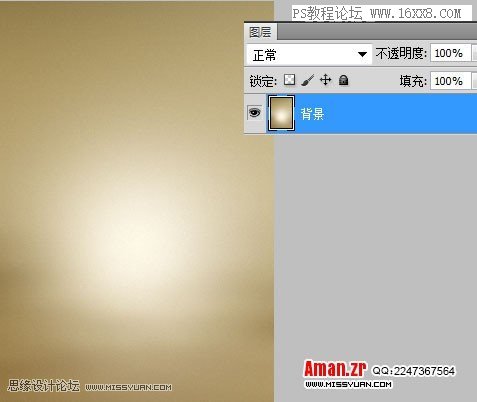
Open background.jpg, copy the background to the document in the previous step, and name it “Background”
Step Three
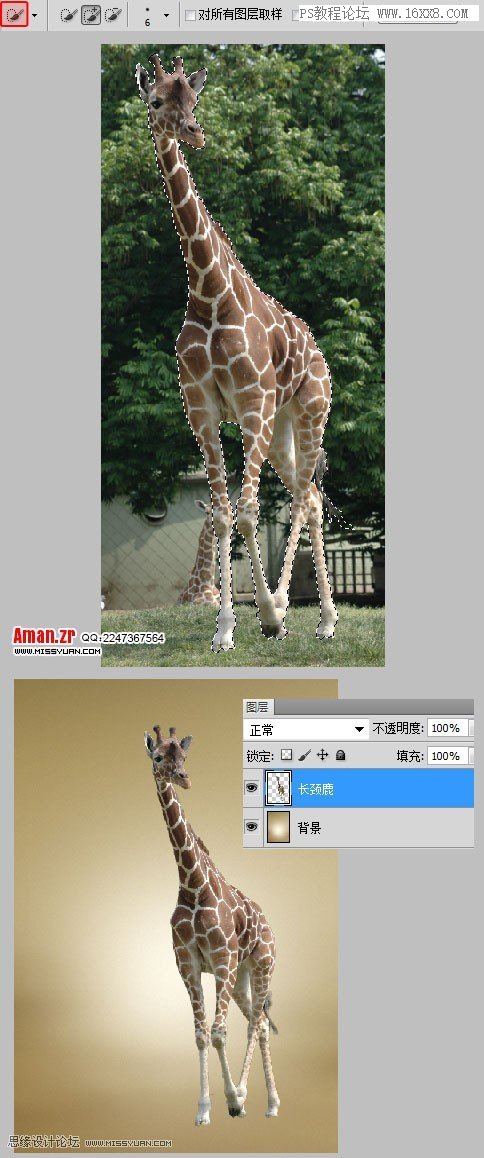
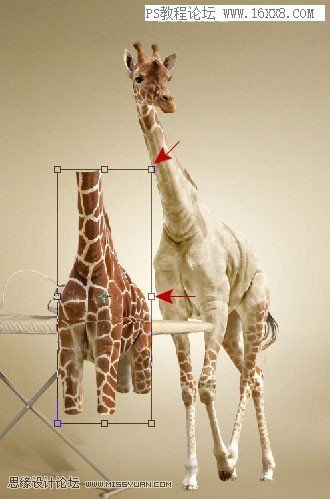
Open giraffe.jpg, use the Quick Selection Tool (W) to cut out the giraffe (you can also use other tools to cut out the image), and then drag the giraffe into the document
Step 4
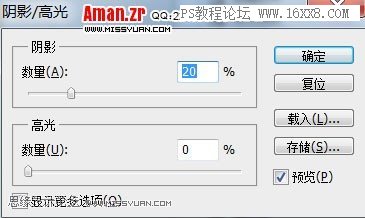
First we need to retouch the picture and adjust the highlights and shadows of the giraffe, “Image -> Adjustments -> Shadow/Highlight”
Step 5
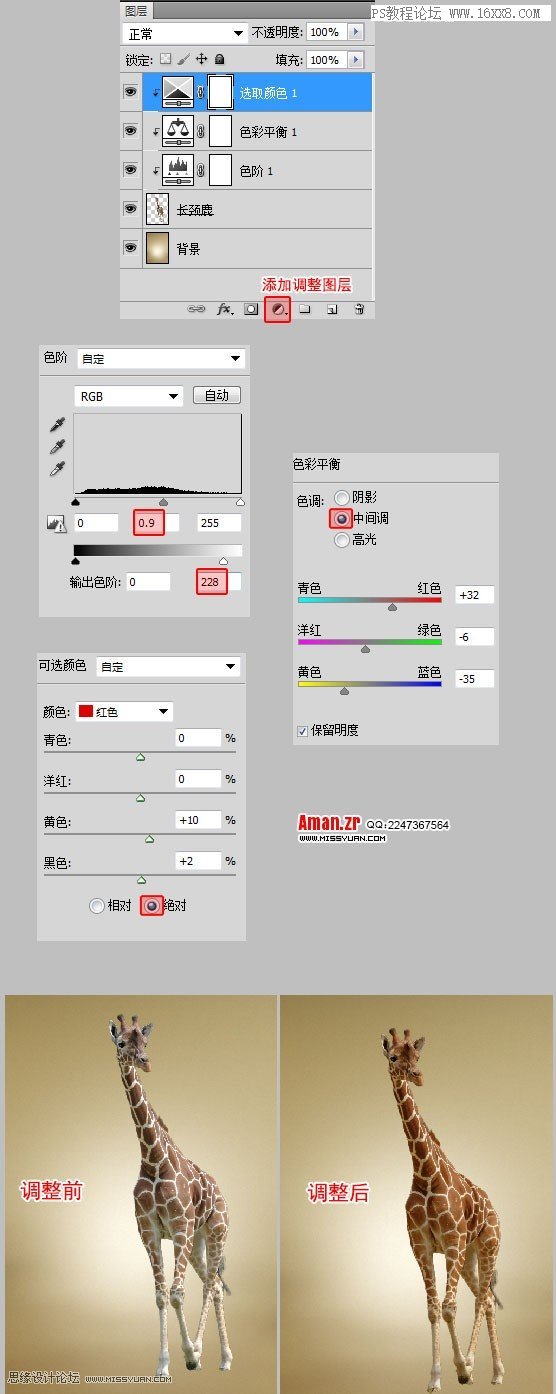
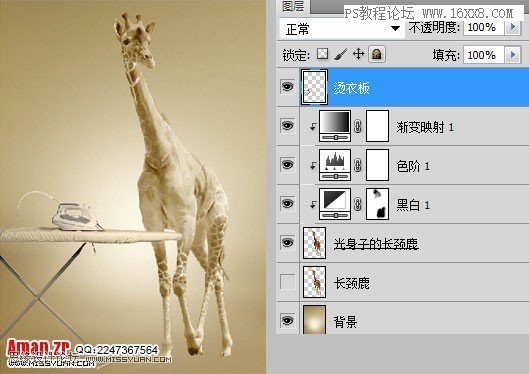
Add several adjustment layers “Levels”, “Color Balance” and “Optional Color” above the layer “Giraffe”. The specific parameters are as follows
Step 6
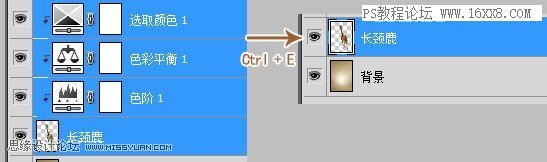
Select the giraffe and adjustment layer, Ctrl + E, merge layers
Step Seven
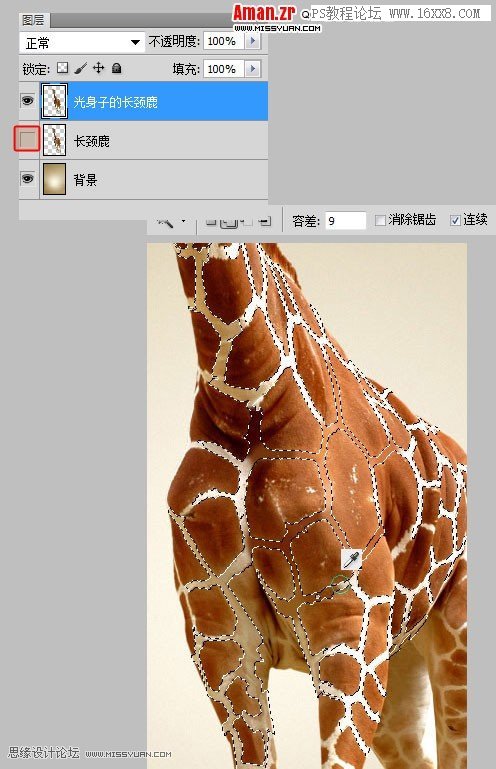
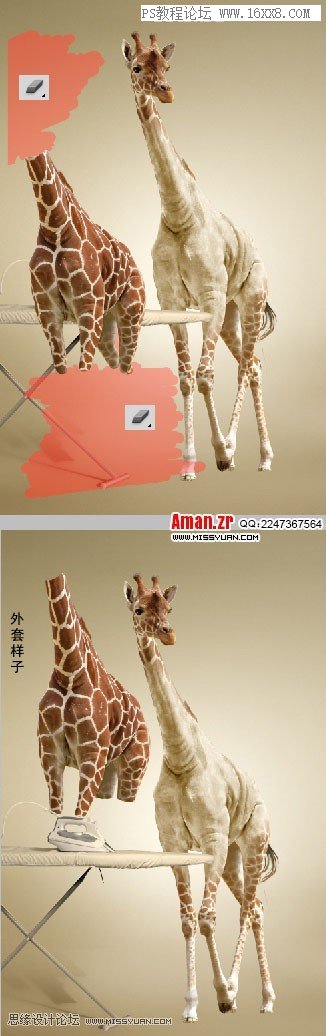
1. Press Ctrl + J, copy the giraffe layer, name it “Naked Giraffe”, and hide the layer “Giraffe”
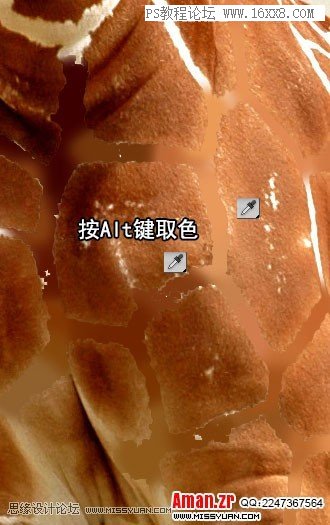
2. Use the Magic Wand Tool (W) to click on the white stripes on the giraffe. Just select the body part. Do not select the head and feet.
Step 8
Use the Brush Tool (B) to paint in the selected area. The color should be the color near the selected area
Step 9
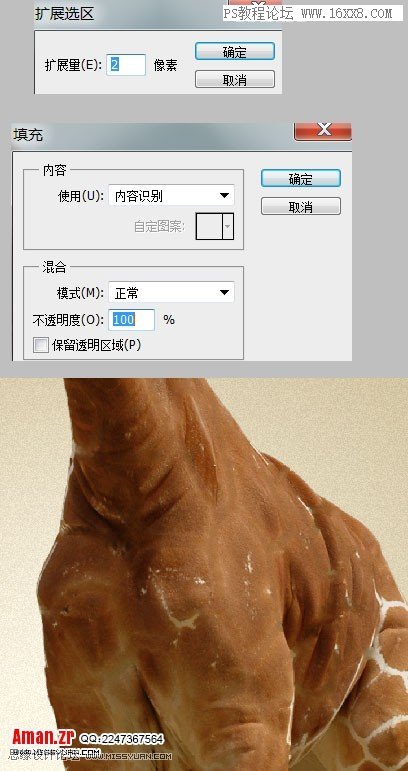
1. Keep the selection (or press Ctrl + Shift + D to restore the selection), then “Menu -> Select -> Modify -> Expand” and enter 2px
2. “Menu -> Edit -> Fill”, select “Content Aware” in the pop-up dialog box
Step 10
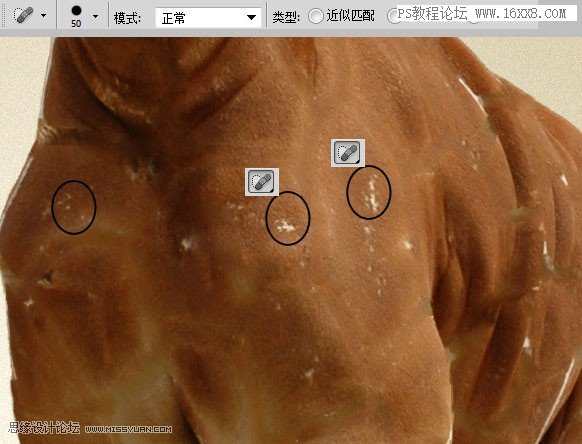
1. Use the Spot Healing Brush Tool (J) to deal with the remaining white spots on the giraffe. The size of the brush depends on the spots to be repaired
Step 11
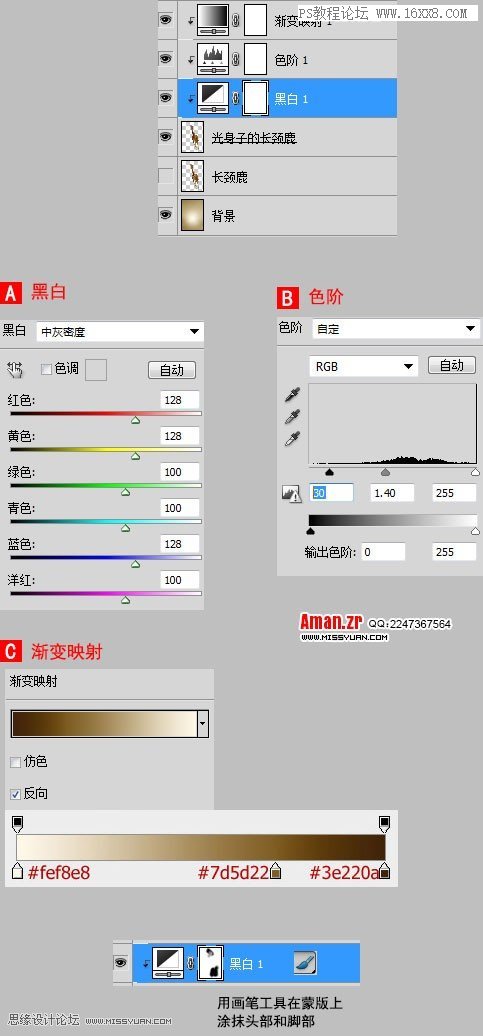
1. Add an adjustment layer to the layer “Naked Giraffe”, “Gradient Mapping”, “Levels” and “Black and White”. The parameters are as follows
Step 12
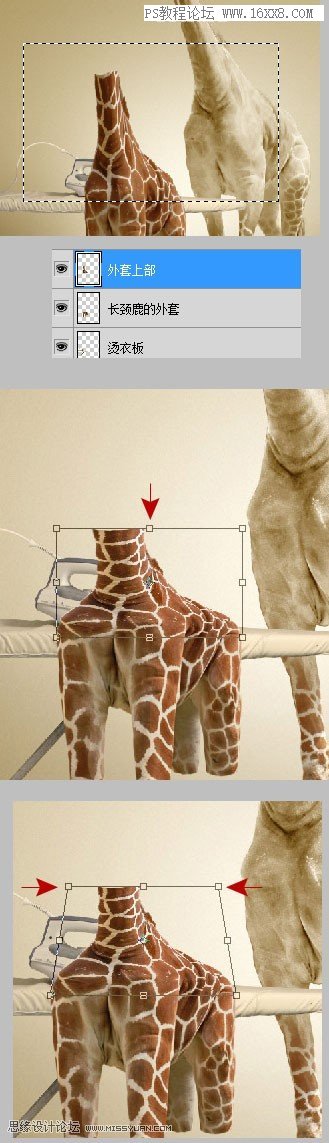
1. Open ironing board.jpg and copy it to the document
Step Thirteen
1. Duplicate the “Giraffe” layer, use the Eraser Tool (E) to erase the giraffe’s head and legs, and name it “Giraffe’s Coat”
Step 14
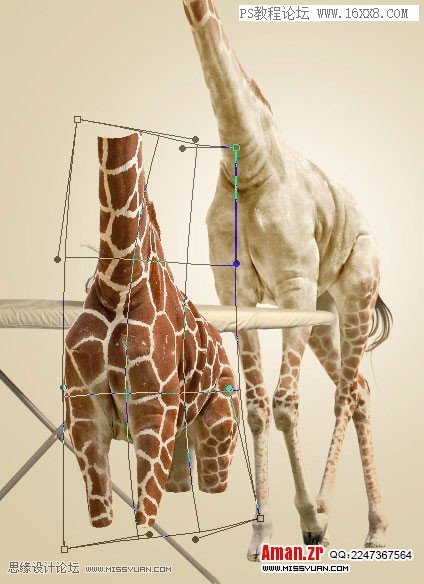
1. Use the deformation tool to flatten the coat, “Edit -> Transform -> Transform”
Step 15
1. Use “Filter -> Liquify” to make the coat smoother
Step 16
1. Press Ctrl + T to shrink the coat and stretch it vertically
Step 17
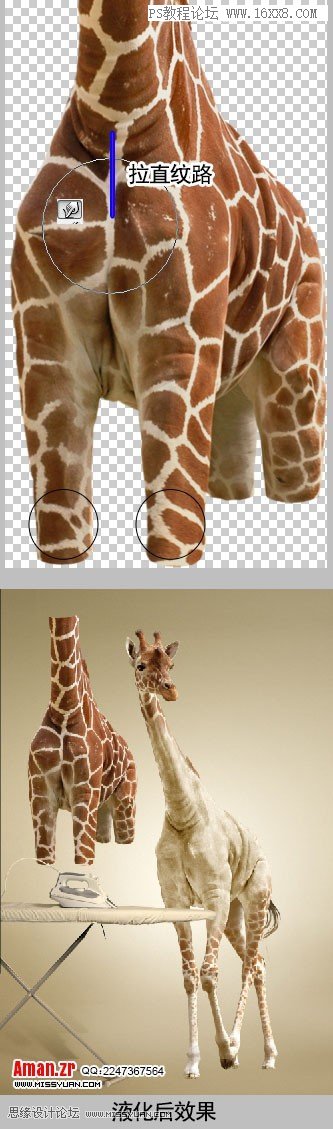
1. Use the Selection Tool (M) to select the upper part of the jacket, right-click, select “Layer By Cut”, and name the new layer “Upper Coat”
2. Press Ctrl + T to compress and deform the “upper part of the jacket”
Step 18
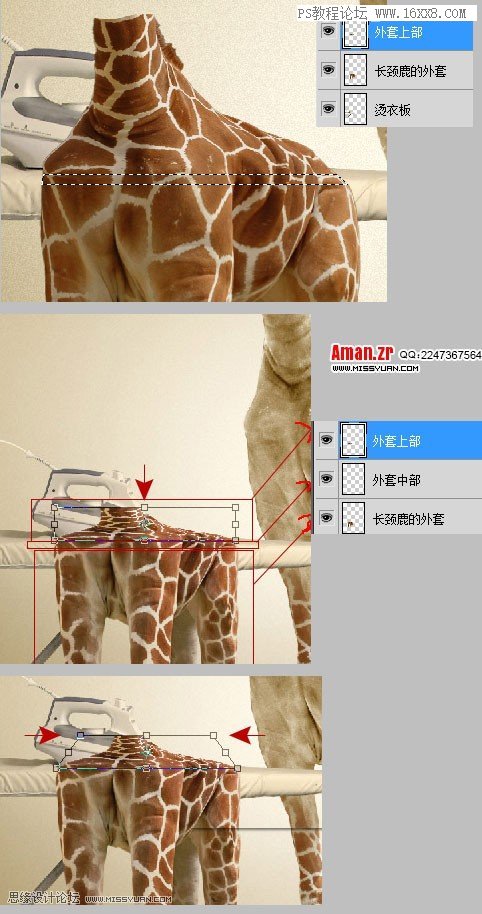
1. Select the layer “Upper Coat”, use the Selection Tool (M) to draw a rectangle, right-click, select “Layer By Cut”, and name the new layer “Middle Coat”
2. Select the layer “upper coat”, press Ctrl + T, compress and transform
Step 19
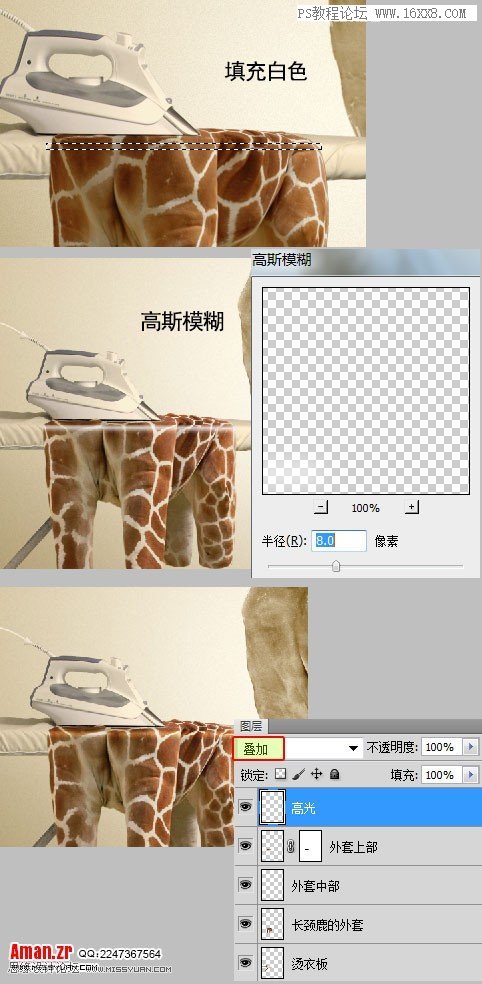
1. Select the layer “Upper Coat”, add Maskhttp://www.16xx8.com/tags/38847/, use the Brush Tool (B) with the brush color black, and paint the iron area coat, smooth out excess coat
Step 20
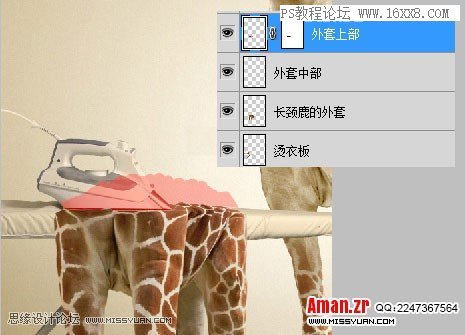
1. Create a new layer above the “upper part of the coat”, name it “Highlight”, then use the Selection Tool (M) to draw a rectangular selection with a height of 13px, fill it with white, and then “Filter->Blur->Gaussian Blur” “, enter the radius 8px
2. Set the layer blending mode to “Overlay”
Step 21
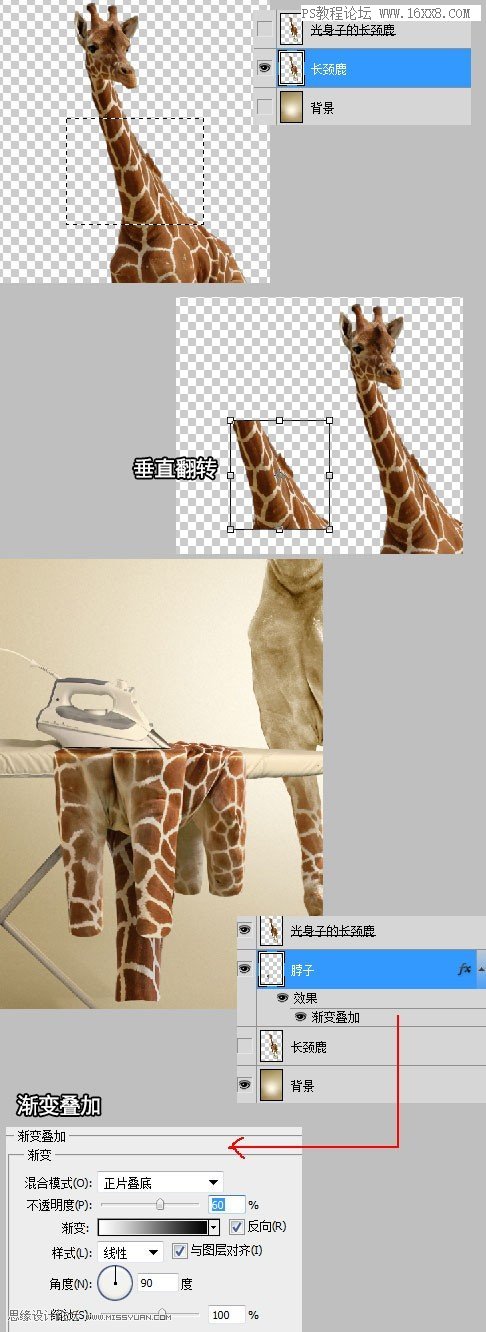
1. Select the layer “Giraffe”, copy the neck part, paste it, and name the layer “Neck”
2. Press Ctrl + T, flip it vertically, move it to the bottom of the ironing board, and add the layer style “Gradient Overlay”. You can also use the deformation and liquefaction tools to align the neck part
Step 22
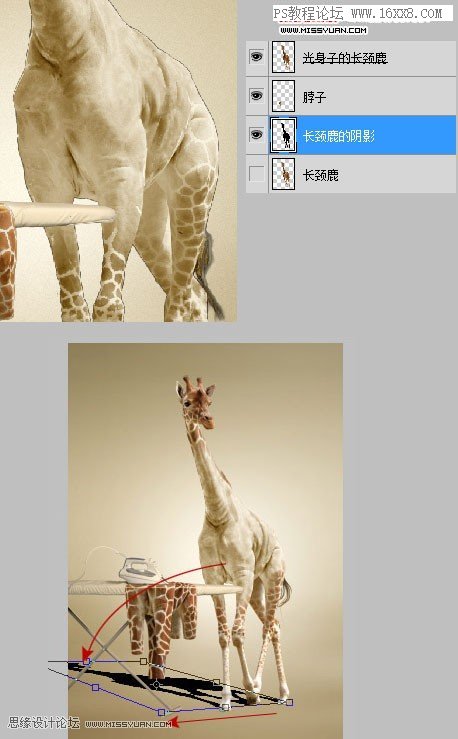
Finally, we add shadow effects to the giraffe and ironing board
1. Create a new layer, below the neck, name it “Shadow of Giraffe”, then hold down the Ctrl key and click the thumbnail of the layer “Giraffe” with the mouse, a selection of the giraffe will appear, then fill it with black
2. Press Ctrl + T to deform the shadow, as shown below
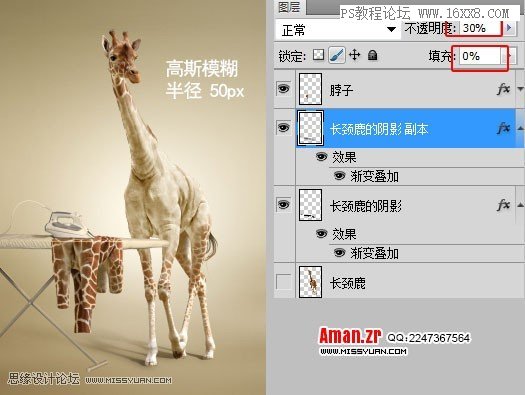
Step 23
1. Set the opacity of the “Giraffe’s Shadow” layer to 20%, fill it to 0%, and add the layer style “Gradient”�Add”
2. Click “Quick Mask”, use the Gradient Tool (G) to drag from left to right, and then click the “Quick Mask” button to exit Quick Mask
3. Then “Filter -> Blur -> Gaussian Blur” and enter the value 10px
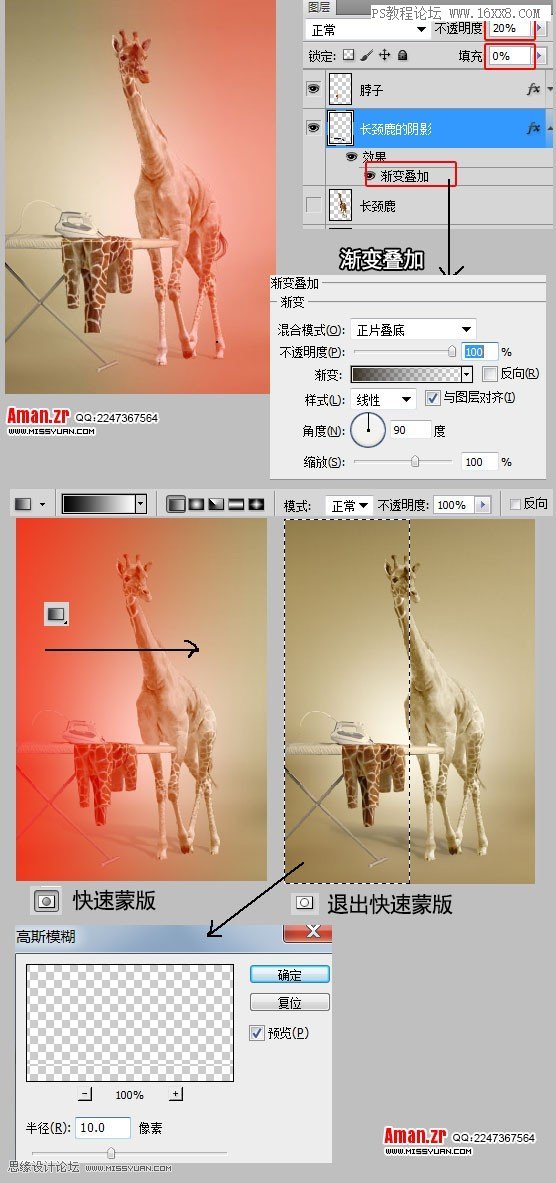
Step 24
1. Duplicate the layer “Giraffe’s Shadow”, set the layer opacity to 30%, fill it to 0%, then “Filter -> Blur -> Gaussian Blur”, enter the value 50px
Step 25
Use the same method to create the shadow of the ironing board
Final effect
No matter how many tutorials you watch, it’s better to make one. You won’t be able to learn without doing it. Let’s learn it together.
When doing synthesis tutorials, we always emphasize that creativity is the key. The second is the question of technique, because it is not too difficult to operate with only technique. This tutorial is a very creative work, which can be said to be a surreal scene operation. In the tutorial, we will use color adjustment and picture editing. There are some basic techniques such as cutout and deformation. Overall, the difficulty is moderate. With a little patience and creativity, I believe students can learn from the ideas and create an extraordinary overall effect. Let’s learn how to make it specifically through the tutorial.
Rendering:
Material: http://bbs.16xx8.com/thread-166235-1-1.html
Operation steps:
First step
1. Press ctrl+N to create a new document with a size of 2200x3200px and name it “Giraffe’s Coat”
Step Two
Open background.jpg, copy the background to the document in the previous step, and name it “Background”
Step Three
Open giraffe.jpg, use the Quick Selection Tool (W) to cut out the giraffe (you can also use other tools to cut out the image), and then drag the giraffe into the document
Step 4
First we need to retouch the picture and adjust the highlights and shadows of the giraffe, “Image -> Adjustments -> Shadow/Highlight”
Step 5
Add several adjustment layers “Levels”, “Color Balance” and “Optional Color” above the layer “Giraffe”. The specific parameters are as follows
Step 6
Select the giraffe and adjustment layer, Ctrl + E, merge layers
Step Seven
1. Press Ctrl + J, copy the giraffe layer, name it “Naked Giraffe”, and hide the layer “Giraffe”
2. Use the Magic Wand Tool (W) to click on the white stripes on the giraffe. Just select the body part. Do not select the head and feet.
No.Eight steps
Use the Brush Tool (B) to paint in the selected area. The color should be the color near the selected area
Step 9
1. Keep the selection (or press Ctrl + Shift + D to restore the selection), then “Menu -> Select -> Modify -> Expand” and enter 2px
2. “Menu -> Edit -> Fill”, select “Content Aware” in the pop-up dialog box
Step 10
1. Use the Spot Healing Brush Tool (J) to deal with the remaining white spots on the giraffe. The size of the brush depends on the spots to be repaired
Step 11
1. Add an adjustment layer to the layer “Naked Giraffe”, “Gradient Mapping”, “Levels” and “Black and White”. The parameters are as follows
Step 12
1. Open ironing board.jpg and copy it to the document
Step Thirteen
1. Duplicate the “Giraffe” layer, use the Eraser Tool (E) to erase the giraffe’s head and legs, and name it “Giraffe’s Coat”
Step 14
1. Use the deformation tool to flatten the coat, “Edit -> Transform -> Transform”
Step 15
1. Use “Filter -> Liquify” to make the coat smoother
Step 16
1. Press Ctrl + T to shrink the coat and stretch it vertically
Step 17
1. Use the Selection Tool (M) to select the upper part of the jacket, right-click, select “Layer By Cut”, and name the new layer “Upper Coat”
2. Press Ctrl + T to compress and deform the “upper part of the jacket”
Step 18
1. Select the layer “Upper Coat”, use the Selection Tool (M) to draw a rectangle, right-click, select “Layer By Cut”, and name the new layer “Middle Coat”
2. Select the layer “upper coat”, press Ctrl + T, compress and transform
Step 19
1. Select the layer “Upper Coat”, add Maskhttp://www.16xx8.com/tags/38847/, use the Brush Tool (B) with the brush color black, and paint the iron area coat, smooth out excess coat
Step 20
1. Create a new layer above the “upper part of the coat”, name it “Highlight”, then use the Selection Tool (M) to draw a rectangular selection with a height of 13px, fill it with white, and then “Filter->Blur->Gaussian Blur” “, enter the radius 8px
2. Set the layer blending mode to “Overlay”
Step 21
1. Select the layer “Giraffe”, copy the neck part, paste it, and name the layer “Neck”
2. Press Ctrl + T, flip it vertically, move it to the bottom of the ironing board, and add the layer style “Gradient Overlay”. You can also use the deformation and liquefaction tools to align the neck part
Step 22
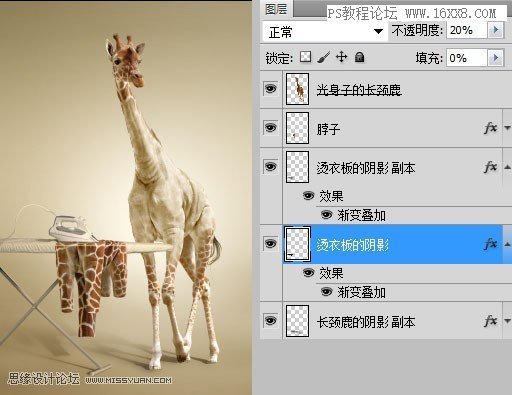
Finally, we add shadow effects to the giraffe and ironing board
1. Create a new layer, below the neck, name it “Shadow of Giraffe”, then hold down the Ctrl key and click the thumbnail of the layer “Giraffe” with the mouse, a selection of the giraffe will appear, then fill it with black
2. Press Ctrl + T to deform the shadow, as shown below
Step 23
1. Set the opacity of the “Giraffe’s Shadow” layer to 20%, fill it to 0%, and add the layer style “Gradient Overlay”
2. Click “Quick Mask”, use the Gradient Tool (G) to drag from left to right, and then click the “Quick Mask” button to exit Quick Mask
3. Then “Filter -> Blur -> Gaussian Blur” and enter the value 10px
Step 24
1. Duplicate the layer “Giraffe’s Shadow”, set the layer opacity to 30%, fill it to 0%, then “Filter -> Blur -> Gaussian Blur”, enter the value 50px
Step 25
Use the same method to create the shadow of the ironing board
Final effect
No matter how many tutorials you watch, it’s better to make one. You won’t be able to learn without doing it. Let’s learn it together.
 微信扫一扫打赏
 支付宝扫一扫打赏

