
This poster is imitated from the work of a Korean designer Song hojong. It looks a bit like the “Monument Valley” game. The overall color is light and light. This tutorial teaches how to use this gradient and colorful poster work of PS Imitation Master. Drawing is difficult. It depends on creativity. Let’s practice together.
First, here are the renderings made by the master (left) and the effect we made (right).

www.16xx8.com
Create a new document. I used 1200X1500 pixels. Feel free to create a gradient fill and a gradient background.

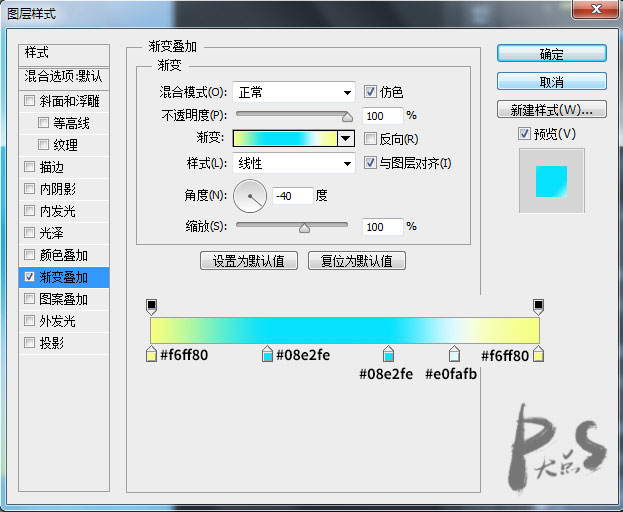
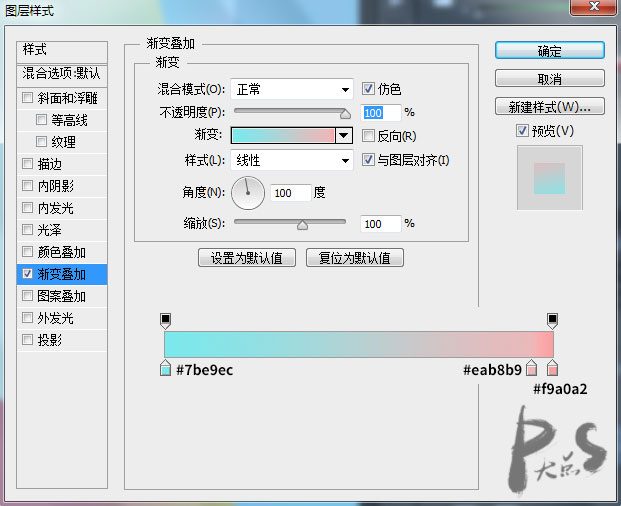
Use the Rectangle Tool to draw a rectangle and add a Gradient Overlay.

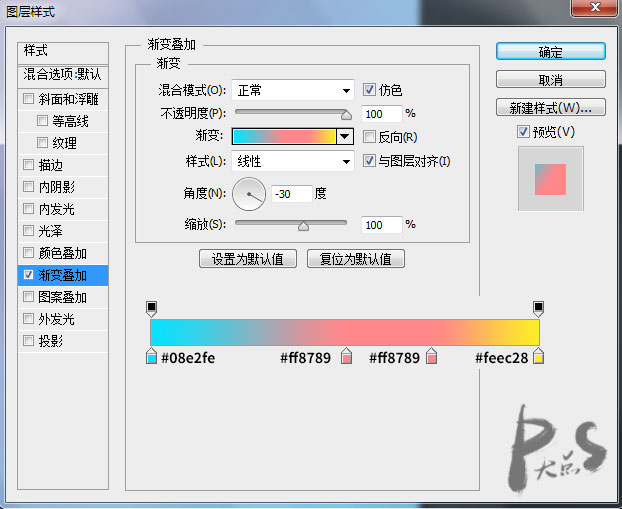
Use the pen tool to draw the shape in the lower left corner, load the selection of the rectangle just now, create a mask, and add a gradient overlay.

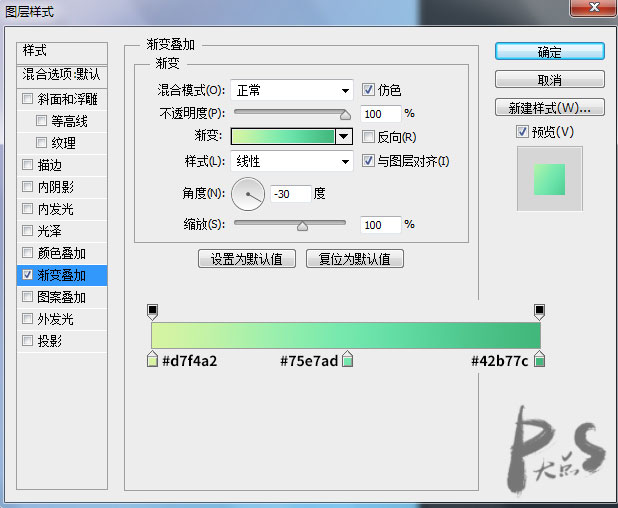
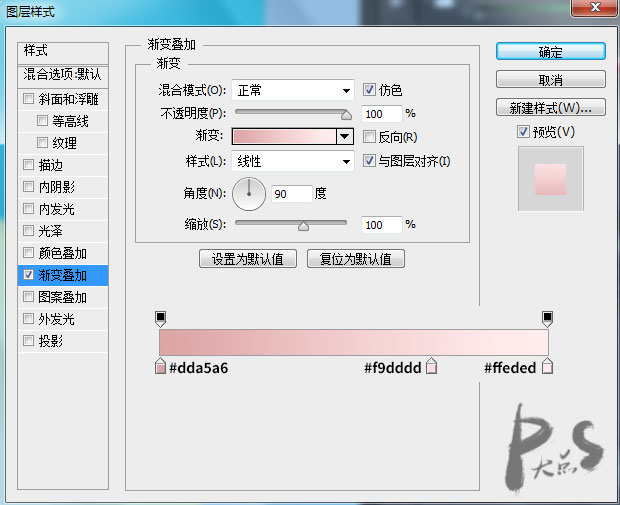
Similarly, use the pencil tool to draw the shape on the right underneath the shape on the left. Similarly, load the rectangular selection, create a mask, and add a gradient overlay.

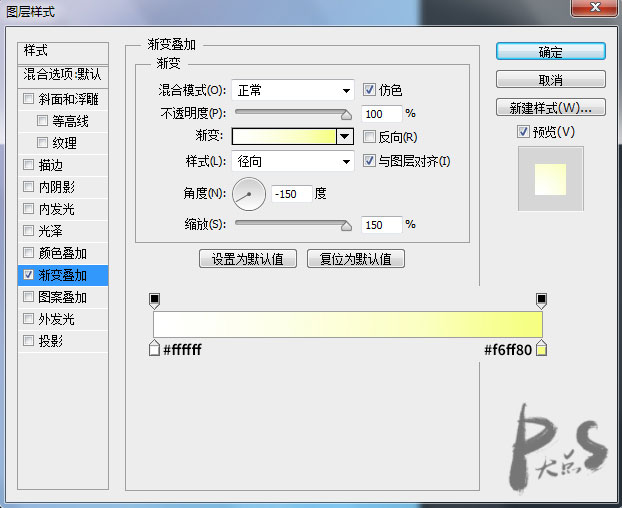
Next, select the Ellipse Tool, draw the middle circle, add the same mask, and then add a Gradient Overlay.

Here’s a little trick. When the layer style gradient overlay dialog box pops up, when you move the mouse over the canvas, the moving sign will appear.
When you drag, the gradient will change. I made a GIF, I believe everyone can understand it.

Next, we create a new layer above the rectangle and below the other layers. Set the foreground color to white. Use a brush and mask to draw the white light where the shape intersects the circle on the lower left.

OK, next, we start to draw the tower, use the pen tool to draw the following shape, and add a gradient overlay.


Next, draw the shape on the bottom right side and add a Gradient Overlay in the same way.

The next step is simple, just draw those shapes. For the left one, copy the layer style of the bottom left layer, and for the right one, copy the right layer style.

Now, let’s draw this spire and add a gradient overlay.

Next, draw the reflection of the tower on the bottom layer of the tower layer group. No pressure, right? Of course, remember to wipe the bottom with a mask and lower the transparency.

Next, to draw the shooting star, just use the straight line tool to draw a few straight lines, supplemented by a mask and that’s it.

Type text.

Oh, and finally, don’t forget to make a shadow.

You’re done, the effect is 100% visible.


This poster is imitated from the work of a Korean designer Song hojong. It looks a bit like the “Monument Valley” game. The overall color is light and light. This tutorial teaches how to use this gradient and colorful poster work of PS Imitation Master. Drawing is difficult. It depends on creativity. Let’s practice together.
First, here are the renderings made by the master (left) and the effect we made (right).
www.16xx8.com
Create a new document. I used 1200X1500 pixels. Feel free to create a gradient fill and a gradient background.
Use the Rectangle Tool to draw a rectangle and add a Gradient Overlay.
Use the pen tool to draw the shape in the lower left corner and load the��With that rectangular selection, create a Mask and add a Gradient Overlay.
Similarly, use the pencil tool to draw the shape on the right underneath the shape on the left. Similarly, load the rectangular selection, create a mask, and add a gradient overlay.
Next, select the Ellipse Tool, draw the middle circle, add the same mask, and then add a Gradient Overlay.
Here’s a little trick. When the layer style gradient overlay dialog box pops up, when you move the mouse over the canvas, the moving sign will appear.
When you drag, the gradient will change. I made a GIF, I believe everyone can understand it.
Next, we create a new layer above the rectangle and below the other layers. Set the foreground color to white. Use a brush and mask to draw the white light where the shape intersects the circle on the lower left.
OK, next, we start to draw the tower, use the pen tool to draw the following shape, and add a gradient overlay.
Next, draw the shape on the bottom right side and add a Gradient Overlay in the same way.
The next step is simple, just draw those shapes. For the left one, copy the layer style of the bottom left layer, and for the right one, copy the right layer style.
Now, let’s draw this spire and add a gradient overlay.
Next, draw the reflection of the tower on the bottom layer of the tower layer group. No pressure, right? Of course, remember to wipe the bottom with a mask and lower the transparency.
Next, to draw the shooting star, just use the straight line tool to draw a few straight lines, supplemented by a mask and that’s it.
Type text.
Oh, and finally, don’t forget to make a shadow.
You’re done, the effect is 100% visible.
 微信扫一扫打赏
 支付宝扫一扫打赏

