
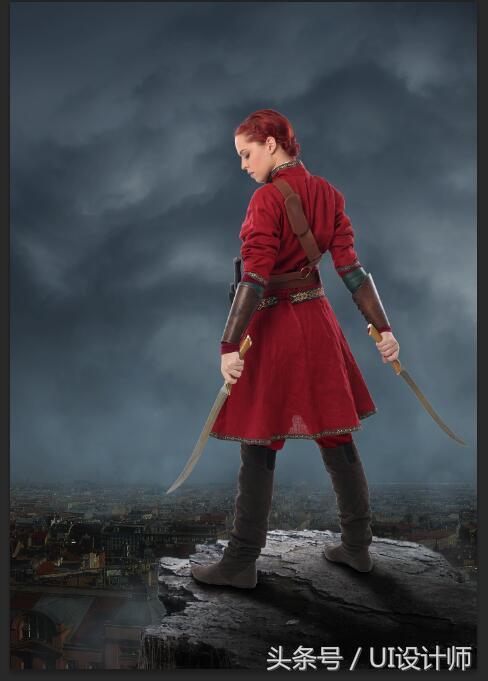
This tutorial uses PS to create a foreign magical poster. There are many steps in the entire tutorial, which are combined with a variety of materials to synthesize the effect. The entire tutorial has the feel of a movie poster, and the difficulty of making it is medium. There are steps, such as giving architectural drawings. When adding mask to a layer, you need to draw details. Students should be more careful when doing this. Let’s follow along together.
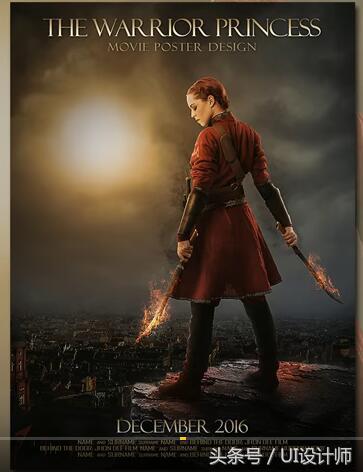
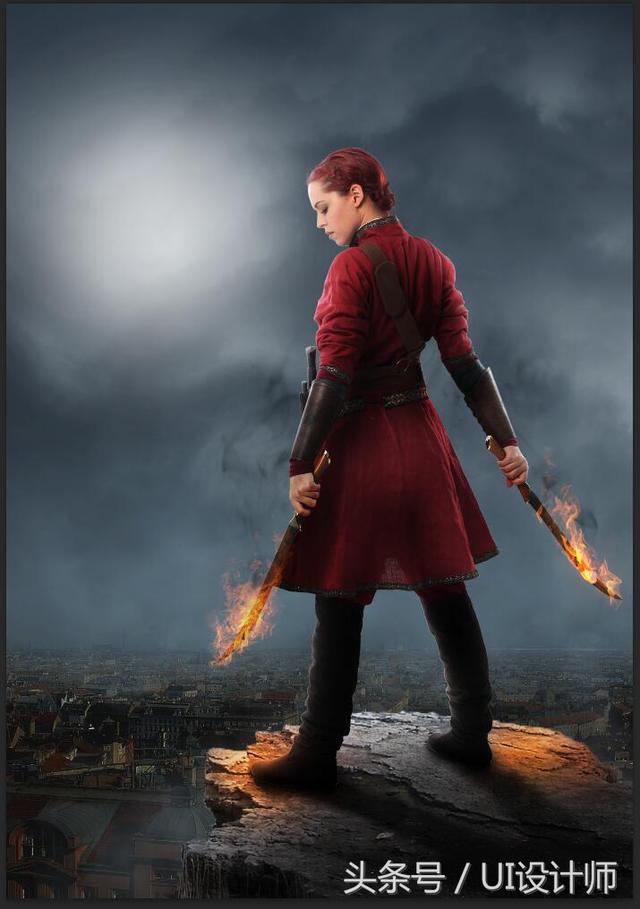
Rendering:
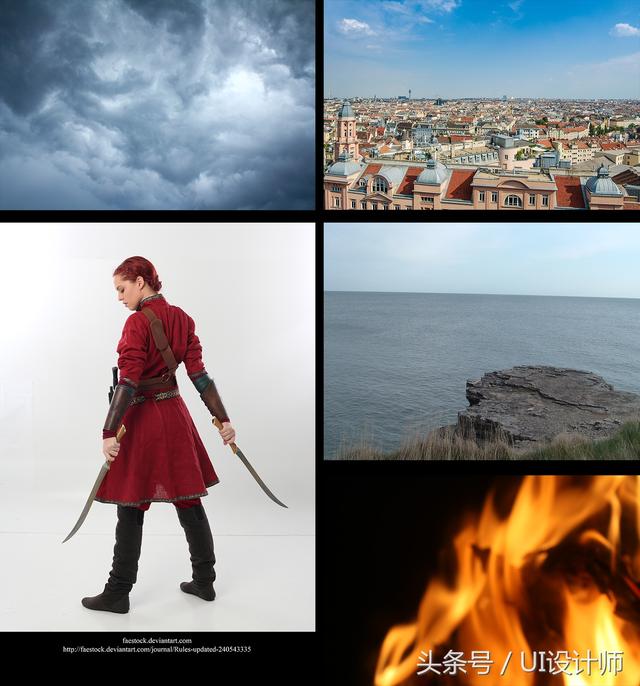
Materials used in the tutorial:
Based on past experience, this tutorial fully takes care of many friends who are new to PS, so those who have a certain basic knowledge can skip some steps by themselves.
Back to business
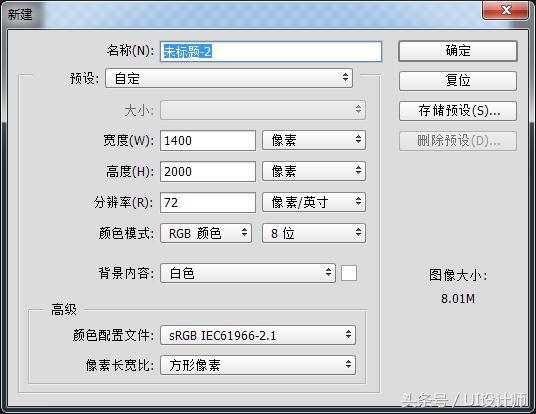
1. Create a new document. Please refer to the diagram for parameters
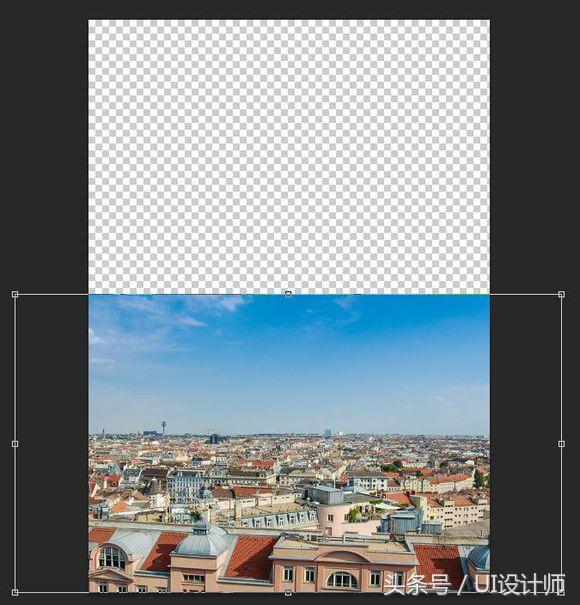
2. Place the architectural materials into the scene, use ctrl+T to reduce the height appropriately (not scale proportionally), the purpose is to increase the sense of perspective under the perspective
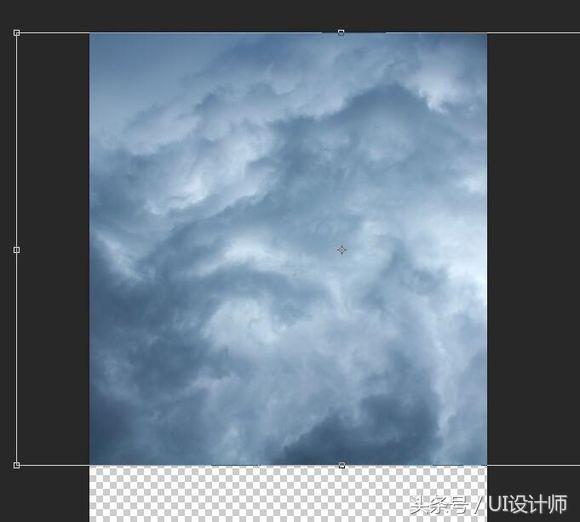
3. Insert the cloud material and adjust it to the position and size as shown in the picture (of course you can also adjust it according to your own feeling, as long as it looks comfortable)
4. Now let’s blend the buildings with the clouds. It’s very simple. Those with some experience can skip this step. Newbies should pay attention carefully
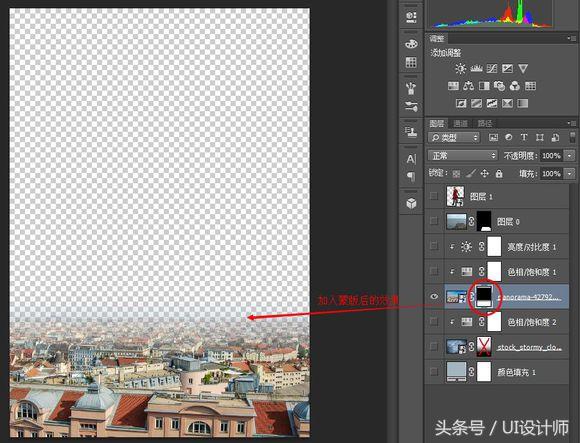
Add a mask to the building layer, use a black and white gradient on the mask (the foreground color is black), press the ctrl key and pull the mouse vertically down from the top.
Get the effect as shown in the picture.
Similarly, do the same operation for the cloud layer to get the effect as shown
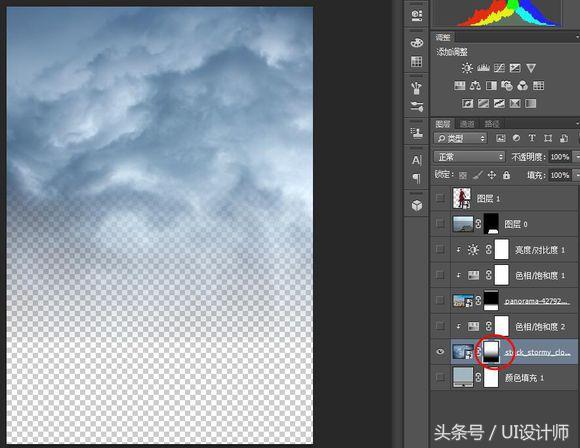
The effect is as shown in the figure on a transparent background
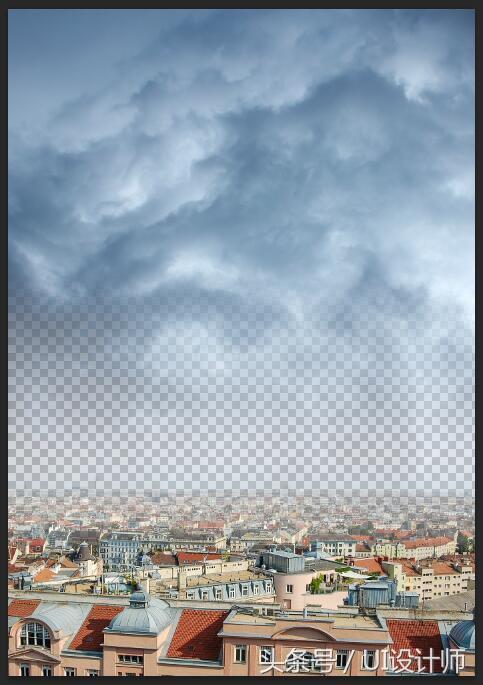
5. Next, we fill the bottom layer of the layer, which is the white background layer, with a gray-blue color (refer to #a3b6bf for the value).
And adjust the opacity of the cloud layer to 80, and the resulting picture looks like this
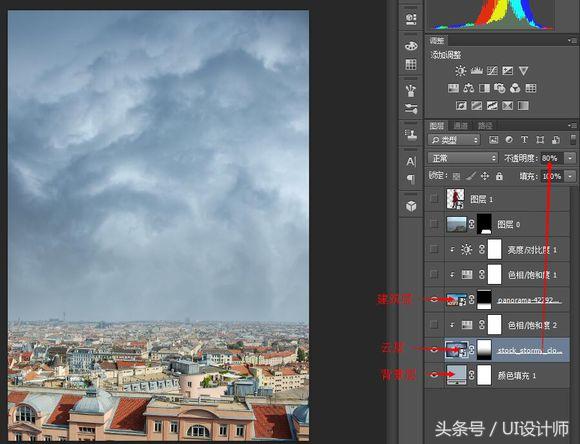
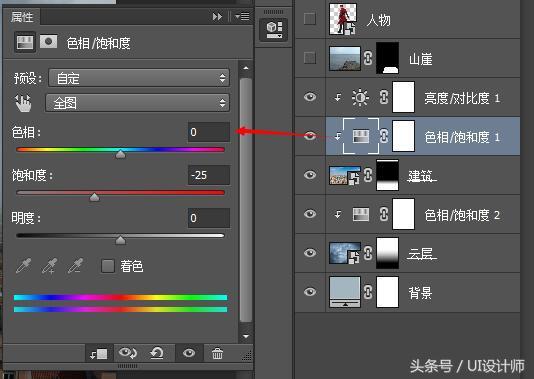
6. Next, we will color-tune the buildings and clouds respectively to meet the effect we want to achieve. Add a hue/saturation adjustment layer to the clouds.
The parameters are as shown in the figure
Add hue/saturation and brightness/contrast adjustment layers to the building layer. The parameters are as shown below
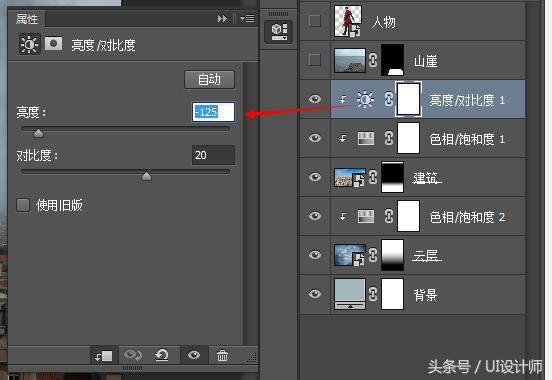
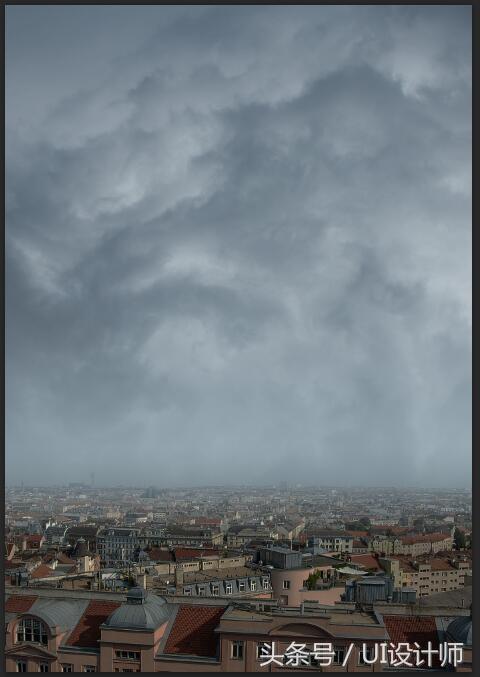
Get the effect as shown in the picture
7. Stamp (ctrl+alt+shift+E) the three visible layers to get a new layer, named bg.
Next, let’s use the camera raw filter under the filter menu to color the bg layer
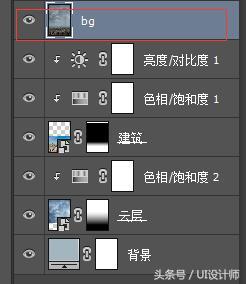
8. Activate the bg layer, open the camera raw filter interface, and adjust the clarity, contrast, highlights, and shadows as shown in the figure to achieve a dark effect

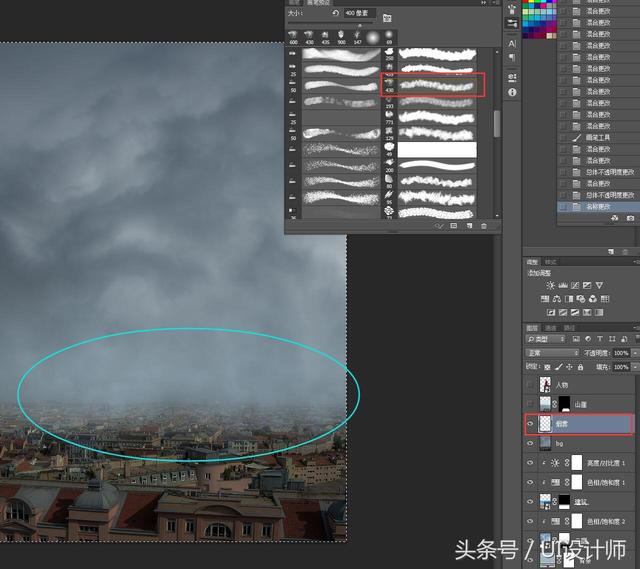
9. Create a new layer above the bg layer, name it smoke, set the foreground color (#a6bfce) with the brush tool, and set the opacity to about 15.
Load the environment_brushes_by_theechodragon-d5uhkx3 brush provided in the material: g-cloud-7, default stroke size, and apply it between the building and the sky to achieve a light smoke effect.
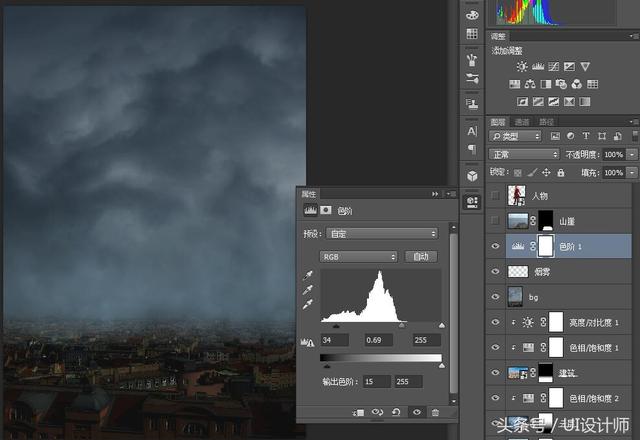
10. Add a new color level adjustment layer to increase the dark atmosphere of the background and better set off the tall image of the characters in the back
11. At this point, the background layout is basically completed. Now let’s add the foreground element: the cliff. Just like my previous tutorials, it basically doesn’t teach how to cut out images.
There are many great cutout tutorials on the Internet.
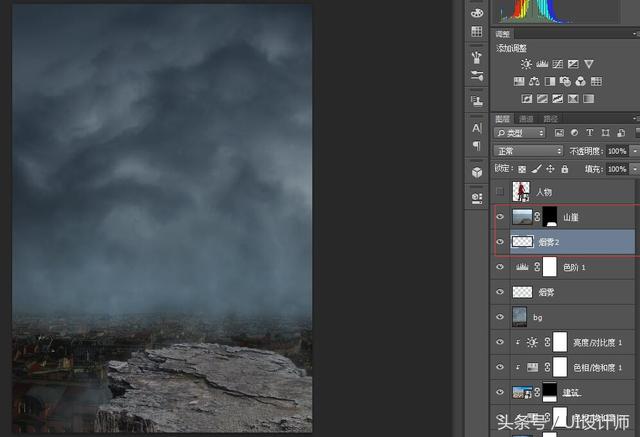
We placed the cut out cliff into the scene, adjusted the appropriate size and position, and created a new layer under it, named Smoke 2. The purpose is of course to take into account the environmental impact.
There will be fog and smoke surrounding the cliff. Refer to the operation in step 9, just apply a few dabs, not too heavy, just a little bit.
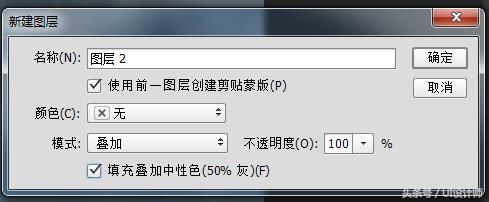
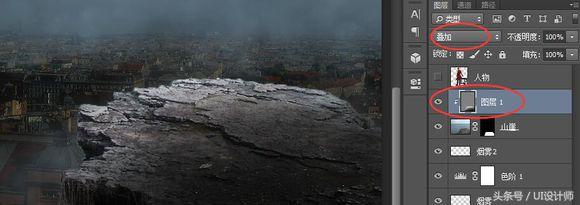
12. Click the layer button in the menu, create a new layer, check Create Clipping Mask and fill it with a neutral color. Select the mode as Overlay (only after selecting the mode, fill it with a neutral color options will appear)
13. Operate the new layer. Select the Brush Tool, and here pay attention to changing the brush back to the original default brush, with a hardness of 0 and an opacity of about 30.
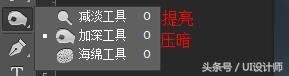
Click the burn tool, switch between darkening and brightening, and shade the mountain cliff
14. Place the cut-out character into the scene. After adjusting the appropriate proportion and position, we add a projection to her. Create a new layer below the character and name it Character Shadow 1.
Hold down Ctrl and click on the thumbnail on the character layer to get the character selection. Fill the selection of the character shadow 1 layer with black.
Then flip it vertically and perform a free transformation on the layer to adjust it to the shape shown in the picture. Then use the Gaussian Blur filter and set the value to 8.
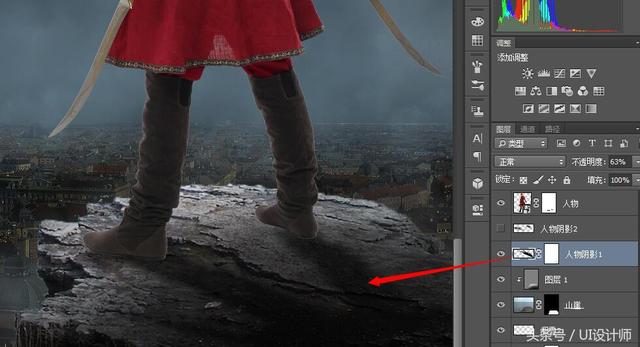
15. Now it looks like the character is suspended and unreal. We continue to process the shadows.
Create a new layer of Character Shadow 2 on Character Shadow 1, and use a black brush with an opacity of about 30 to paint on the soles and nearby areas. The effect is as shown below

www.16xx8.com
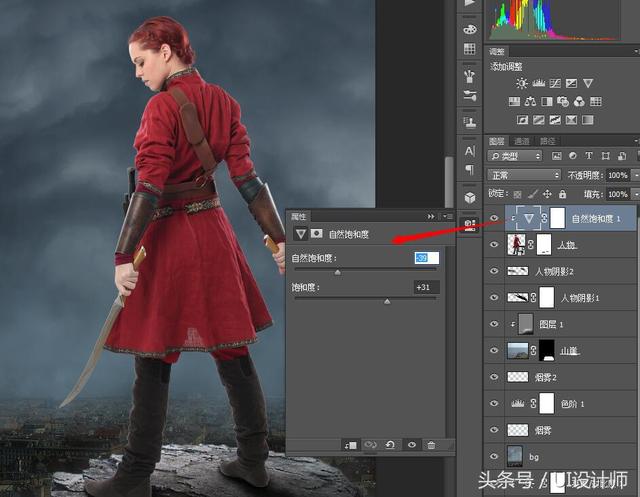
16. Add a natural saturation clipping mask adjustment layer to the character, with the values as shown:
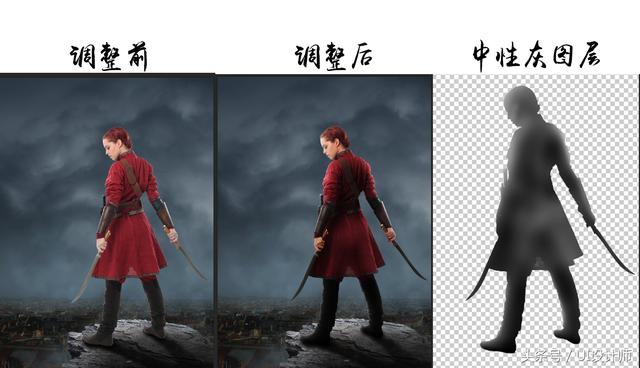
17. Refer to step 12, create a new neutral gray layer, set it as the clipping mask of the character, and set the mode to Overlay.
Adjust the light and dark relationship of the character on this layer. For the tools used, please refer to step 13.
The direction of the light source must be taken into consideration here. The back of the character is the backlit surface, so this must be taken into consideration when applying.
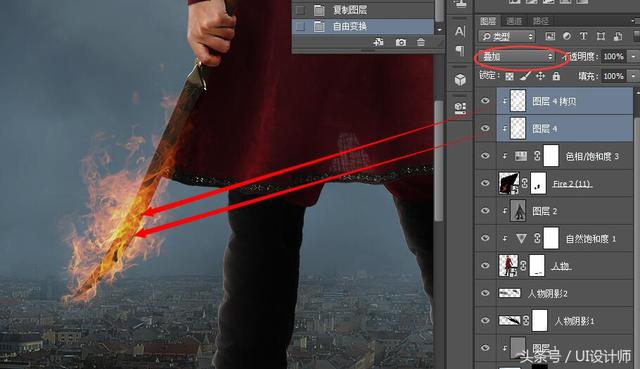
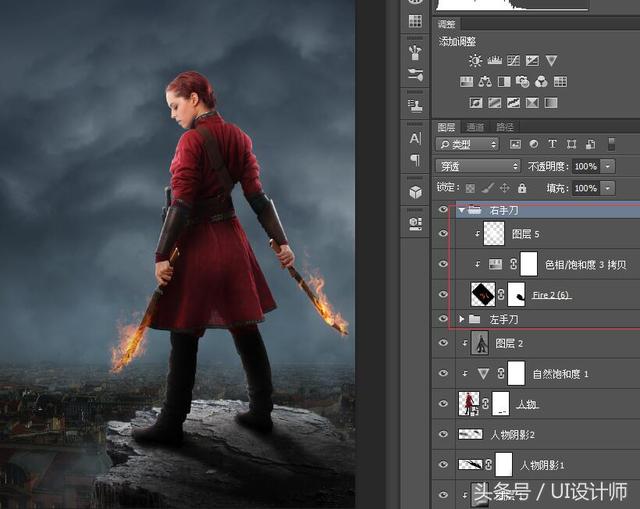
18. Next, let’s add a flame effect to the knife. Find a flame material in the flame material package. You can find your favorite flame and put it into the scene.
Adjust the position and size, and set the blending mode to Screen. Then create a mask for it��, use a black paintbrush to erase the excess.
Add a Hue/Saturation adjustment layer to it, with the parameters as shown

19. Create a new layer on it, use a white brush with a size of about 200 to click on the blade, change it to a long shape, rotate it to follow the blade, and set the blending mode to Overlay.
If you think the brightness is not enough, you can copy another layer and you will get the following effect
20. Refer to steps 18 and 19 to create the flame effect of the right-hand knife.
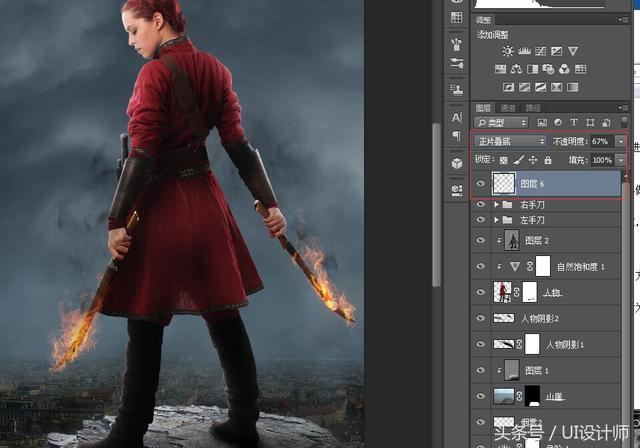
21. Use the black smoke brush to paint on a new layer, and use an eraser to erase the excess part to get the effect of flames with black smoke coming out as shown in the figure. Set the blending mode to Multiply
22. Create a new layer at the top of the layer panel, name it flame light, set the foreground color to #e85927, and use a flexible brush to paint as shown,
And set the layer opacity to 70 and the blending mode to Overlay
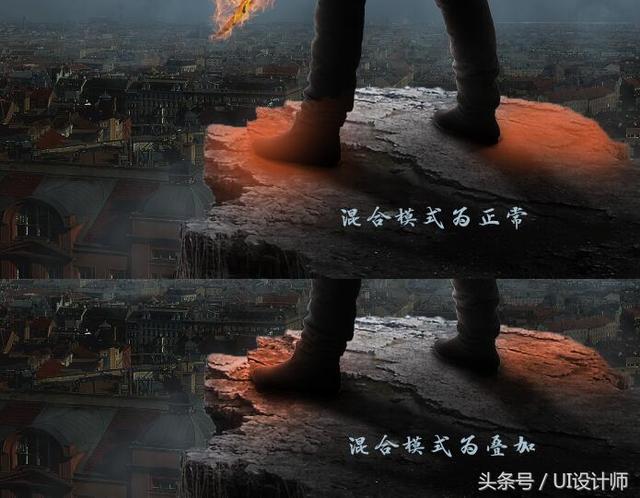
23. Now the light projection on the cliff is still unnatural. Let’s continue processing and use the eyedropper tool to absorb bright yellow #dde179 on the flame, as in the previous step.
Set the layer opacity to 80 and the blending mode to Overlay to get the following effect
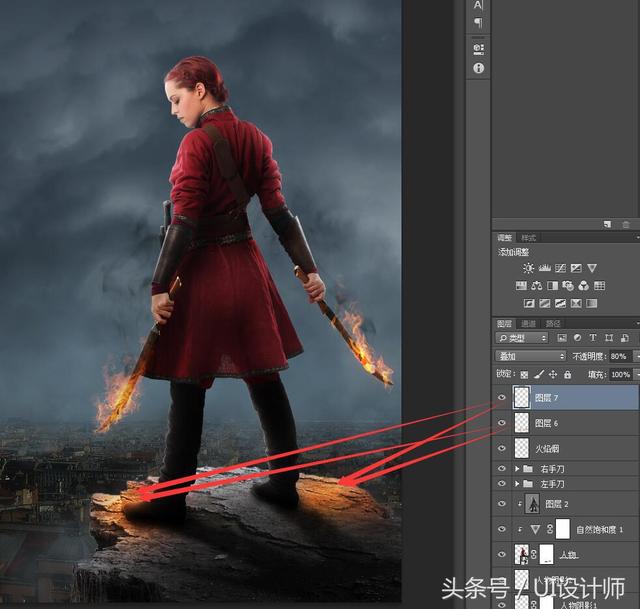
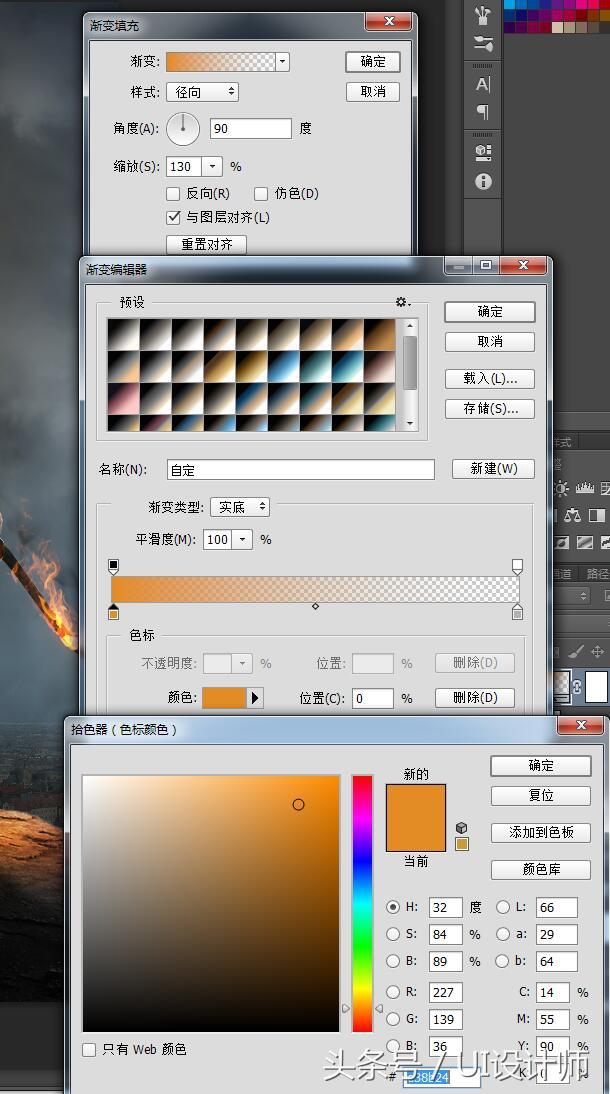
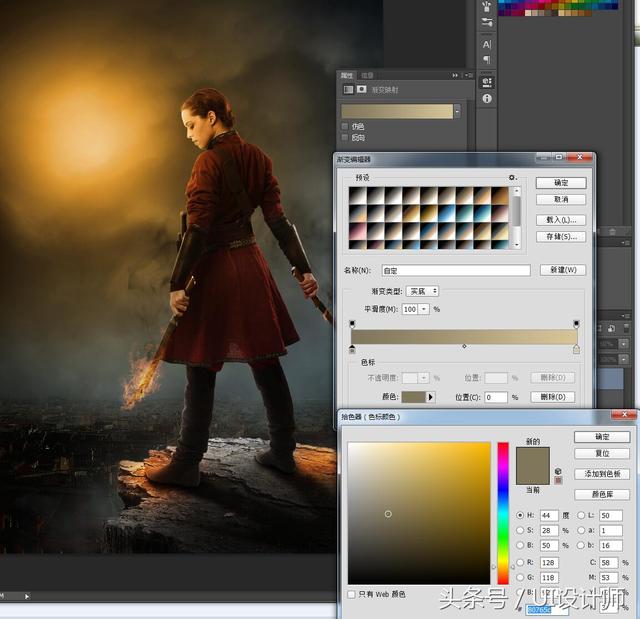
24. Create a light source in the sky. Create a new layer, use a 700 white brush, and click on the position in the picture to get a white light source. Set the opacity to 70.
Add a gradient adjustment layer on top of it, with the parameters as shown in the picture
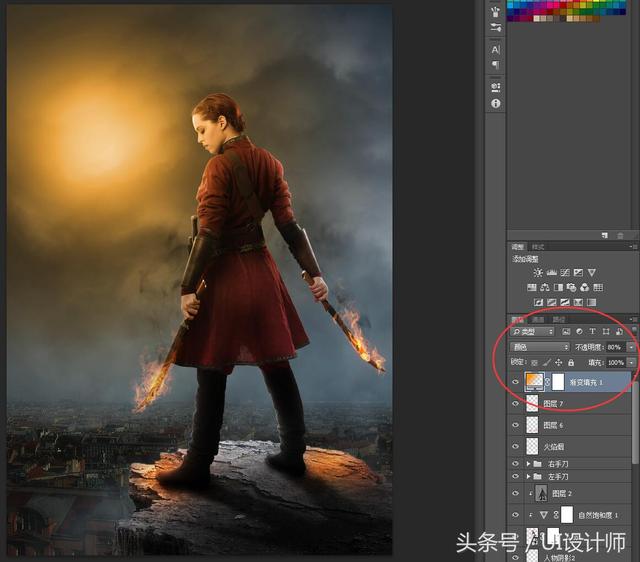
Finally, we get the effect shown below.
25. It’s almost done. Are you excited? Don’t worry, details determine success or failure. Next we adjust the overall tone of the scene.
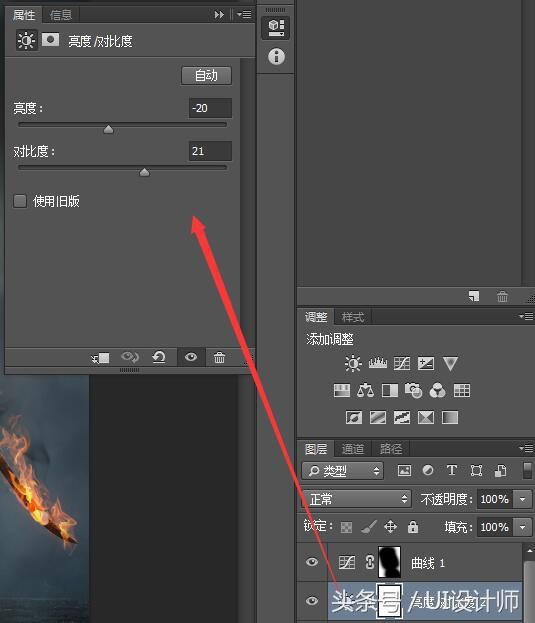
Add a new brightness/contrast adjustment layer to the top layer, with the parameters as shown in the figure
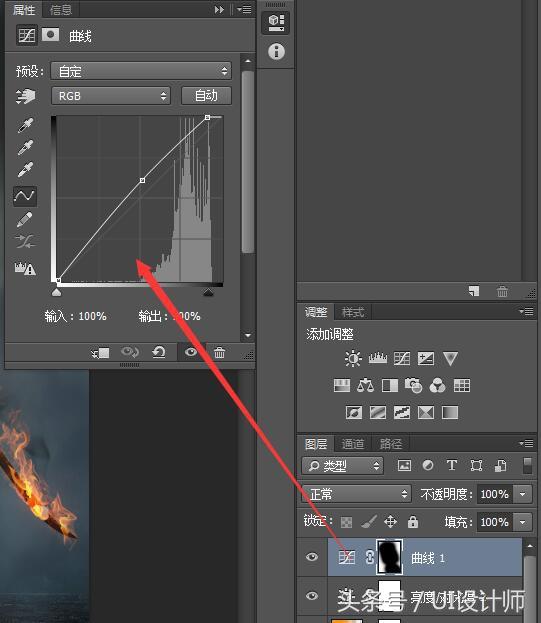
Then add a curve adjustment layer and blacken the middle part of the curve mask. The purpose is to make the curve effect not affect the middle part and increase the depth of the scene

26. Add a Gradient Mapping adjustment layer. The parameters are as shown in the figure. Set the layer mode to Soft Light and the opacity to 60.
Final renderings!
In the synthetic tutorial fantasy, we can add a variety of elements to create many different magical effects. Students can create according to the actual situation.
This tutorial uses PS to create a foreign magical poster. The entire tutorial has many steps and is combined with a variety of materials to synthesize the effect. The entire tutorial has the feel of a movie poster. The difficulty of making it is medium. Once there are steps,…For example, when adding a mask to a building layer, you need to draw details. Students should be more careful when doing this. Let’s follow along.
Rendering:
Materials used in the tutorial:
Based on past experience, this tutorial fully takes care of many friends who are new to PS, so those who have a certain basic knowledge can skip some steps by themselves.
Back to business
1. Create a new document. Please refer to the diagram for parameters
2. Place the architectural materials into the scene, use ctrl+T to reduce the height appropriately (not scale proportionally), the purpose is to increase the sense of perspective under the perspective
3. Insert the cloud material and adjust it to the position and size as shown in the picture (of course you can also adjust it according to your own feeling, as long as it looks comfortable)
4. Now let’s blend the buildings with the clouds. It’s very simple. Those with some experience can skip this step. Newbies should pay attention carefully
Add a mask to the building layer, use a black and white gradient on the mask (the foreground color is black), press the ctrl key and pull the mouse vertically down from the top.
Get the effect as shown in the picture.
Similarly, do the same operation for the cloud layer to get the effect as shown
The effect is as shown in the figure on a transparent background
5. Next, we fill the bottom layer of the layer, which is the white background layer, with a gray-blue color (refer to #a3b6bf for the value).
And adjust the opacity of the cloud layer to 80, and the resulting picture looks like this
6. Next, we will color-tune the buildings and clouds respectively to meet the effect we want to achieve. Add a hue/saturation adjustment layer to the clouds.
The parameters are as shown in the figure
Add hue/saturation and brightness/contrast adjustment layers to the building layer. The parameters are as shown below
Get the effect as shown in the picture
7. Stamp (ctrl+alt+shift+E) the three visible layers to get a new layer, named bg.
Next, let’s use the camera raw filter under the filter menu to color the bg layer
8. Activate the bg layer, open the camera raw filter interface, and adjust the clarity, contrast, highlights, and shadows as shown in the figure to achieve a dark effect
9. Create a new layer above the bg layer, name it smoke, set the foreground color (#a6bfce) with the brush tool, and set the opacity to about 15.
Load the environment_brushes_by_theechodragon-d5uhkx3 brush provided in the material: g-cloud-7, default stroke size, between the building and the sky�Apply for a light smoke effect.
10. Add a new color level adjustment layer to increase the dark atmosphere of the background and better set off the tall image of the characters in the back
11. At this point, the background layout is basically completed. Now let’s add the foreground element: the cliff. Just like my previous tutorials, it basically doesn’t teach how to cut out images.
There are many great cutout tutorials on the Internet.
We placed the cut out cliff into the scene, adjusted the appropriate size and position, and created a new layer under it, named Smoke 2. The purpose is of course to take into account the environmental impact.
There will be fog and smoke surrounding the cliff. Refer to the operation in step 9, just apply a few dabs, not too heavy, just a little bit.
12. Click the layer button in the menu, create a new layer, check Create Clipping Mask and fill it with a neutral color. Select the mode as Overlay (only after selecting the mode, fill it with a neutral color options will appear)
13. Operate the new layer. Select the Brush Tool, and here pay attention to changing the brush back to the original default brush, with a hardness of 0 and an opacity of about 30.
Click the burn tool, switch between darkening and brightening, and shade the mountain cliff
14. Place the cut-out character into the scene. After adjusting the appropriate proportion and position, we add a projection to her. Create a new layer below the character and name it Character Shadow 1.
Hold down Ctrl and click on the thumbnail on the character layer to get the character selection. Fill the selection of the character shadow 1 layer with black.
Then flip it vertically and perform a free transformation on the layer to adjust it to the shape shown in the picture. Then use the Gaussian Blur filter and set the value to 8.
15. Now it looks like the character is suspended and unreal. We continue to process the shadows.
Create a new layer of Character Shadow 2 on Character Shadow 1, and use a black brush with an opacity of about 30 to paint on the soles and nearby areas. The effect is as shown below
www.16xx8.com
16. Add a natural saturation clipping mask adjustment layer to the character, with the values as shown:
17. Refer to step 12, create a new neutral gray layer, set it as the clipping mask of the character, and set the mode to Overlay.
Adjust the light and dark relationship of the character on this layer. For the tools used, please refer to step 13.
The direction of the light source must be taken into consideration here. The back of the character is the backlit surface, so this must be taken into consideration when applying.
18. Next, let’s add a flame effect to the knife. Find a flame material in the flame material package. You can find your favorite flame and put it into the scene.
Adjust the position and size, and set the blending mode to Screen. Then create a mask for it and paint out the excess with a black brush.
Add a Hue/Saturation adjustment layer to it, with the parameters as shown
19. Create a new one on itOn the � layer, use a white, 200-size brush to click on the blade, change it to a long strip shape, rotate it to follow the blade, and set the blending mode to Overlay.
If you think the brightness is not enough, you can copy another layer and you will get the following effect
20. Refer to steps 18 and 19 to create the flame effect of the right-hand knife.
21. Use the black smoke brush to paint on a new layer, and use an eraser to erase the excess part to get the effect of flames with black smoke coming out as shown in the figure. Set the blending mode to Multiply
22. Create a new layer at the top of the layer panel, name it flame light, set the foreground color to #e85927, and use a flexible brush to paint as shown,
And set the layer opacity to 70 and the blending mode to Overlay
23. Now the light projection on the cliff is still unnatural. Let’s continue processing and use the eyedropper tool to absorb bright yellow #dde179 on the flame, as in the previous step.
Set the layer opacity to 80 and the blending mode to Overlay to get the following effect
24. Create a light source in the sky. Create a new layer, use a 700 white brush, and click on the position in the picture to get a white light source. Set the opacity to 70.
Add a gradient adjustment layer on top of it, with the parameters as shown in the picture
Finally, we get the effect shown below.
25. It’s almost done. Are you excited? Don’t worry, details determine success or failure. Next we adjust the overall tone of the scene.
Add a new brightness/contrast adjustment layer to the top layer, with the parameters as shown in the figure
Then add a curve adjustment layer and blacken the middle part of the curve mask. The purpose is to make the curve effect not affect the middle part and increase the depth of the scene
26. Add a Gradient Mapping adjustment layer. The parameters are as shown in the figure. Set the layer mode to Soft Light and the opacity to 60.
Final renderings!
In the synthetic tutorial fantasy, we can add a variety of elements to create many different magical effects. Students can create according to the actual situation.
 微信扫一扫打赏
 支付宝扫一扫打赏

