This tutorial uses PS to synthesize a dreamy two-dimensional scene. It uses a lot of materials, but the materials are not the key. The key is that we learn the method through the tutorial. The key point of the scene is creativity. What the students see The great scenes are all integrated with the author’s imagination and creativity. When we are learning, we should also create according to the ideas. Let’s learn through the tutorial together.
Rendering:
 If you want to learn more, please visit www.16xx8.com
Operation steps:
1. Start by building a basic scene
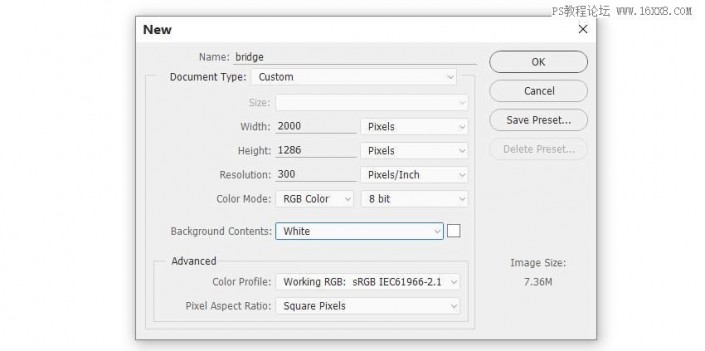
1. Create a new 2000 x 1286 px document in photoshop using the given parameters: (This is an exercise so please determine the size of your work based on the size of your material and other factors)
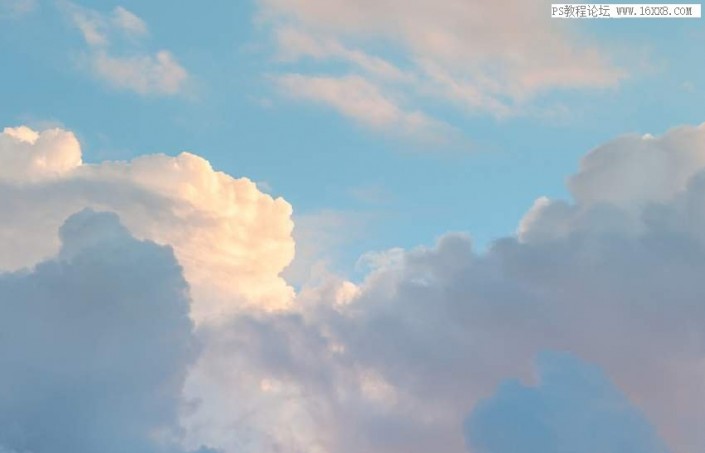
2. Open the sky image and use the Move Tool (v) to drag it onto the white canvas. Convert this layer to a Smart Object /wp-content/uploads/2024/03/15/pgfbjtxe3zc
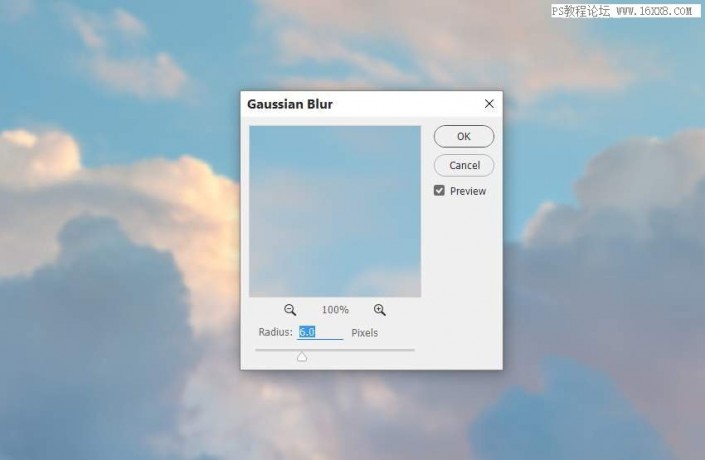
3. Go to Blur > Gaussian Blur and set the Radius to 6 px. This step is to separate the background and main elements, not to increase depth of field.
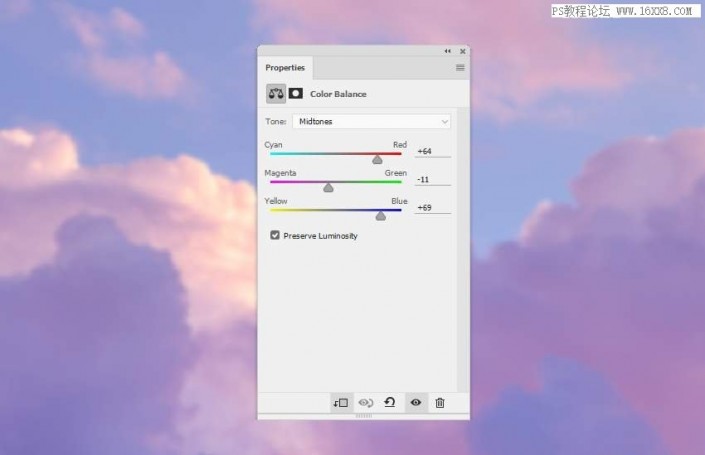
4. Select the layer (remember to clip to the sky) > New Adjustment Layer > Color Balance to change the color of the sky. Change the midtone value.
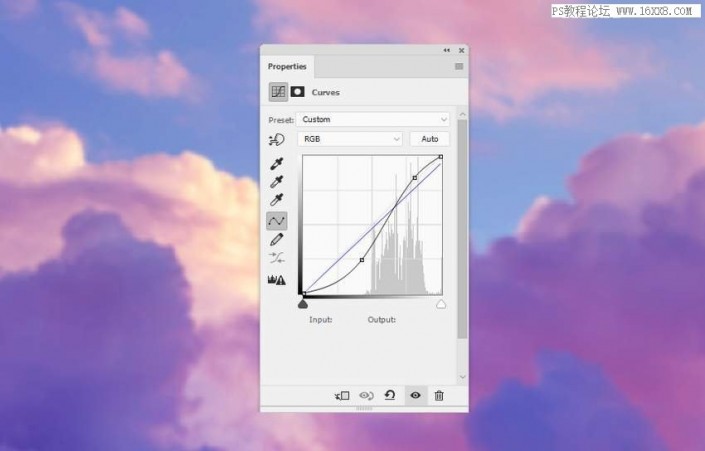
5. Create a new Curves adjustment layer to increase the contrast and brightness of the sky.
6. Open the mountain image and place it in the lower part of the main canvas. on top of the sky layer.

7. Click the second icon at the bottom of the “Layer” panel to add Mask/wp-content/uploads/2024/03/15/thto24xmff0 to this layer. Paint with a soft round brush in black to remove the hard edges of the sky and make it blend with the existing background.
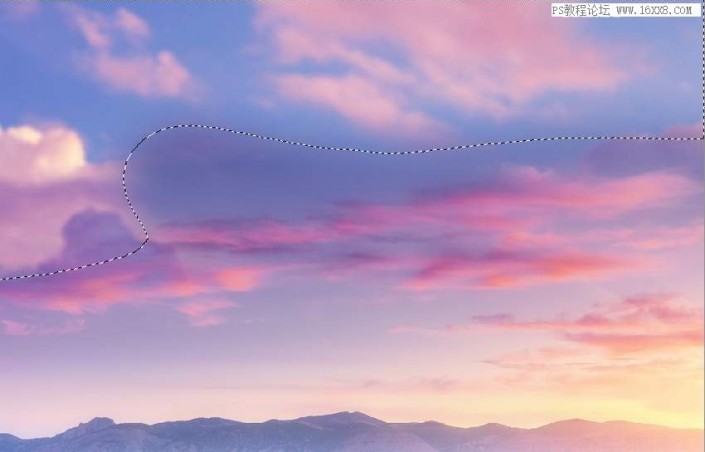
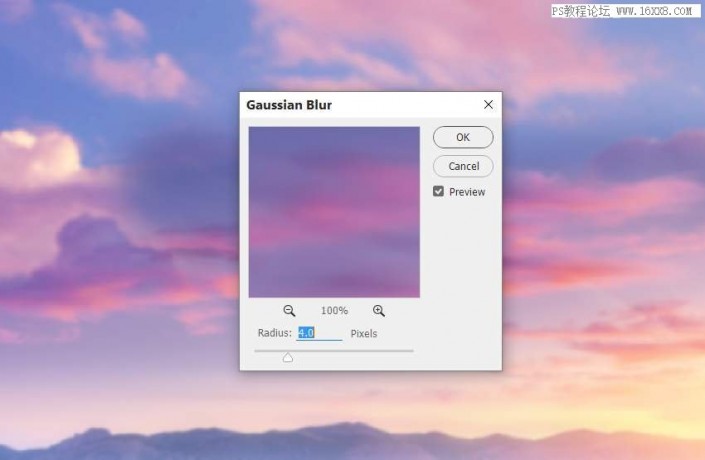
8. Apply a 4px Gaussian Blur to this layer to make the softness of the mountain match the existing sky.
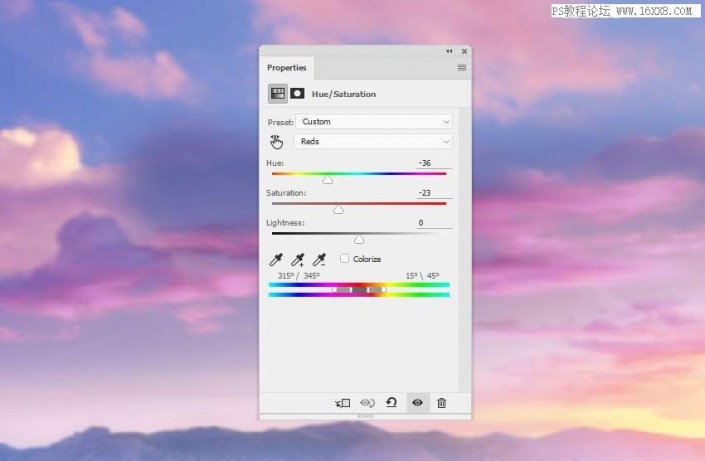
9. Create a Hue/Saturation adjustment layer and set it to “Clipping Mask”. Change the value of red. The parameters are as shown below.
10. Add a Curves adjustment layer (set it as Clipping Mask) to lighten the mountain and the lower part of the sky. On this layer mask, use a soft black brush to erase the lower left corner of these areas below so that they won’t be too bright after applying this adjustment layer.
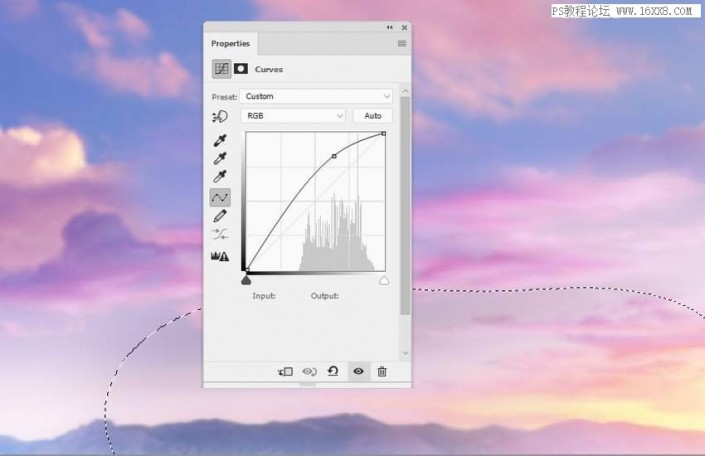
11. To change the position of the light (my goal is to brighten it), please…�Create a new layer on top of the other layers and use a soft brush with the color #ffafb8 to paint in the middle right position of the sky. Change this layer mode to “Overlay 100%” and add a mask to this layer. Use a soft brush to paint the lower areas of light.

12. Create a new layer and use a soft brush with the color #ffba69 to paint a highlight on the right edge of the sky. Change the layer mode of this layer to 90% Hard Light.
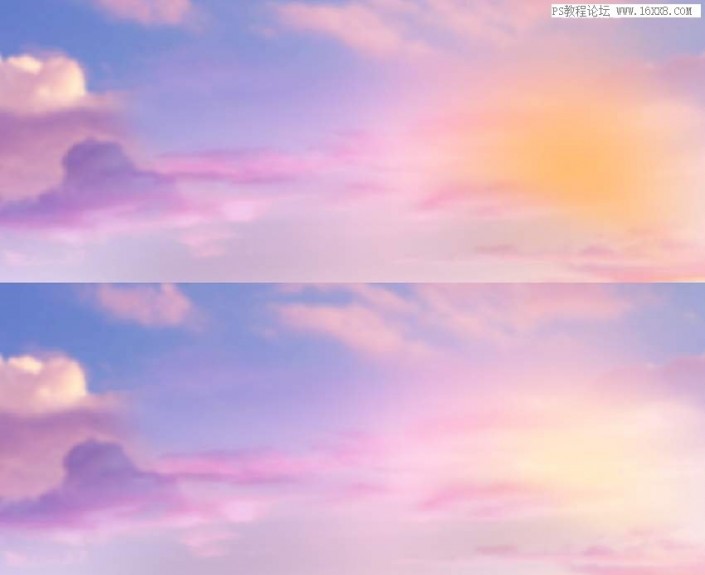
2. Add a tower to the scene
1. Choose a tower with a suitable angle. This is the angle I chose.
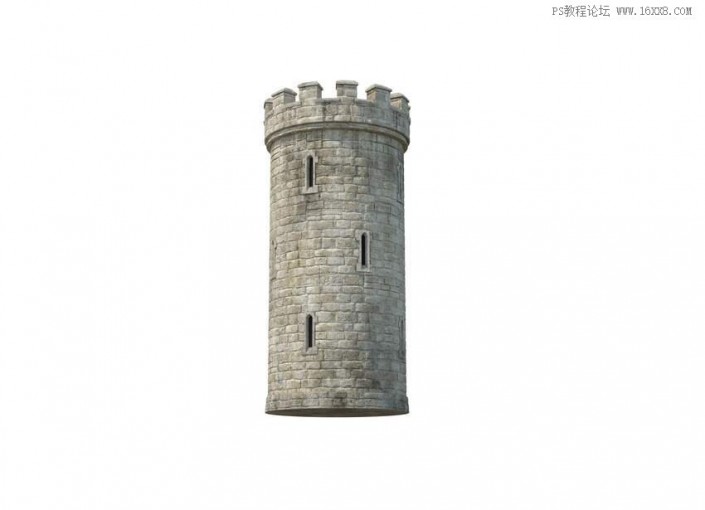
2. Place the tower on the left side of the main canvas, and flip it horizontally to adapt to the direction of the light on the right (“Edit” > “Transform” Flip horizontally)
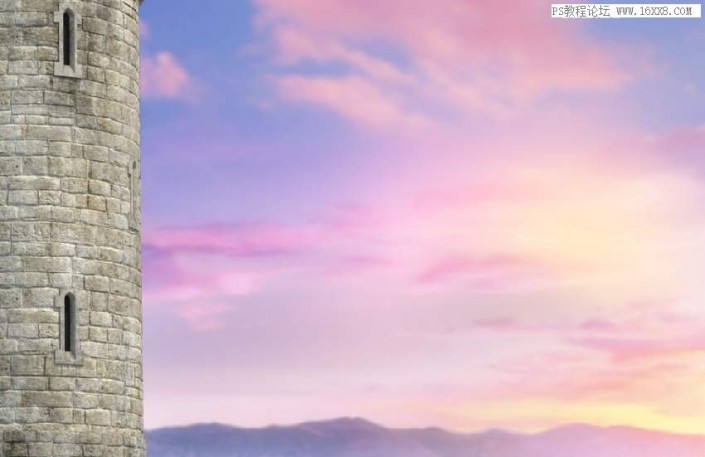
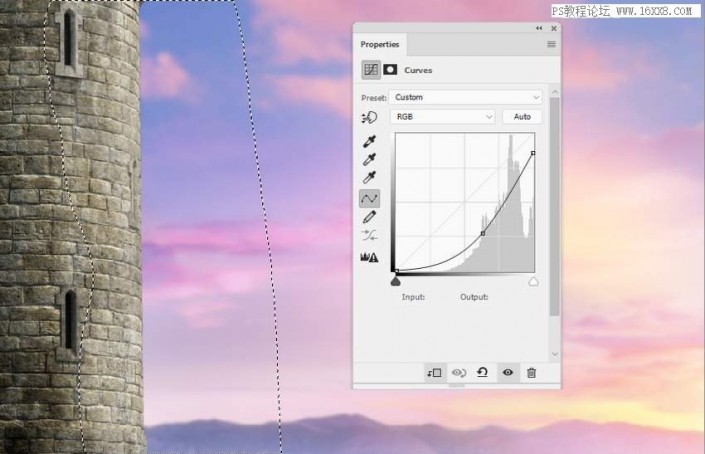
3. Create a new Curves adjustment layer and make the left side of the tower darker since it is in the shadow area. Add a mask on this layer (generally it comes with a mask, so just apply it directly, no need to add it, it is masked), and use a brush on the right side to apply it to maintain its brightness.
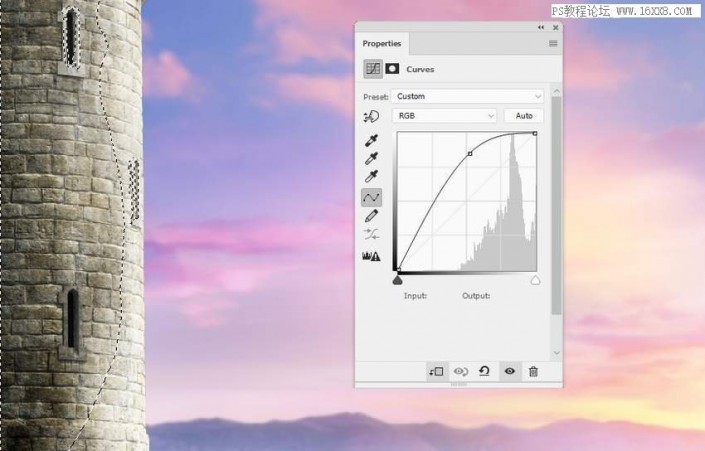
4. Create a new Curves adjustment layer to let more light illuminate the right side. Use the brush to paint on the darker areas on the left so that they are not lit by this adjustment layer.
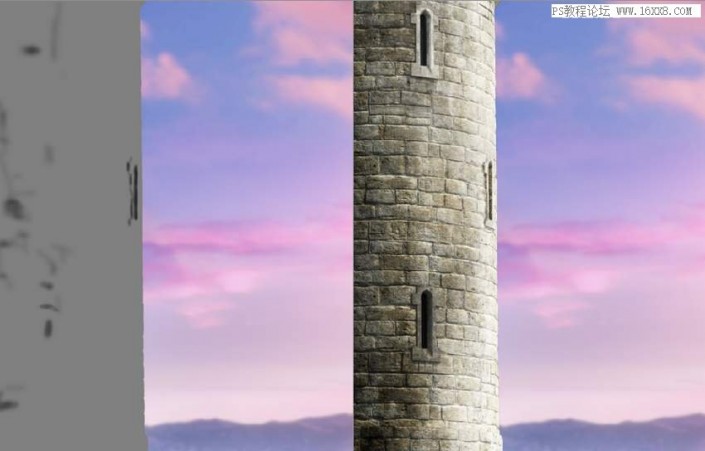
5. Create a new layer, change the mode to “Overlay”, and fill it with 50% gray.

6. Use the Burn Tool (o) and then use a mid-tone Exposure of about 10-15 to enhance the shadows on the window and fix some light detail. You can see how I did it in normal mode, and the results in overlay mode.
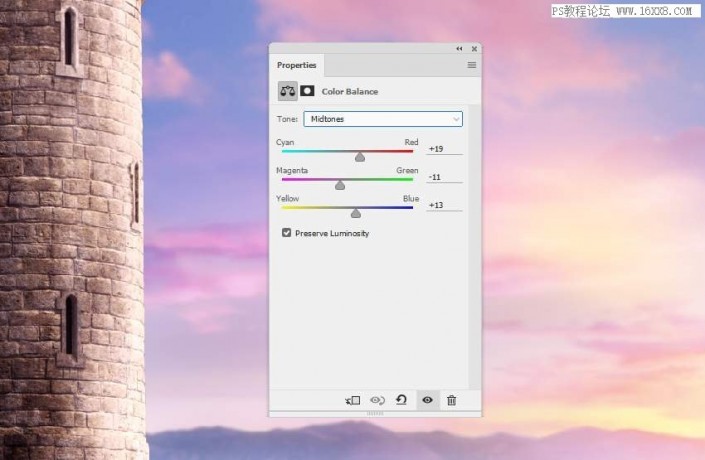
7. Add a Color Balance adjustment layer to bring some warm tones and light to the tower. (midtones/highlights).

8. Use the Photo Filter adjustment layer and select the color #ec2100 to bring more red to the dark areas of the tower. On this layer mask, paint on the bright side of the tower so it won’t be affected by this adjustment layer.

3. Add ivy to the tower
1. Open the Ivy image and use your own method fromExtracted from the scene. Select the top part of the ivy using the Lasso Tool (L), drag it into our working document and place it onto the tower.
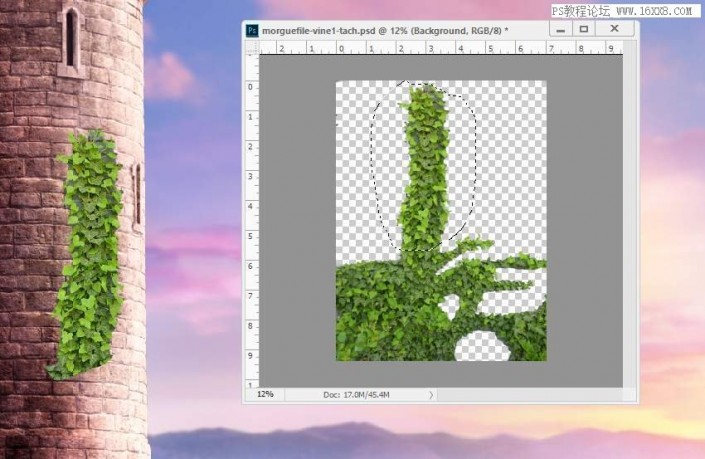
2. Add a mask to this layer and use a small, stiff, black brush to carefully remove some of the hard edges from the ivy.
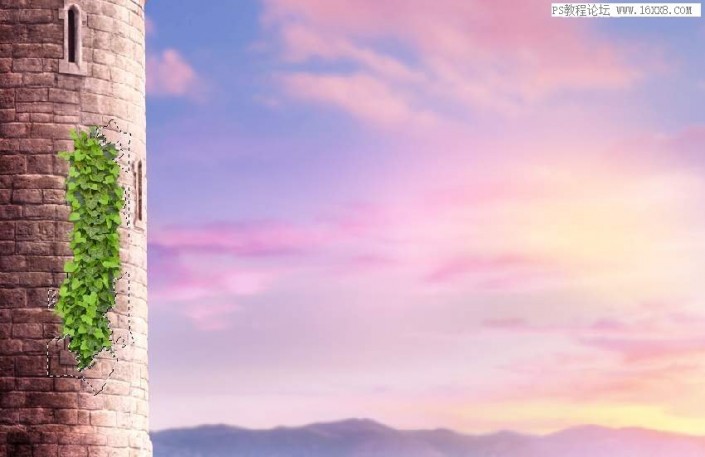
3. Get different parts from the ivy image and add them to the tower. Use layer masks to delete the unnecessary parts. I recommend that you use a hard black brush when erasing the edges of the ivy, otherwise the result will look unnatural.
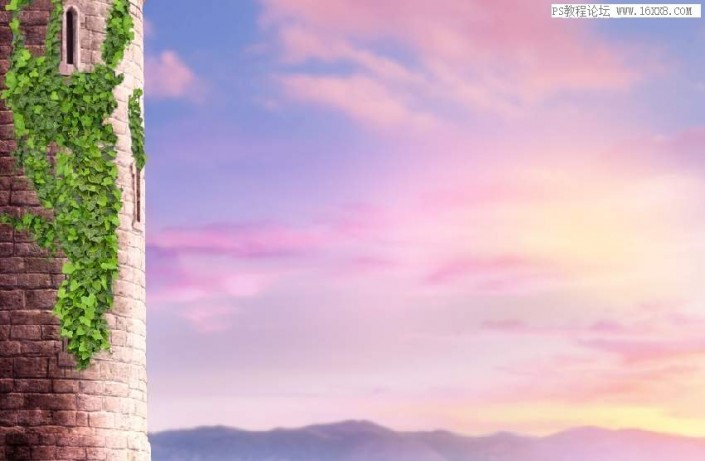
4. Create a new layer below the ivy layer and use a soft brush with color #16130f and an opacity of about 30-40 to shade the ivy on the tower walls.

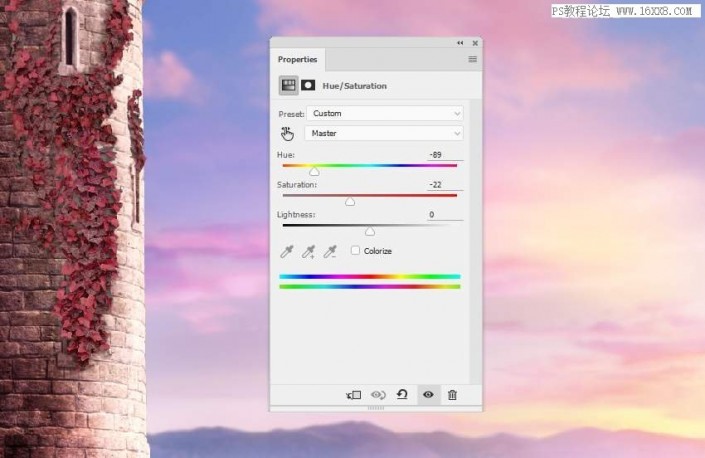
5. Select all the ivy layers and hit ctrl-g to create a group for them. Change the mode of this group to “100% Normal” and add a Hue/Saturation adjustment layer to change the color of the ivy.
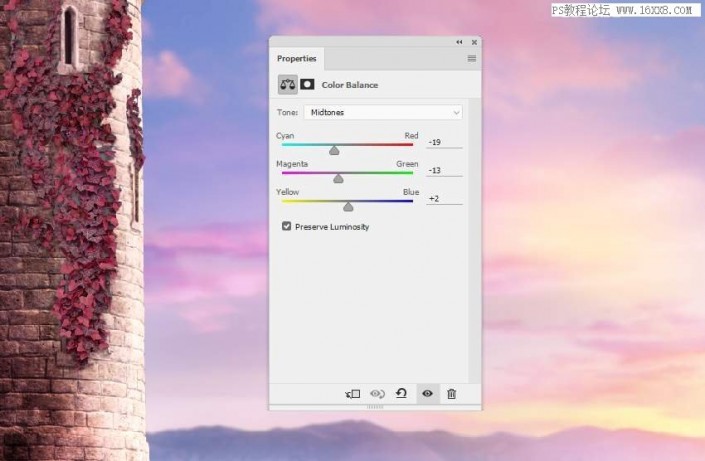
6. Create a new “Color Balance” adjustment layer and change the “Midtones” settings.
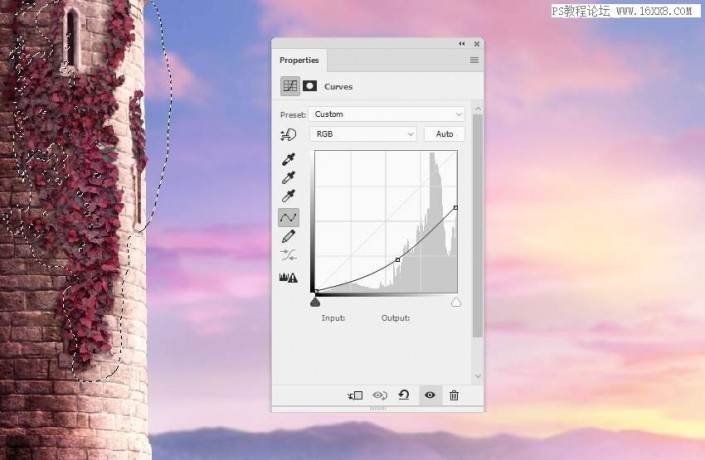
7. Create a Curves adjustment layer to make the dark areas on the ivy darker. Use a brush to paint over the rest so that it won’t be darkened by this adjustment layer.
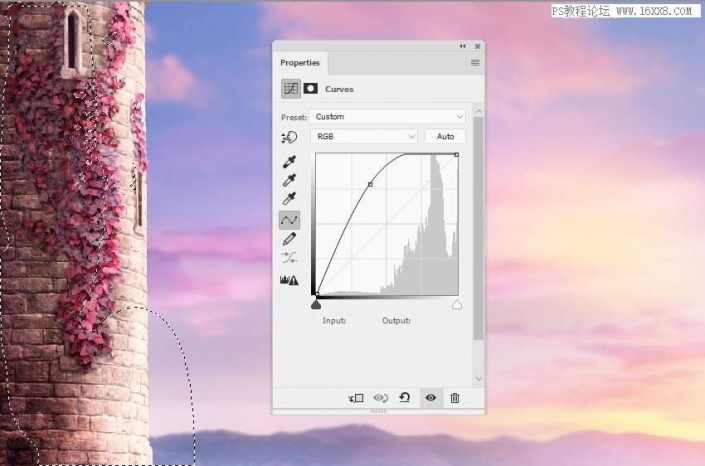
8. Create a new Curves adjustment layer again and let the highlight shine to the front of the tower. The selected area as shown in the picture is the location that needs to be painted on the layer mask.
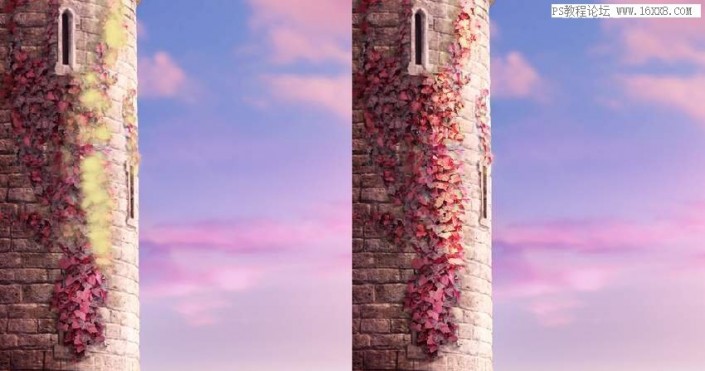
9. Create a new layer on top of the other layers and use a soft brush with the color #efe29c to color the ivy in front of the tower. Change this layer mode to “100% Overlay”.
4. Add a bridge to the scene
1. Cut out the bridge and place it at the bottom of the canvas. Add a mask to this layer and use the Polygonal Lasso Tool to select the unkeyed background and higher parts of the bridge. Use a hard black brush to paint over these selections to remove them.
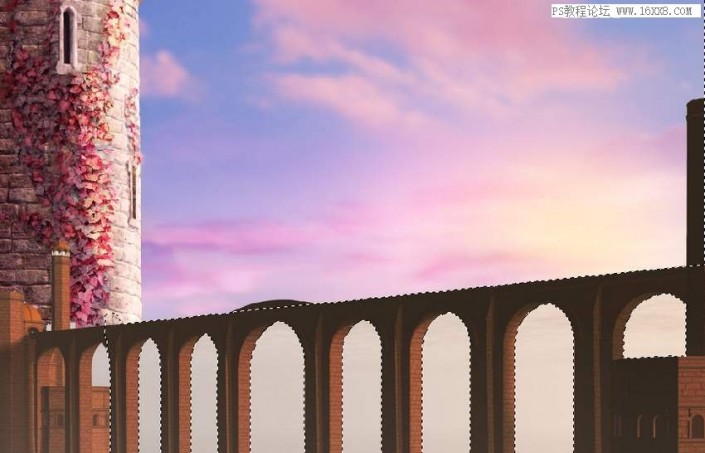
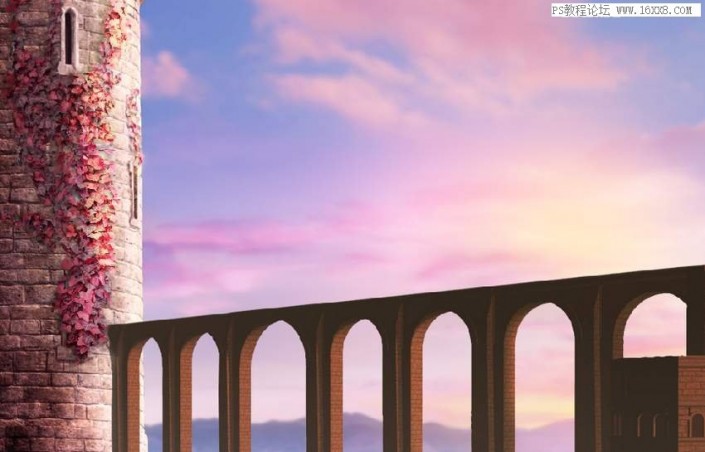
2. Create a new Hue/Saturation adjustment layer to change the color of the bridge.

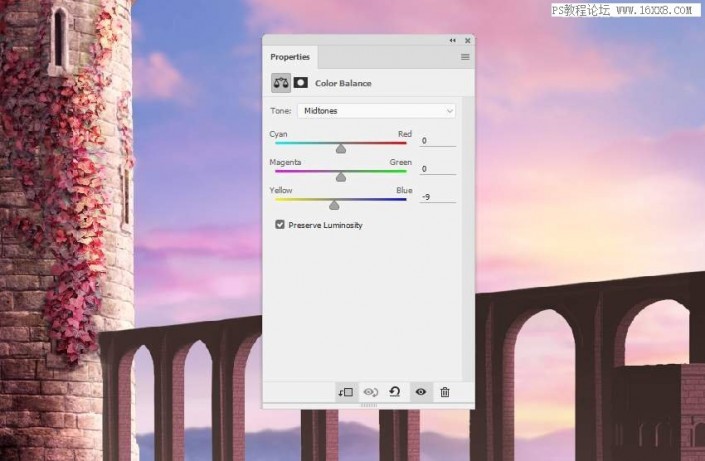
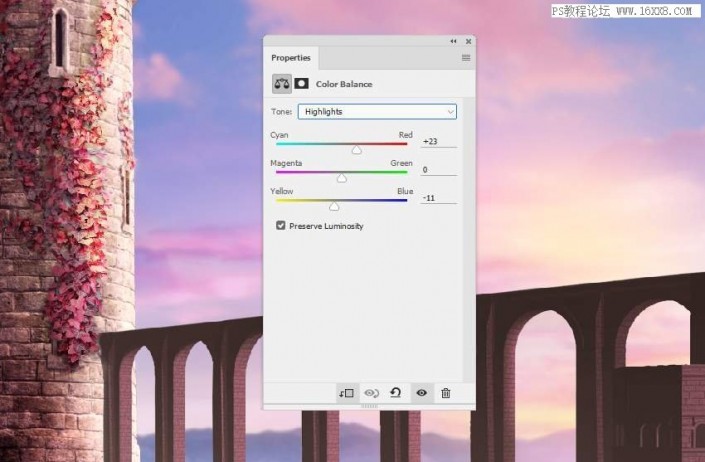
3. Create a color balance adjustment layer with the same purpose.Change the Midtones and Highlights values.
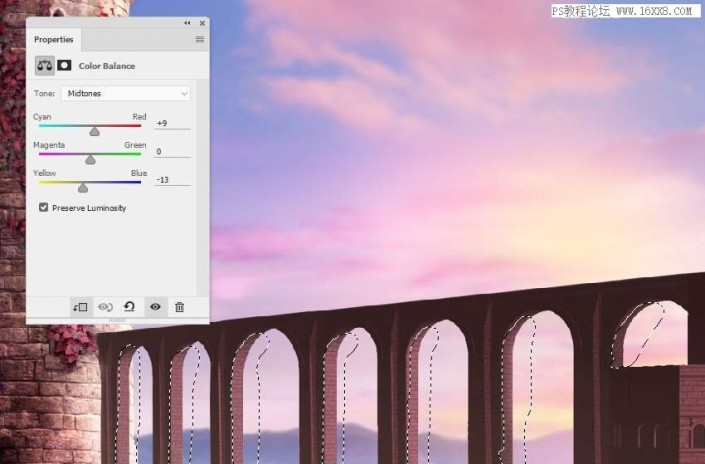
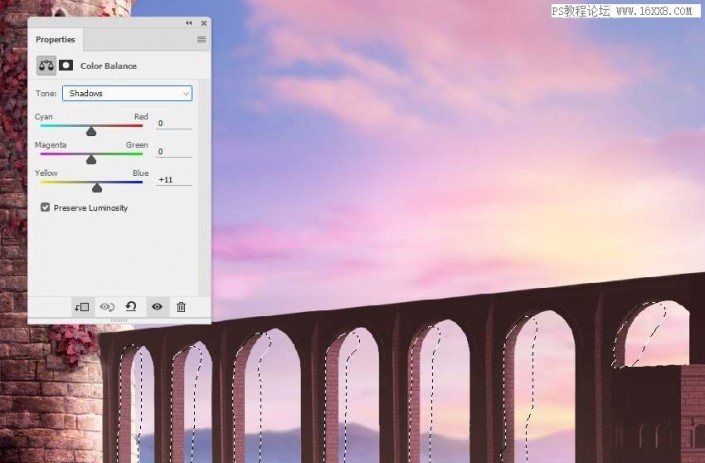
4. Add a Color Balance adjustment layer again and change the “Midtones” and “Shadows” settings. Paint on the bright parts of the bridge opening so that they are not affected by this adjustment layer.
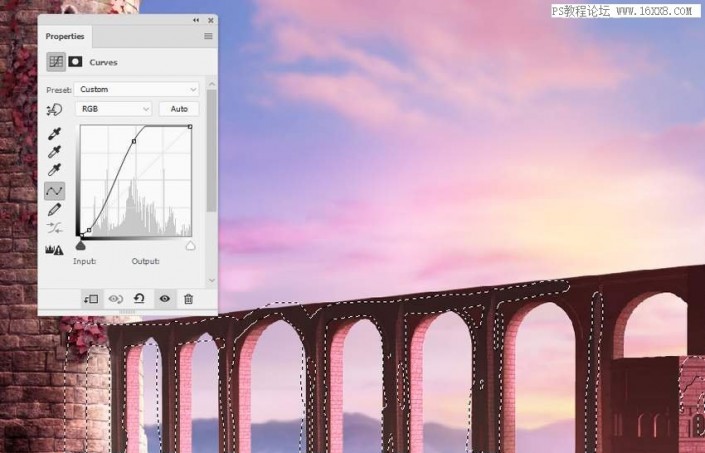
5. Create a new Curves adjustment layer to increase the highlights and contrast of the bridge. On the layer mask, paint on the shadowed dark areas of the bridge so they don’t become too dark.
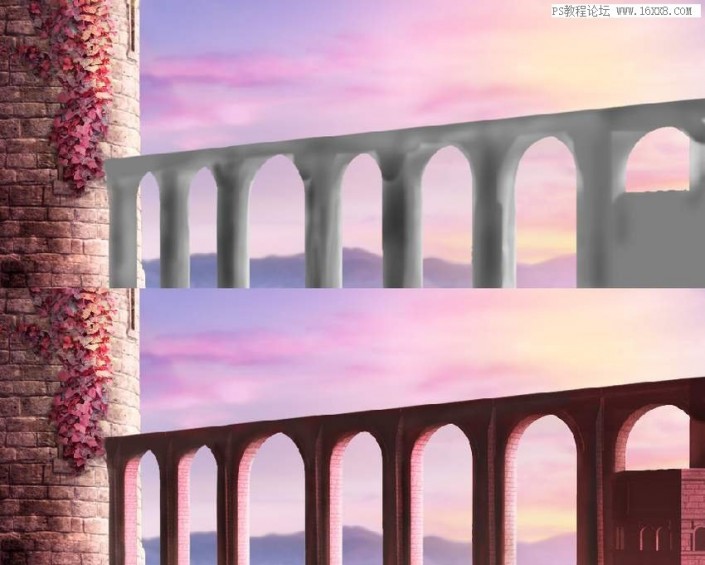
6. Create a new layer, change the mode to “100% Overlay”, and fill it with 50% gray. Use the Dodge Tool and Burn Tool to refine the lights and shadows of the bridge.
5. Add trees to the scene
1. Add Tree 1 to the lower right corner and Tree 2 (I selected Image 1) to the lower left corner of the canvas. On these layers, apply a 4 px Gaussian Blur to blur the trees. (The tree numbers here are just the author’s names. Please add them according to your own situation and feeling).

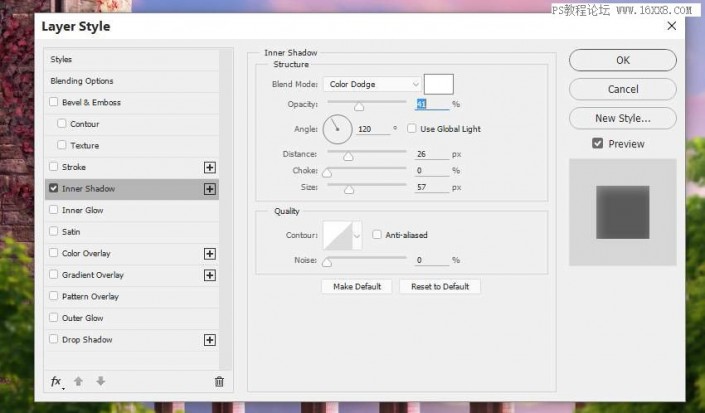
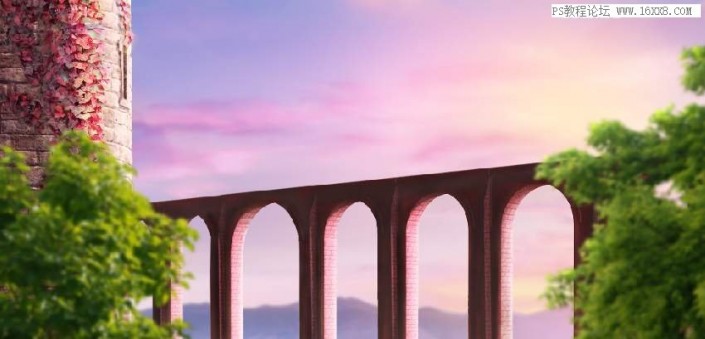
2. Double-click the tree layer 1 and select “Inner Shadow”. Set the shadow’s color to white to add some light to the tops of the leaves.
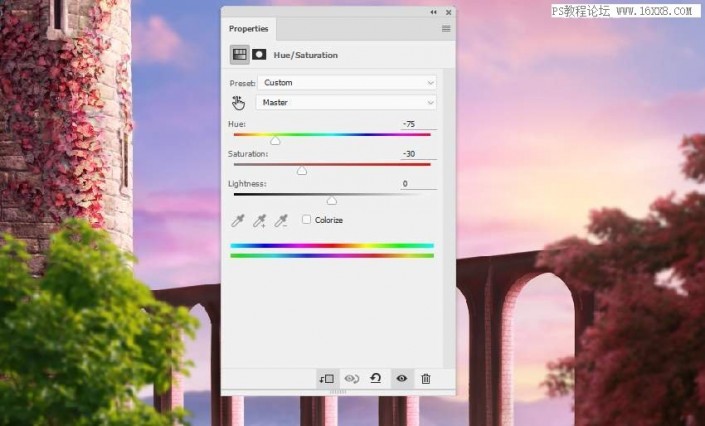
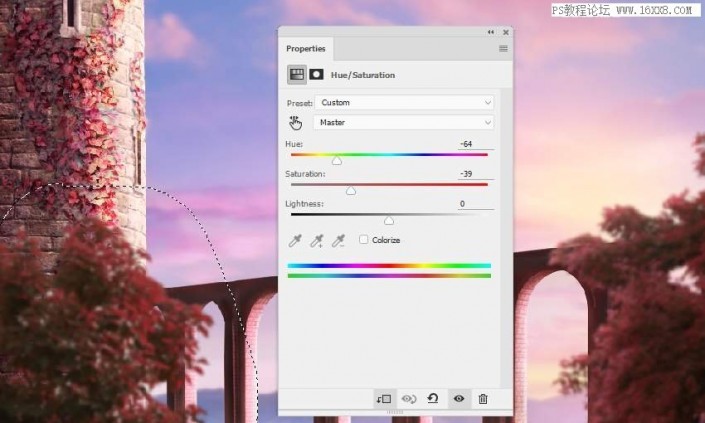
3. Create two Hue/Saturation adjustment layers to change the color of the tree.
4. Create a new Curves adjustment layer to light up the top of tree 2. Paint over the shaded areas of the tree to maintain its brightness.
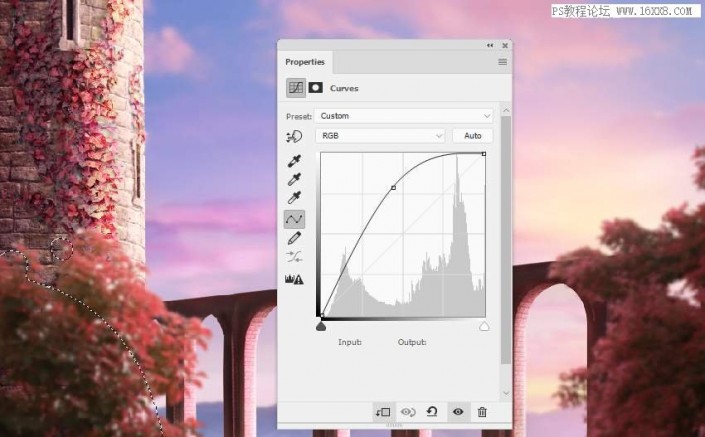
5. Create a group for the tree layer and add a “Color Balance” adjustment layer to this group to convert the color of the tree to pink.
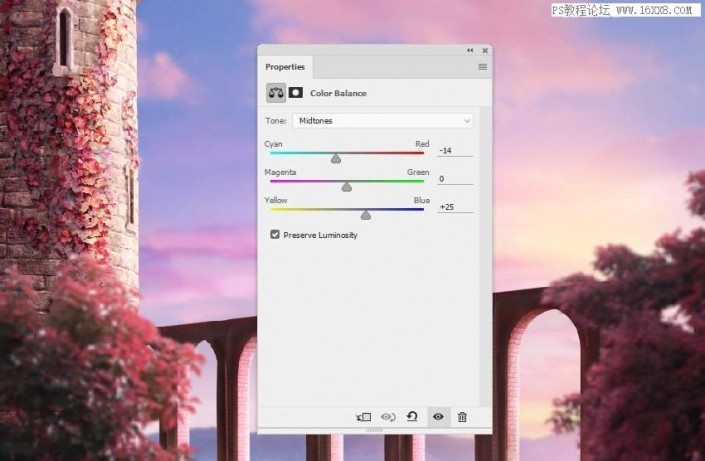
6. Add a Curves adjustment layer to bring more highlights to the top/front of the tree.
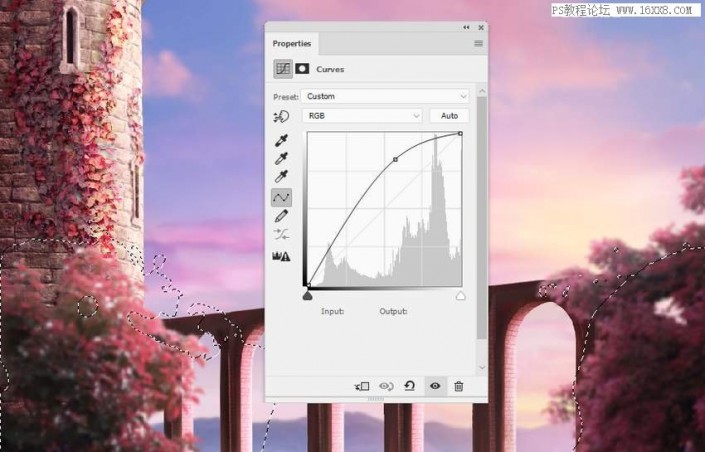
7. Create a new layer on top of the layers and paint on the top of the tree using a soft brush with the color #efe29c and an opacity of about 40-50%. Change this layer mode to “100% Overlay”.
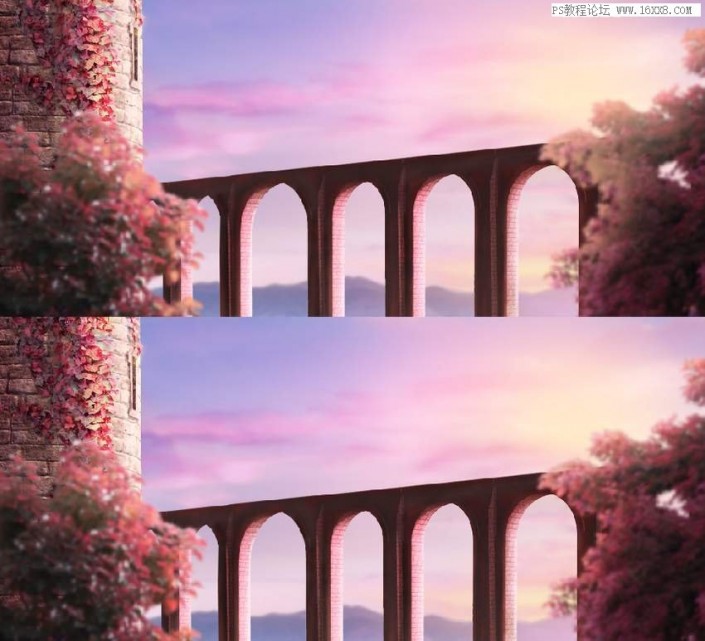
8. Open the Tree 3 image and use the Polygonal Lasso Tool to select the tree on the left and drag it to the right of the main canvas. Flip it horizontally and use the Free Transform Tool (Control-T) with Distort mode to adjust the shape of the tree.
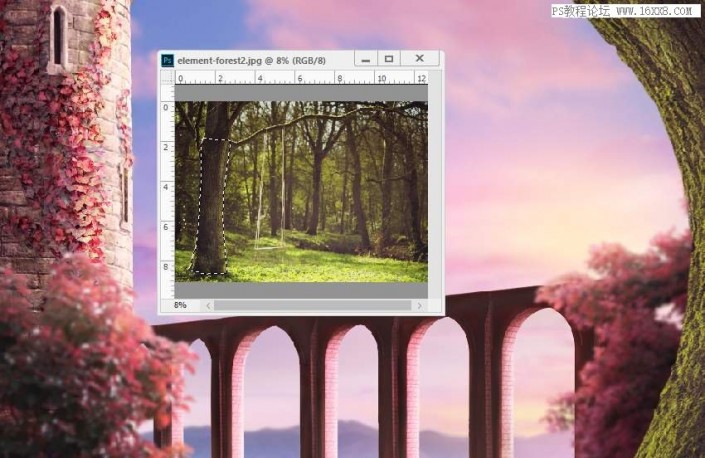
9. Apply a 7 px Gaussian Blur to this tree layer. A larger blur radius helps increase the depth of field in a scene.
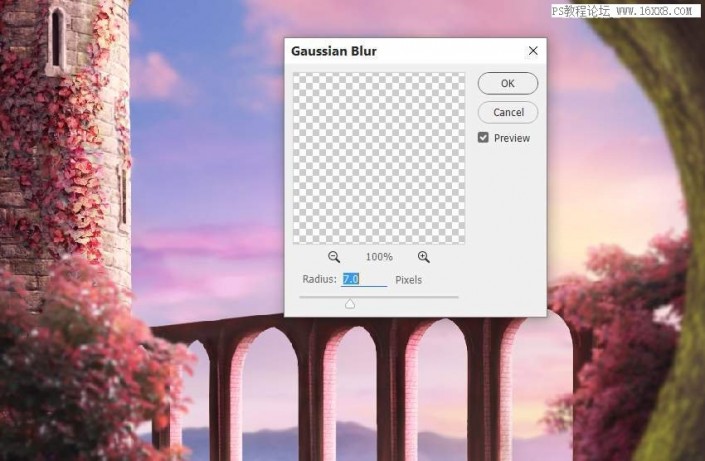
10. Add a Hue/Saturation adjustment layer to desaturate the tree.
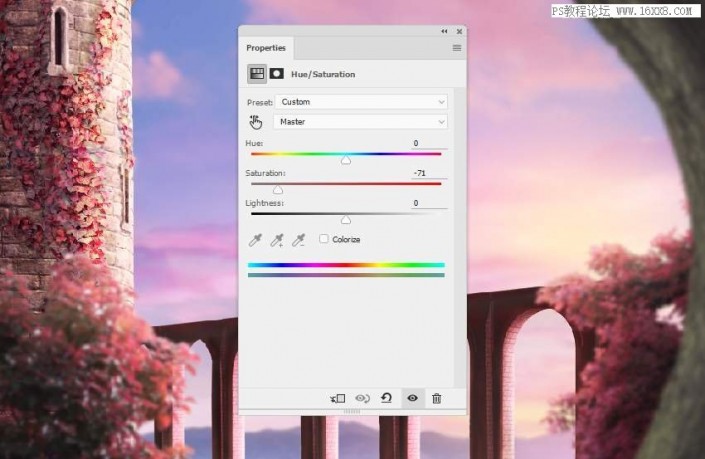
11. Add a Color Balance adjustment layer to add red to the tree.
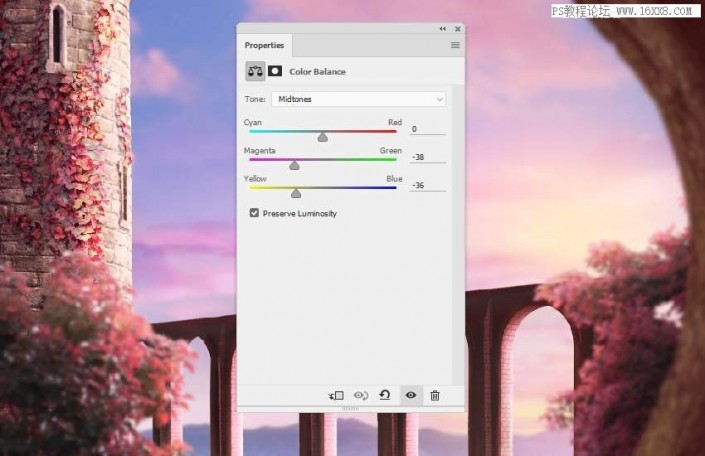

12. Use a Curves adjustment layer to darken the dark areas of the tree. Paint on the front of the tree to maintain brightness.
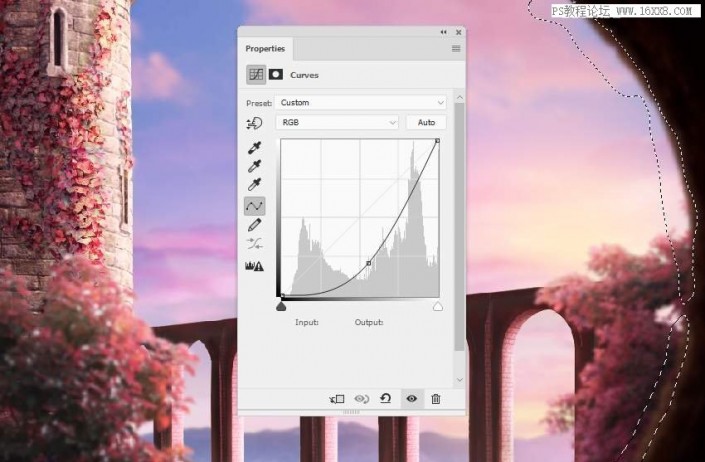
13. Select tree 4 and place it on top of tree 3. Use ctrl-t to rotate it to fit the angular pose of Tree 3.
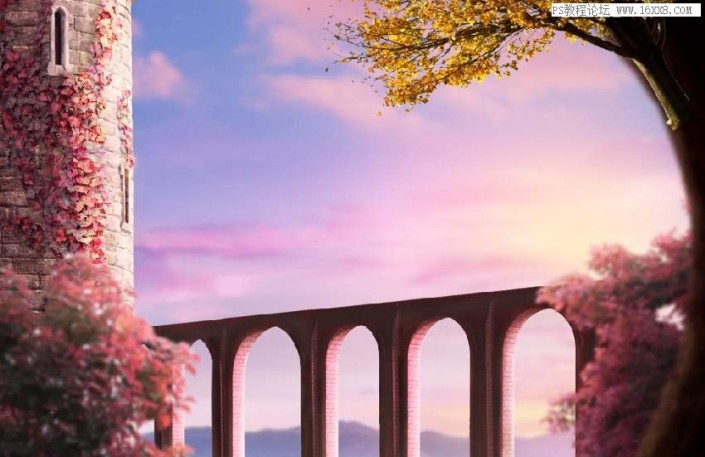

14. Apply a 9px Gaussian blur to this tree layer to blend and match the softness of the tree and tree 3.

15. Add a Hue/Saturation adjustment layer to change the color of the tree.
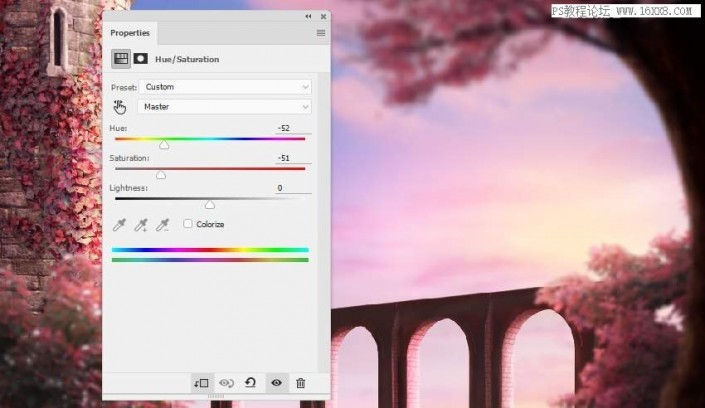
16. Add a Curves adjustment layer to lighten the front of the tree. On the layer mask, paint on the shadow details to maintain their contrast.
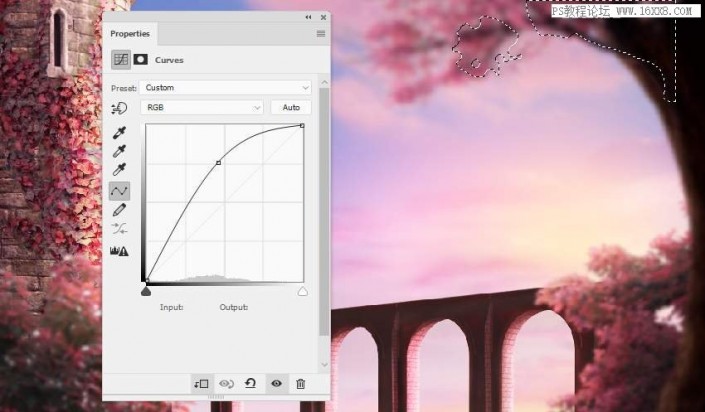
17. Create a new layer, change the mode to “100% Overlay”, and fill it with 50% gray. Use the Burn tool to make certain details in dark areas darker.

6. Add characters to the scene
1. Cut out the character, place her in the center of the bridge, and flip her horizontally.�
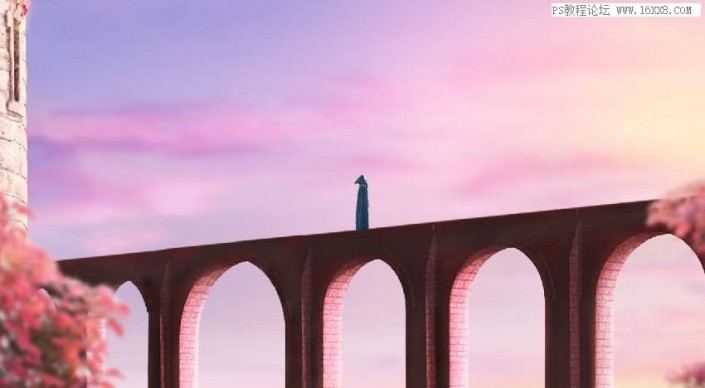
2. Go to Edit > Override Transformation and make the character raise its head.

3. Return to the original character image, and select her cloak, then add it to the character in the working document. Use Free Transform to adjust the cape and match it to the character.

4. Add a mask to this layer to delete the bottom part of the character’s feet.
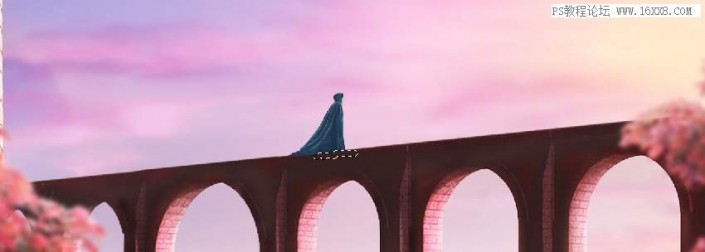
5. Use the Dodge and Burn tools on each of these layers to apply light, shadow and detail to the character and cape. (Before doing this, follow the previous steps to create a neutral gray/wp-content/uploads/2024/03/15/dwyw4aghob4 layer).

6. Create a group for the character layer and add a Hue/Saturation adjustment layer to desaturate the character.
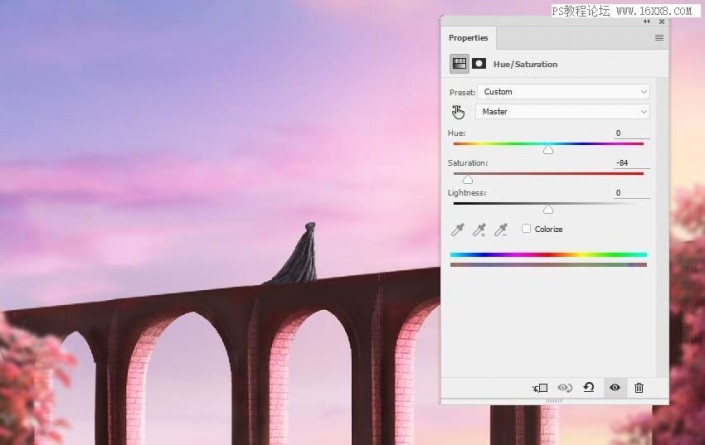
7. Add a Color Balance adjustment layer to match it with the rest of the scene.
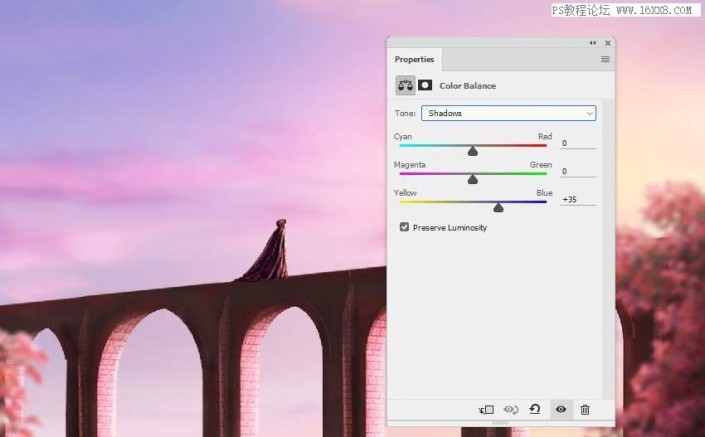
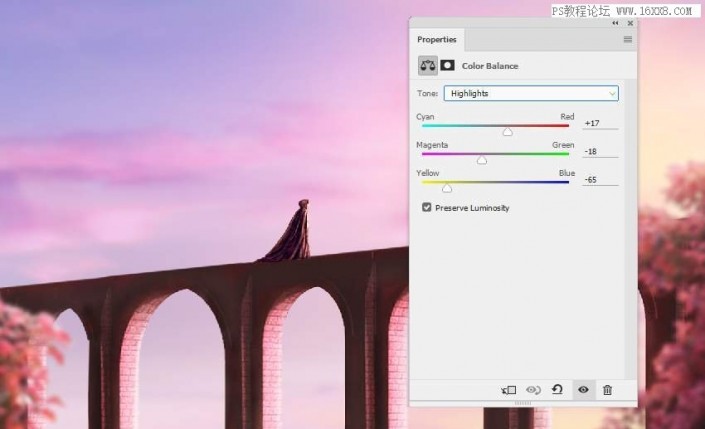
8. Use the Curves adjustment layer to enhance the highlights in front of the character. Paint on the back side so that it won’t be lit by this adjustment layer.
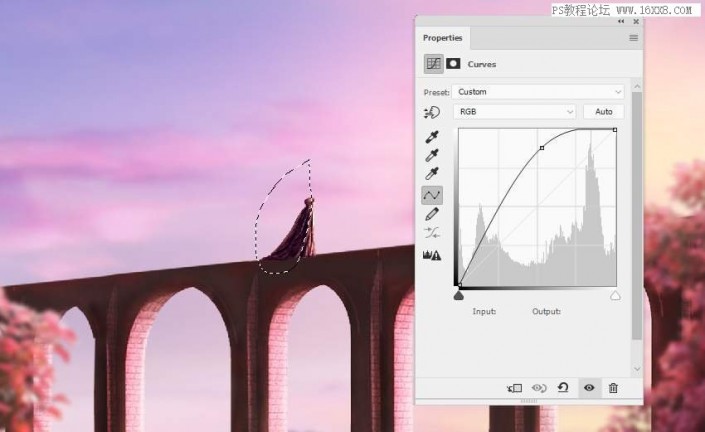
7. Add atmosphere to the scene
1. Open the leaf image. Take the first leaf (from the left) and add it to the main canvas, then ctrl-t, then select the top switch between Free Mode and Transform Mode to make adjustments to the leaves.
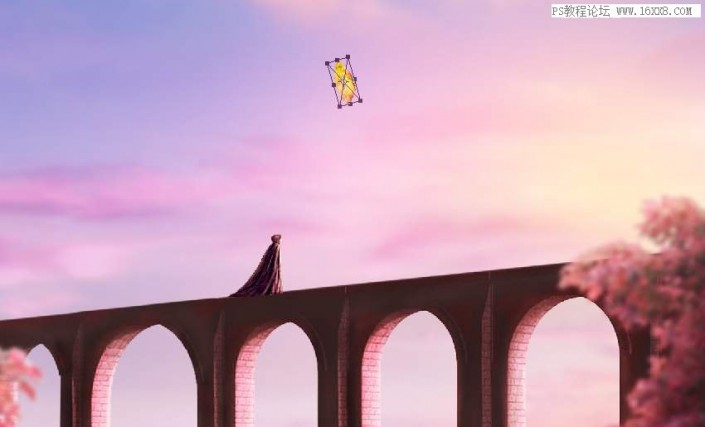
2. Take different leaves, add them around the characters, and twist them into different forms.

3. Add more leaves around the canvas and apply the Gaussian Blur filter to these leaves. Set the Blur Radius from 2 to 12 px to increase the depth of field effect of the scene. For larger leaves on the edges, use a larger blur radius.
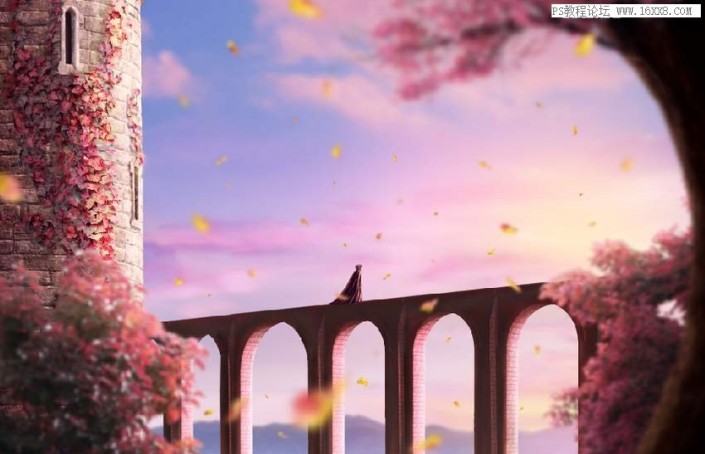
4. Create a group for the leaves layer and use a Hue/Saturation adjustment layer to change the color of the leaves.
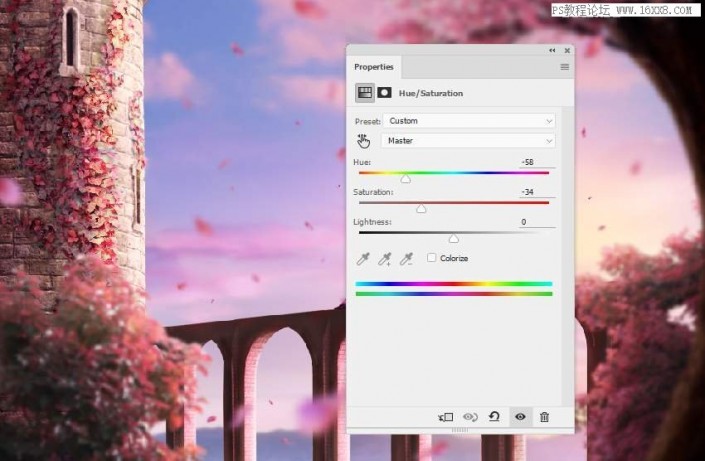
5. Add a Color Balance adjustment layer to bring a yellow light to the leaves.
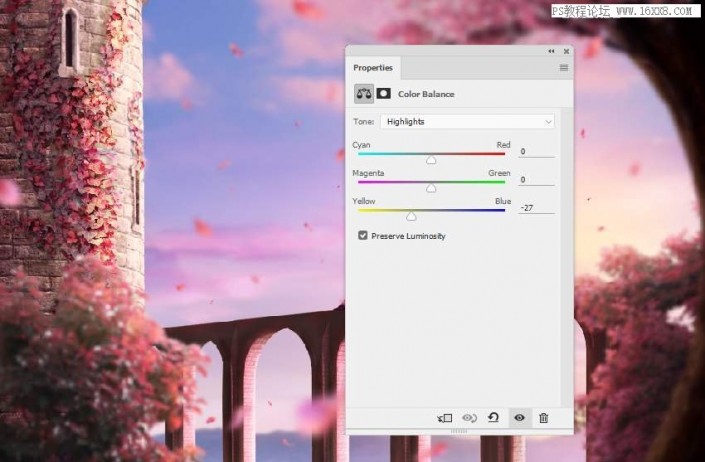
6. Add a Curves adjustment layer to darken the leaves. Paint on the right side of the leaf to reveal the highlights there.
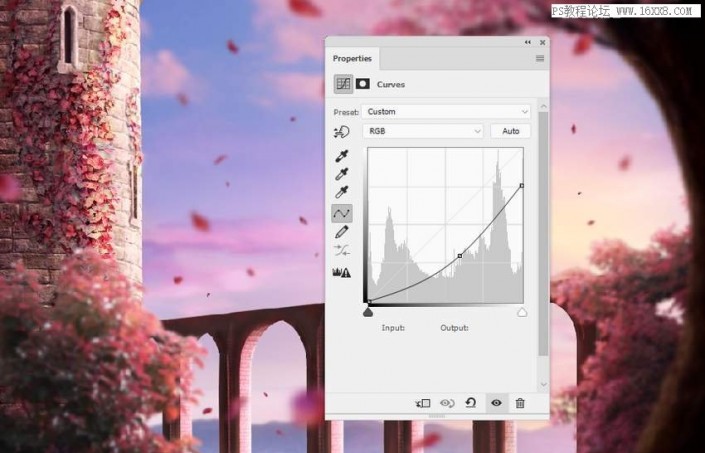
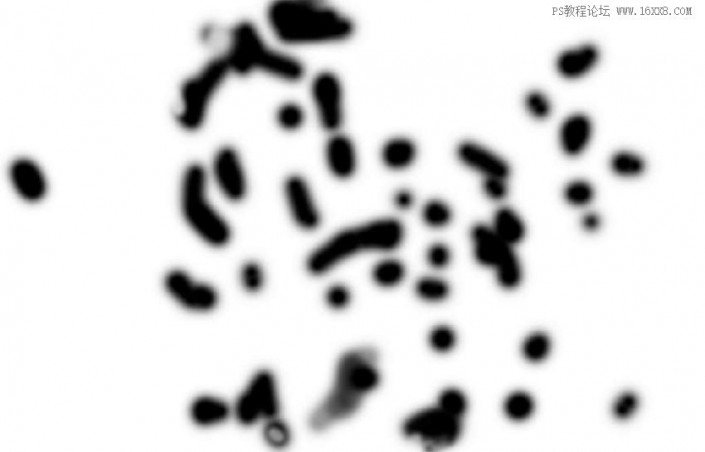
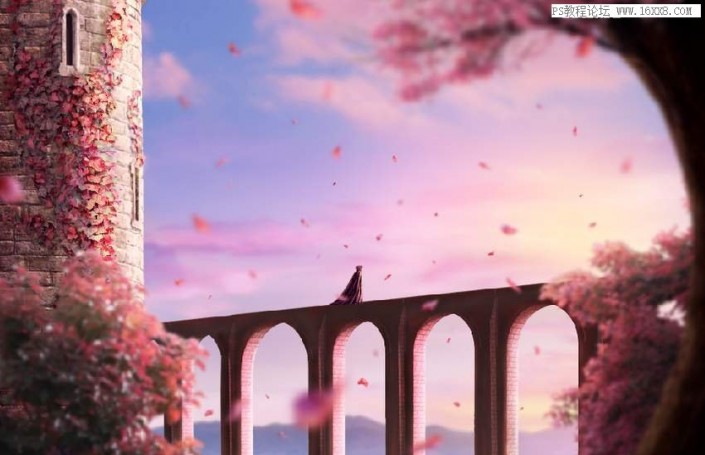
7. Add a new Curves adjustment layer to add more highlights and paint on the left side to keep the bright side of the leaves.
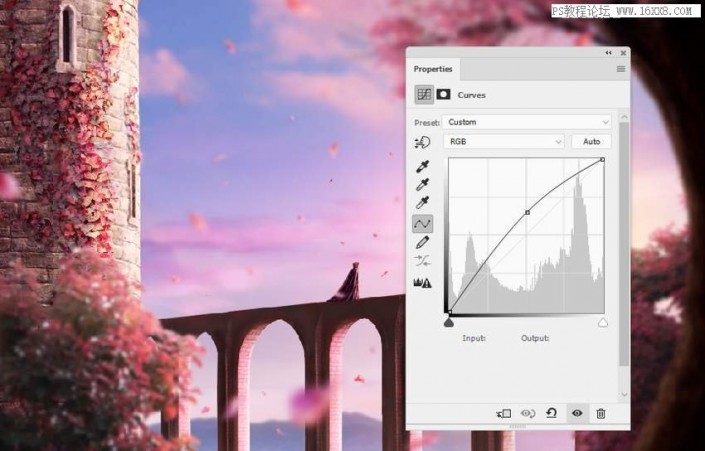

8. Make the final touches
1. Create a “Color Balance” adjustment layer on top of the other layers and change the “Midtones” value. (You can also directly merge a new picture for individual adjustments).
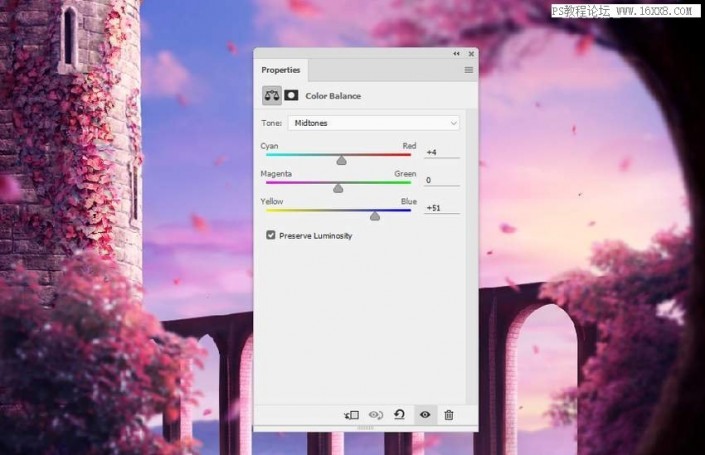
2. Add a photo filter adjustment layer and select the color #f2eb83.
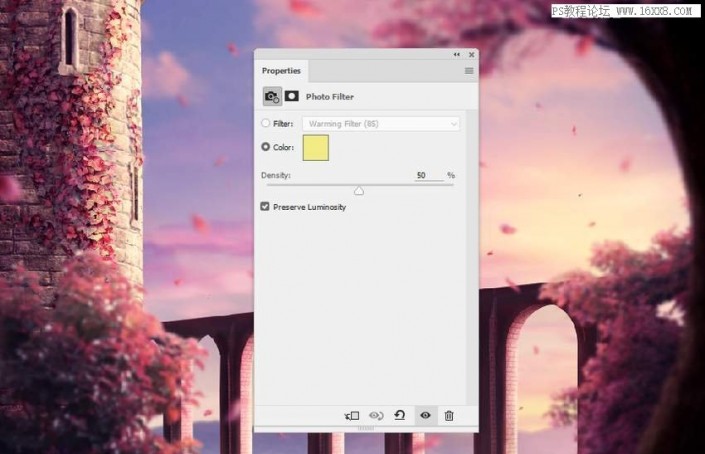
3. Add an optional color adjustment layer and change the parameters for red, yellow, and magenta. On the layer mask, paint in the upper left corner of the scene to reduce the red effect there.

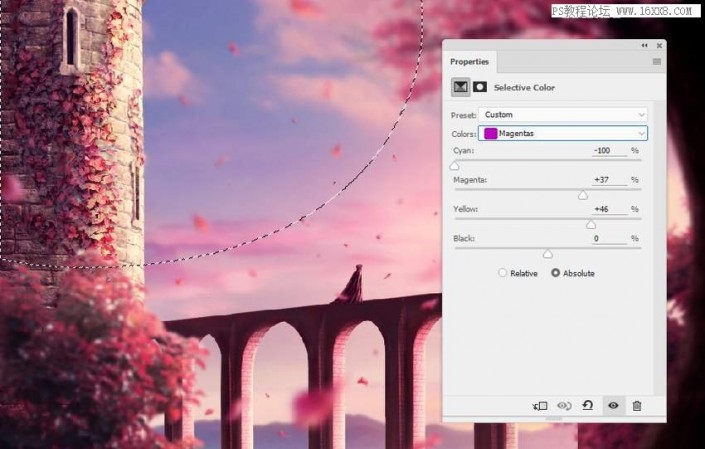
4. Use a Color Balance adjustment layer to increase the brightness (vibrancy) of the sunlight and edges. Paint on top of the rest so it won’t be affected by this adjustment layer.
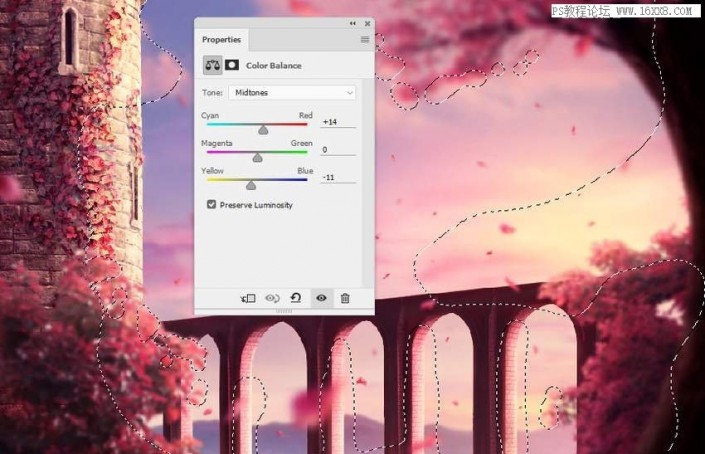

5. Add a Curves adjustment layer to darken the edges of the canvas. Apply in the middle to maintain its brightness.

Complete:
 If you want to learn more, please visit www.16xx8.com
The whole scene is quite dreamy, and it is a perfect work in terms of composition and color. Let’s learn about it together, students.
This tutorial uses PS to synthesize a dreamy two-dimensional scene. It uses a lot of materials, but the materials are not the key. The key is that we learn the method through the tutorial. The key point of the scene is creativity. What the students see The great scenes are all integrated with the author’s imagination and creativity. When we are learning, we should also create according to the ideas. Let’s learn through the tutorial together.
Rendering:
 If you want to learn more, please visit www.16xx8.com
Operation steps:
1. Start by building a basic scene
1. Create a new 2000 x 1286 px document in photoshop using the given parameters: (This is an exercise so please determine the size of your work based on the size of your material and other factors)

2. Open the sky image and use the Move Tool (v) to drag it onto the white canvas. Convert this layer to a Smart Object /wp-content/uploads/2024/03/15/pgfbjtxe3zc

3. Go to Blur > Gaussian Blur and set the Radius to 6 px. This step is to separate the background and main elements, not to increase depth of field.

4. Select the layer (remember to clip to the sky) > New Adjustment Layer > Color Balance to change the color of the sky. Change the midtone value.

5. Create a new Curves adjustment layer to increase the contrast and brightness of the sky.

6. Open the mountain image and place it in the lower part of the main canvas. on top of the sky layer.

7. Click the second icon at the bottom of the “Layer” panel to add Mask/wp-content/uploads/2024/03/15/thto24xmff0 to this layer. Paint with a soft round brush in black to remove the hard edges of the sky and make it blend with the existing background.

8. Apply a 4px Gaussian Blur to this layer to make the softness of the mountain match the existing sky.

9. Create a Hue/Saturation adjustment layer and set it to “Clipping Mask”. Change the value of red. The parameters are as shown below.

10. Add a Curves adjustment layer (set it as Clipping Mask) to lighten the mountain and the lower part of the sky. On this layer mask, use a soft black brush to erase the lower left corners of these areas below after applying this adjustment layerThey are not too bright.

11. To change the position of the light (my goal is to brighten it), create a new layer on top of the other layers and paint in the middle right of the sky using a soft brush with the color #ffafb8 . Change this layer mode to “Overlay 100%” and add a mask to this layer. Use a soft brush to paint the lower areas of light.

12. Create a new layer and use a soft brush with the color #ffba69 to paint a highlight on the right edge of the sky. Change the layer mode of this layer to 90% Hard Light.

2. Add a tower to the scene
1. Choose a tower with a suitable angle. This is the angle I chose.

2. Place the tower on the left side of the main canvas, and flip it horizontally to adapt to the direction of the light on the right (“Edit” > “Transform” Flip horizontally)

3. Create a new Curves adjustment layer and make the left side of the tower darker since it is in the shadow area. Add a mask on this layer (generally it comes with a mask, so just apply it directly, no need to add it, it is masked), and use a brush on the right side to apply it to maintain its brightness.

4. Create a new Curves adjustment layer to let more light illuminate the right side. Use the brush to paint on the darker areas on the left so that they are not lit by this adjustment layer.

5. Create a new layer, change the mode to “Overlay”, and fill it with 50% gray.

6. Use the Burn Tool (o) and then use a mid-tone Exposure of about 10-15 to enhance the shadows on the window and fix some light detail. You can see how I did it in normal mode, and the results in overlay mode.

7. Add a Color Balance adjustment layer to bring some warm tones and light to the tower. (midtones/highlights).


8. Use the Photo Filter adjustment layer and select the color #ec2100 to bring more red to the dark areas of the tower. On this layer mask, paint on the bright side of the tower so it won’t be affected by this adjustment layer.
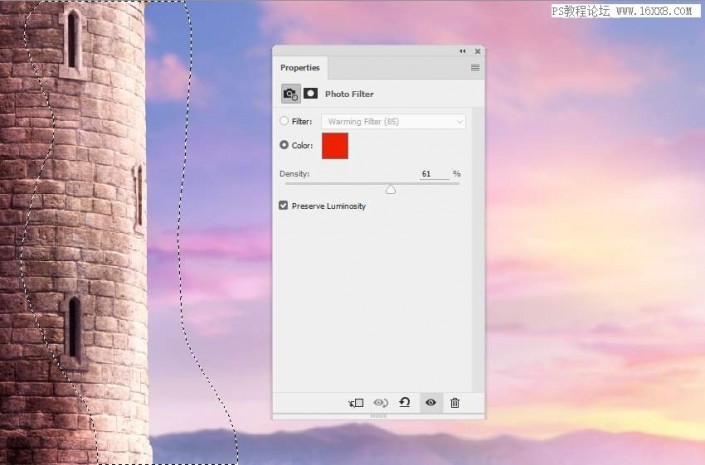
3. Add ivy to the tower
1. Open the ivy image and use your own method to extract it from the background. Select the top part of the ivy using the Lasso Tool (L), drag it into our working document and place it onto the tower.

2. Add a mask to this layer and use a small, stiff, black brush to carefully remove some of the hard edges from the ivy.

3. Get different parts from the ivy image and add them to the tower. Use layer masks to delete the unnecessary parts. I recommend that you use a hard black brush when erasing the edges of the ivy, otherwise the result will look unnatural.

4. Create a new layer below the ivy layer and use a soft brush with color #16130f and an opacity of about 30-40 to shade the ivy on the tower walls.

5. Select all the ivy layers and hit ctrl-g to create a group for them. Change the mode of this group to “100% Normal” and add a Hue/Saturation adjustment layer to change the color of the ivy.

6. Create a new “Color Balance” adjustment layer and change the “Midtones” settings.

7. Create a Curves adjustment layer to make the dark areas on the ivy darker. Use a brush to paint over the rest so that it won’t be darkened by this adjustment layer.

8. Create a new Curves adjustment layer again and let the highlight shine to the front of the tower. The selected area as shown in the picture is the location that needs to be painted on the layer mask.

9. Create a new layer on top of the other layers and use a soft brush with the color #efe29c to color the ivy in front of the tower. Change this layer mode to “100% Overlay”.

4. Add a bridge to the scene
1. Cut out the bridge and place it at the bottom of the canvas. Add a mask to this layer and use the Polygonal Lasso Tool to select the unkeyed background and higher parts of the bridge. Use a hard black brush to paint over these selections to remove them.


2. Create a new Hue/Saturation adjustment layer to change the color of the bridge.
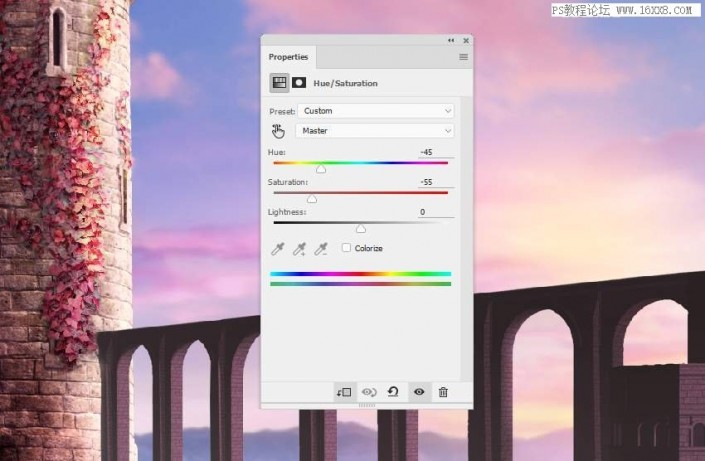
3. Create a color balance adjustment layer with the same purpose. Change the Midtones and Highlights values.


4. Add a Color Balance adjustment layer again and change the “Midtones” and “Shadows” settings. Paint on the bright parts of the bridge opening so that they are not affected by this adjustment layer.


5. Create a new Curves adjustment layer to increase the highlights and contrast of the bridge. On the layer mask, paint on the shadowed dark areas of the bridge so they don’t become too dark.

6. Create a new layer, change the mode to “100% Overlay”, and fill it with 50% gray. Use the Dodge Tool and Burn Tool to refine the lights and shadows of the bridge.

5. Add trees to the scene
1. Add Tree 1 to the lower right corner and Tree 2 (I selected Image 1) to the lower left corner of the canvas. On these layers, apply a 4 px Gaussian Blur to blur the trees. (The tree numbers here are just the author’s names. Please add them according to your own situation and feeling).

2. Double-click the tree layer 1 and select “Inner Shadow”. Set the shadow’s color to white to add some light to the tops of the leaves.


3. Create two Hue/Saturation adjustment layers to change the color of the tree.


4. Create a new Curves adjustment layer to light up the top of tree 2. Paint over the shaded areas of the tree to maintain its brightness.

5. Create a group for the tree layer and add a “Color Balance” adjustment layer to this group to convert the color of the tree to pink.

6. Add a Curves adjustment layer to bring more highlights to the top/front of the tree.

7. Create a new layer on top of the layers and paint on the top of the tree using a soft brush with the color #efe29c and an opacity of about 40-50%. Change this layer mode to “100% Overlay”.

8. Open the Tree 3 image and use the Polygonal Lasso Tool to select the tree on the left and drag it to the right of the main canvas. Flip it horizontally and use the Free Transform Tool (Control-T) with Distort mode to adjust the shape of the tree.

9. Apply a 7 px Gaussian Blur to this tree layer. A larger blur radius helps increase the depth of field in a scene.

10. Add a Hue/Saturation adjustment layer to desaturate the tree.

11. Add a Color Balance adjustment layer to add red to the tree.


12. Use a Curves adjustment layer to darken the dark areas of the tree. Paint on the front of the tree to maintain brightness.

13. Select tree 4 and place it on top of tree 3. Use ctrl-t to rotate it to fit the angular pose of Tree 3.


14. Apply a 9px Gaussian blur to this tree layer to blend and match the softness of the tree and tree 3.

15. Add a Hue/Saturation adjustment layer to change the color of the tree.

16. Add a Curves adjustment layer to lighten the front of the tree. On the layer mask, paint on the shadow details to maintain their contrast.

17. Create a new layer, change the mode to “100% Overlay”, and fill it with 50% gray. Use the Burn tool to make certain details in dark areas darker.

6. Add characters to the scene
1. Cut out the character, place her in the center of the bridge, and flip her horizontally.

2. Go to Edit > Override Transformation and make the character raise its head.

3. Return to the original character image, and select her cloak, then add it to the character in the working document. Use Free Transform to adjust the cape and match it to the character.

4. Add a mask to this layer to delete the bottom part of the character’s feet.

5. Use the Dodge and Burn tools on each of these layers to apply light, shadow and detail to the character and cape. (Before doing this, follow the previous steps to create a neutral gray/wp-content/uploads/2024/03/15/dwyw4aghob4 layer).

6. Create a group for the character layer and add a Hue/Saturation adjustment layer to desaturate the character.

7. Add a Color Balance adjustment layer to match it with the rest of the scene.


8. Use the Curves adjustment layer to enhance the highlights in front of the character. Paint on the back side so that it won’t be lit by this adjustment layer.

7. Add atmosphere to the scene
1. Open the leaf image. Take the first leaf (from the left) and add it to the main canvas, then ctrl-t, then select the top switch between Free Mode and Transform Mode to make adjustments to the leaves.

2. Take different leaves, add them around the characters, and twist them into different forms.

3. Add more leaves around the canvas and apply the Gaussian Blur filter to these leaves. Set the Blur Radius from 2 to 12 px to increase the depth of field effect of the scene. For larger leaves on the edges, use a larger blur radius.

4. Create a group for the leaves layer and use a Hue/Saturation adjustment layer to change the color of the leaves.

5. Add a Color Balance adjustment layer to bring a yellow light to the leaves.

6. Add a Curves adjustment layer to darken the leaves. Paint on the right side of the leaf to reveal the highlights there.


7. Add a new Curves adjustment layer to add more highlights and paint on the left side to keep the bright side of the leaves.


8. Make the final touches
1. Create a “Color Balance” adjustment layer on top of the other layers and change the “Midtones” value. (You can also directly merge a new picture for individual adjustments).

2. Add a photo filter adjustment layer and select the color #f2eb83.

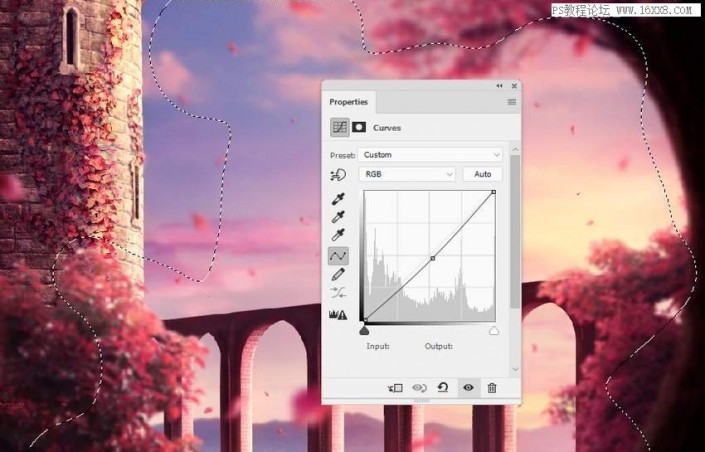
3. Add an optional color adjustment layer and change the parameters for red, yellow, and magenta. On the layer mask, paint in the upper left corner of the scene to reduce the red effect there.


4. Use a Color Balance adjustment layer to increase the brightness (vibrancy) of the sunlight and edges. Paint on top of the rest so it won’t be affected by this adjustment layer.


5. Add a Curves adjustment layer to darken the edges of the canvas. Apply in the middle to maintain its brightness.
Complete:
 If you want to learn more, please visit www.16xx8.com
The whole scene is quite dreamy, and it is a perfect work in terms of composition and color. Let’s learn about it together, students.

 微信扫一扫打赏
 支付宝扫一扫打赏

