

Creative synthesis, imagine how big PS can be and how big of a surreal synthesis it is – Interesting things about design
I can’t believe some of the pictures that were synthesized in the post-production process. It’s true that as much imagination as possible can be accomplished with PS. Everything that seems impossible to us has become possible in PS. This tutorial teaches students how to create it through practical examples. A surreal picture, the material is in the tutorial, students, let’s practice together. Rendering: www.16xx8. com 1. ctry+o drag the material in 2. Use the first material first, then add the vector mask to the second one, smear on the vector mask, and subtract what we don’t need. 3. Copy the floor layer, use Multiply mode, add foreground color #726956, adjust the transparency to 26%, flow 70%, and hardness 0. You can also adjust it according to the actual situation. 4. Add hue and saturation 5. Drag a water splash material and add a vector mask 6. Put in the killer whale material and add some water texture brushes in appropriate places 7. Add some strokes on the killer whale with a brush, #877e71 8. Add hat material, add color balance and curve clipping mask 9. Convert objects and add camera raw filters 10. Use a brush to add halo 11.…
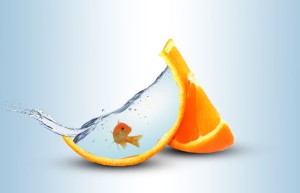
Creative synthesis, synthesize an orange peel fish tank – photo synthesis
This creative effect is like a goldfish living in an orange peel-shaped fish tank. The production method is not difficult. First, remove the orange flesh, then replace it with water material, and then synthesize the goldfish into it. It is very simple, let’s learn together. Material download: http://www.16xx8.com/photoshop/sucai/2016/p657002.html Rendering: First make the background and cut out the orange flesh Synthetic processing of water materials and goldfish: final effect!
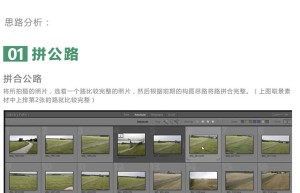
Creative synthesis, see how foreign masters do synthesis – photo synthesis
Sharing the ideas and steps of synthetic creation by foreign masters, from pre-photography materials to post-synthesis production, it is not a tutorial, but you can learn about other people’s experiences through this article, which I believe will be helpful to students with basic knowledge. From the creative visuals created by Erik Johansson, we can see that early conception and shooting materials are very important. Without these materials, it would be difficult to create a work with such a strong composition. Most of the synthetic advertisements for e-commerce visual banners were found by myself through 500px and pixabay. The original idea may have been a top-down composition, but due to the limitations of the materials, it ended up being a flat view. Good e-commerce banners first conceive the creative idea and then shoot the material. However, most e-commerce designers do the opposite. They shoot the product first and then create the creative idea. This has too many restrictions. www.16xx8.com
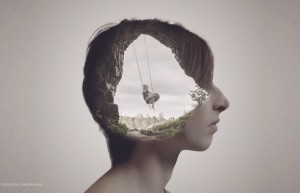
Creative synthesis, synthesize and design an imaginative and creative picture – photo synthesis
<pThis is a synthetic video tutorial translated from a foreign master "rafy A". The techniques used in the tutorial are relatively simple, and the tutorial steps also focus on explaining the basic steps. The main purpose is to learn other people's creativity. Video downloads are provided below the tutorial, and you can study together with the graphic tutorial. The original image effect is as follows: Video tutorial: http://pan.baidu.com/ Password: yiui Materials used: Pictures of women: http://www.16xx8.com/photoshop/sucai/2016/r374106.html Cave pictures: http://www.16xx8.com/photoshop/sucai/2016/k351793.html Children’s pictures: http://www.16xx8.com/photoshop/sucai/2016/l15682.html The steps are as follows: 1. Dealing with characters Cut out people Open the character material and use the “Quick Selection Tool” to select a selection of the character, add a layer Mask to cut out the character, and then use the “Adjust Edge” tool to process the character’s hair. Then create a new canvas of 2300X1400px, 72dpi, and place the character in the middle of the canvas. www.16xx8.com Make background Create a new “Gradient” channel below the character layer (gradient color: black – color value e8e8e8, radial gradient, 90 degrees, zoom 352%, reverse check). Adjust character color Place the “Hue/Saturation” channel above the character layer (Saturation: -77, Lightness: -8), and then place the “Level” channel (Histogram value:…
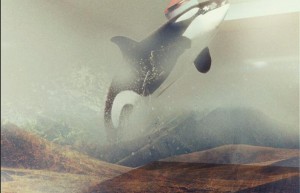
Creative synthesis, imagine how big PS can be and how big of a surreal synthesis it is – Interesting things about design
I can’t believe some of the pictures that were synthesized in the post-production process. It’s true that as much imagination as possible can be accomplished with PS. Everything that seems impossible to us has become possible in PS. This tutorial teaches students how to create it through practical examples. A surreal picture, the material is in the tutorial, students, let’s practice together. Rendering: www.16xx8. com 1. ctry+o drag the material in 2. Use the first material first, then add the vector mask to the second one, smear on the vector mask, and subtract what we don’t need. 3. Duplicate the floor layer, use Multiply mode, add foreground color #726956, adjust the transparency to 26%, flow 70%, and hardness 0. You can also adjust it according to the actual situation. 4. Add hue and saturation 5. Drag a water splash material and add a vector mask 6. Put in the killer whale material and add some water texture brushes in appropriate places 7. Add some strokes on the killer whale with a brush, #877e71 8. Add hat material, add color balance and curve clipping mask 9. Convert objects and add camera raw filters 10. Use a brush to add halo 11.…

Creative synthesis, use PS to synthesize a promotional poster for shoes – photo synthesis
This tutorial uses PS to synthesize a shoe. The entire tutorial is suitable for commercial purposes. It is both creative and interesting. It provides the basic knowledge points required to complete each process. Good works emerge in endlessly with various styles. You can learn from them. Ideas, create works rich in your own ideas. Let’s take a look at how exactly this is done. Rendering: www.16xx8.com Operation steps: The first step is to decide on a theme, determine the time and place where the story takes place, and then find relevant materials through keywords. Put all the materials on a canvas, extract the desired parts at will, and draw them into a draft. It does not necessarily need to be very good. The main thing about hand-drawing ability is to find the feeling and tell yourself where to place what, what proportions, and how to roughly compose the picture. As long as you can understand it, it doesn’t matter if it’s a bit sloppy. Of course, if you know some basic perspective, structural sketch and composition knowledge, you can do this step better. Knowledge points used: composition knowledge, perspective knowledge, structural sketch. Divide the picture into three parts: near, middle…

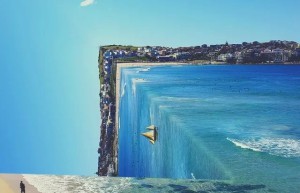
Creative synthesis, imagine how big PS can be and how big of a surreal synthesis it is – Interesting things about design
I can’t believe some of the pictures that were synthesized in the post-production process. It’s true that as much imagination as possible can be accomplished with PS. Everything that seems impossible to us has become possible in PS. This tutorial teaches students how to create it through practical examples. A surreal picture, the material is in the tutorial, students, let’s practice together. Rendering: www.16xx8. com 1. ctry+o drag the material in 2. Use the first material first, then add the vector mask to the second one, smear on the vector mask, and subtract what we don’t need. 3. Duplicate the floor layer, use Multiply mode, add foreground color #726956, adjust the transparency to 26%, flow 70%, and hardness 0. You can also adjust it according to the actual situation. 4. Add hue and saturation 5. Drag a water splash material and add a vector mask 6. Put in the killer whale material and add some water texture brushes in appropriate places 7. Add some strokes on the killer whale with a brush, #877e71 8. Add hat material, add color balance and curve clipping mask 9. Convert objects and add camera raw filters 10. Use a brush to add halo 11.…
Creative synthesis, PS synthesis with super cool three-dimensional space effects – photo synthesis
Today we are learning a small synthesis to create a three-dimensional space effect. The operation is quite simple. Let’s take a look at the renderings. Production steps First step First open the prepared beach material and copy one layer. www.16xx8.com Step Two Freely transform the copied material into the following state. This can achieve symmetry between the lower left corner and the upper right corner. Step Three Use the Crop tool to crop out the unwanted area on the left side. Step 4 Use the polygon tool to create a selection in the lower left corner, and directly add a layer Mask to hide the outside of the selection, thus forming a symmetrical effect between the lower left corner and the upper right corner Step 5 Complete symmetry is visually false, so we cancel the link between the layer and the mask, use the move tool to move the layer mask to the upper left, and pay attention to the alignment of the house area in the distance. Step 6 Use content-aware fill to repair the clouds in the sky, making the joints appear less symmetrical and form a whole. Step Seven The water area also has a very stiff…
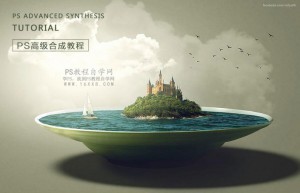
Creative synthesis, use PS to synthesize a city miniature landscape – photo synthesis
This tutorial uses PS to synthesize a city miniature landscape. The tutorial is relatively simple to make. Just put the required materials in as a whole. The whole production is quite interesting. You only need to drag it into the appropriate position and it can be completed. Interested students We can learn it through tutorials. No matter whether it is simple or difficult, it still requires hands-on production. Come and learn it. Rendering: www.16xx8.com Materials used: Proceed as follows: 01 Make background Create a new canvas with a size of 2000×1300px, 72dpi, and fill color: #9c9c9c. Create a new layer of “circular gradient: white to transparent” to make the highlight, transparent bottom: 77%, and create a new “Curve Mask“Dark to cover the bright part, use “circular gradient; white-transparent” to pull out the bright part, transparent bottom: 64%. 02Add to plate First remove the color from the plate, use “Color Levels” to brighten it as a whole, then use the “Pen” tool to highlight the plate and drag it to the background. Then use “Color Balance” to adjust the color of the plate, and the “Brush” tool to create a shadow on the plate and reduce the transparency of the…

Creative synthesis, use PS to create a creative picture of a giraffe ironing clothes – photo synthesis
When doing synthesis tutorials, we always emphasize that creativity is the key. The second is the question of technique, because it is not too difficult to operate with only technique. This tutorial is a very creative work, which can be said to be a surreal scene operation. In the tutorial, we will use color adjustment and picture editing. There are some basic techniques such as cutout and deformation. Overall, the difficulty is moderate. With a little patience and creativity, I believe students can learn from the ideas and create an extraordinary overall effect. Let’s learn how to make it specifically through the tutorial. Rendering: Material: http://bbs.16xx8.com/thread-166235-1-1.html Operation steps: First step 1. Press ctrl+N to create a new document with a size of 2200x3200px and name it “Giraffe’s Coat” Step Two Open background.jpg, copy the background to the document in the previous step, and name it “Background” Step Three Open giraffe.jpg, use the Quick Selection Tool (W) to cut out the giraffe (you can also use other tools to cut out the image), and then drag the giraffe into the document Step 4 First we need to retouch the picture and adjust the highlights and shadows of the giraffe, “Image ->…

